Injection Pump Fuel Leak Fix
on the 1991 W124 300D Turbo 2.5 (OM602.962)
by jbach36
7/22/06
My car sprung a fuel leak at the injector pump.
The worst part of this job was looking at it, trying to figure it out, getting ready to fix it, then finding out you need a special tool that takes 4 days to get, in order to do the job.
Here are the steps, as I REMEMBER them, and this was on my 1991 300d 2.5 engine, the leak started with 90k on the engine. Note other model years might be different.
You'll need:
1) A T30 torx socket. A T30 screwdriver will not work, you won't have the room.
2) A splined socket for your 1/2 inch (not 3/8") socket drive. The socket cost $45 or so, then you can resell when done. I think it's a 32 tooth socket, part M604-0109 at Technitools, or Hazet H4556. Mine is made by Hazet, but others are out there. Check ebay or your local MB dealer.
3) To do it right, you should have a small torque wrench.
4) You need 5 rubber washers. The copper washers, as someone else said and so far I agree, you probably don't need to replace. Cost of the rubber washers, maybe $3 for all 5.
5) A 14mm short handled open box wrench to fit over the 1/2" tall copper nuts at both ends of the injector lines.
6) A small pick for helping to lift the flat collars.
7) If you want your life easier, take photos left, right, and top of the area reference for reassembly. At a minimum, draw how the Torx wrenched flat collars overlap one another, and note how high or low the STOP button is.
8) Clean the area well. You don't want debris of any kind going into the injector area. This includes any debris as you hang over the engine.
I did mine in a series of wrong steps, so I'm not sure which area to "start with" first, and maybe there is no right area to start in, but basically, what you need to do, is to remove the copper fuel lines, so you can get to the splined valve at the injector pump.
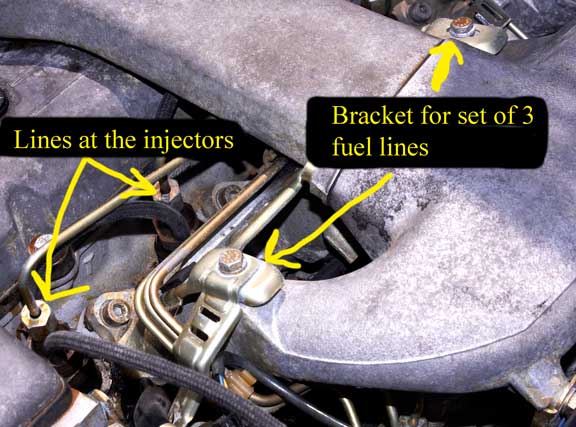
If I had this to do over again, I think I would start with the brackets. You'll see the bracket holding the first set of 3 lines easily. It's on the manifold, you need a 10mm wrench to get those 2 bolts off. The bracket holding the other 2 lines, is hidden and caused me a lot of problems. On my model, looking from the top of the engine down, it's view is sort of occluded by a small dark plastic coated cable of some type, that runs from the mess of wires in front of it, and back to the engine compartment. You have to get rid of that line in order to get the bracket off.
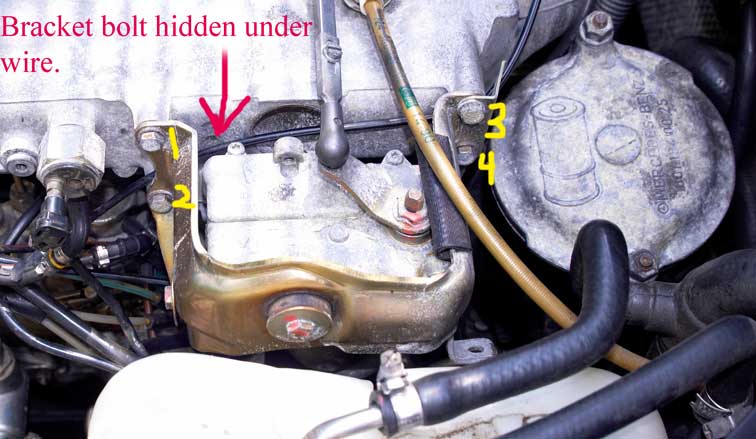
To get that line out of the way, you have to loosen (but not take off) sort of square thing, looking down at it, it's maybe 3" x 3", and held on by 4 bolts. The upper right bolt of that module will have to be removed, the other 3 loosened pretty well, but not all the way. Once the upper right bolt of that cruise control module is out and the unit is loosened up real well, you can lift that black plastic coated line out a bit, enough to get a 10mm socket onto the bolt under it, and unscrew the injector bracket holding the 2 injector lines together. (Putting that injector bracket back is a real hassle, so look at the bracket once loose, and see how the clip inside the bracket slides back and forth. It is this clip that the bolt must go through when reassembling).
Once the brackets are loose, now loosen both ends of all 5 injector lines with the short 14mm box wrench. Once loose, work the first set of 3 lines so they go back and are out of the way, then do the same with the remaining set of 2 lines.
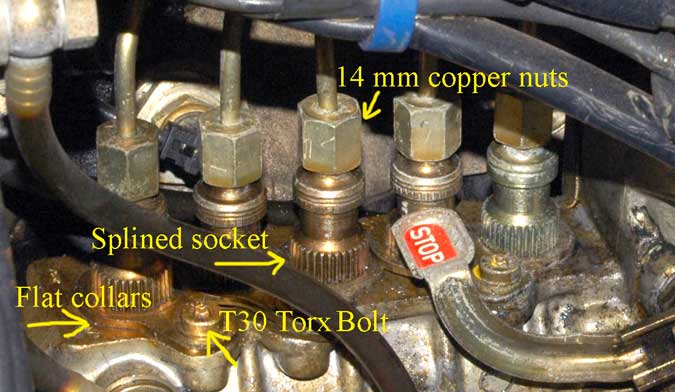
Once the lines are out of the way, draw a picture of how the flat collars are, which overlaps which, then remove. Again, be careful of getting any debris in the injector! If by chance you strip one, you'll have to carefully use a small vice grip wrench on them, preferably in the upright position so as not to torque them sideways. Once loose the screw come up easily. (There's an annoying brown plastic line right in the way of all this, coming from the fuel filter. I don't know if this could be taken out; I left mine so it'd be less potential problems, but it's reeeeeealy annoying.) Use a pick of some type to help walk the collars up and off from the back as you lift from the front.
Take the STOP lever off. It uses maybe a 6mm wrench at bottom, be careful when it comes loose so as not to lose the nut and tiny washer.
Once the collars are out, use the splined socket on the fuel delivery valves. Some on the forums said they loosened the valves a bit just enough to used a pick to get the rubber seals off. I tried that, and it was a waste of time for me. MUCH simpler to just take the valve out. When you do, be prepared, as a spring will come out the bottom. So go slowly, take the valve out at a sharp angle, to prevent losing the spring. Once completely out, take the old O-ring off by hand. Lightly lube the new
O-ring in some fuel, and put it on. The threads of the valve might have some debris on them, use a paper towel to clean that off so it goes back in better.
Once the valve is ready to install, take the spring out of the valve, and place it by hand directly in the center of fuel delivery area on the IP. Place the valve slowly and directly over it, and screw it down. Do that for all 5, then tighten with the splined socket as tight as they were originally.
The latest service document from Mercedes specifies this torque spec for the delivery valves:
- Torque to 30 Nm and loosen
- Torque to 30 Nm and loosen
- Torque to 30 Nm and then an additional 5 Nm.
Reassemble, making sure to replace any injector clips you may have taken off. The clips are to prevent the lines from clacking together and cracking. If yours broke, you can run the car without them for a while, but best to have them. Put the lines at the injector pump on and tighten completely, but leave the ones at the injectors only hand tight for now.
At this point, everything should be back to where it was, with the exception of the lines at the injector pump, which should be on just hand tight. Crank the car, will probably take 45 seconds of cranking, to get fuel to come out of the lines. When fuel comes out, tighten the lines at the injectors completely, and you're done!!
Start the car and look for any leaks, which unless you did something really stupid, there shouldn't be any. If there is a leak, find and fix. If no leaks, you should be good to go. The car might sound a bit funny at first, but after a few miles, any additional clacking should go away, if not, you might have air in the line. To get air out, you can try starting the car, and SLIGHTLY back off one injector line at the injector (not at the pump). The car will buckle a bit like you're pulling a spark plug off a gas car, once it does that, tighten and go onto the next one until the problem is fixed.
Take it out for a test spin
Discuss this DIY here.
-jbach36
CategoryDiy