Revision [735]
This is an old revision of OM617StarterMotor made by WebMaster on 2011-01-08 19:17:58.
Starter Motor Replacement
on the 1985 300D Turbo (OM617 W123)
by dieseldan44
12/27/10
Pictorial: W123 300D Turbo Starter Motor Replacement
[I humbly submit this for peer review and hopefully to be included in the DIY section. I have a PDF with pics embedded as well if anyone wants that, or to make it easier to publish on the DIY article part of the site.]
Application notes:
This article is written specifically for the W123 300D turbo. Some of the techniques will apply to W116 and W126 chassis with the 617 turbo motor, as well as an NA 300D. Starter replacement on a 240D is significantly easier because of the extra room.
Time required:
Count on approximately 6 hours for a hobbyist mechanic working on the floor of a garage taking on the task for the first time.
Sourcing a new starter:
A remanufactured Bosch unit is approximately $175+core as of this writing (available from this site). California models use a different starter, be mindful of your specific model and getting the correct part. A note: If sourcing an ‘off brand’ starter at a chain parts store - be sure to have the store test it before you install into your vehicle. You will not be happy to do this twice if the starter is DOA.
Tools required:
- Self-Made tool: 7/8†long piece of allen key (see step #8)
- 20†1/2†drive extension (Sears Craftsman makes a 20†extension)
- 1/2†drive socket wrench and 18†1/2†drive breaker bar
- 1/2†drive universal joint
- 1/2†drive 10mm socket, 6 point preferred
- 2 - 10mm right angle allen sockets
- 27mm deep well socket to rotate engine
- Floor Jack
- 2 Jack stands (use jack stands instead of ramps - being able to move the front wheels is required later in the job)
- Wheel Chocks
- Aero-Kroil, PB Blaster etc.
- Dielectric grease and sandpaper to clean electrical contacts (optional)
- Brake cleaner
- Propane torch
- Standard metric sockets and hand tools
Step by step:
1. Remove negative lead from battery and cover securely to ensure it does not make contact with the battery post. For extra security, also remove the positive lead. The wires that lead to the starter are designed to deliver a very large amount of power and are directly connected to the battery's positive terminal.
2. Remove air cleaner assembly. Cover turbo air intake and air cleaner oil return to prevent dirt/tools/fasteners from finding their way into the engine
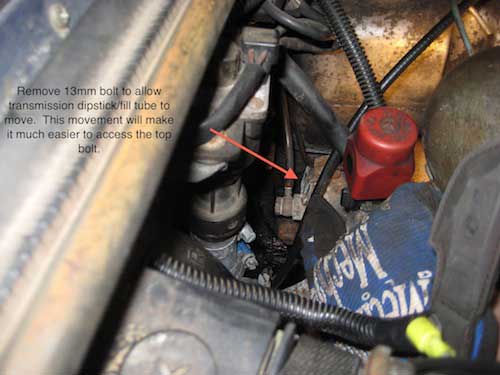
3. Remove 13mm bolt from back of ATF fill/dipstick tube. A 13mm ratcheting gear wrench is useful here.
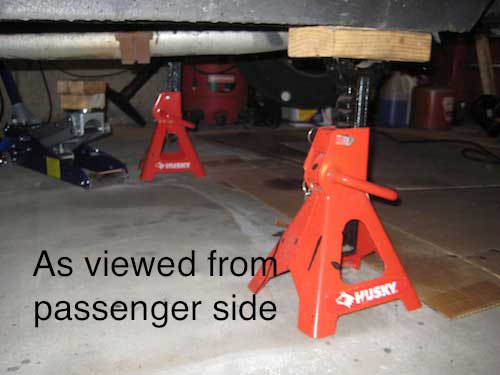
4. Securely chock rear wheels. Put car on jack stands placed under front body rails.
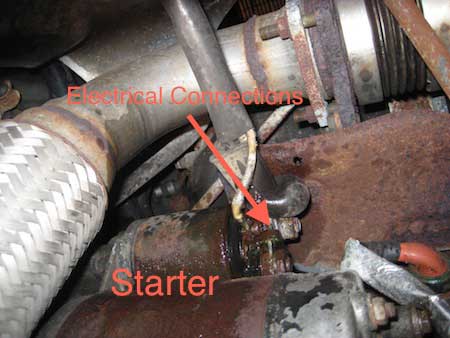
5. Remove starter electrical connections from underneath the vehicle. To loosen, I applied Aero-Kroil to ensure easy removal. The bolt that holds the main starter electrical connection is 17mm. The other connection is a phillips-head screw.
6. Remove the starter brace at the front of the starter (towards from of engine). 10mm bolts hold it to the block and starter. A 10mm ratcheting gear wrench is helpful. They should come out easily. Place in bag off to the side.
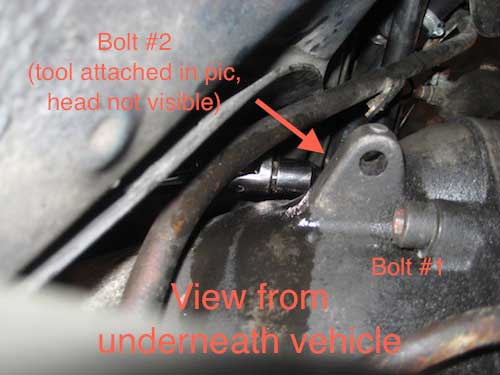
7. The starter is now held to the block by two 10mm allen head bolts. This is the hard part of the job. The bolt heads face the rear of the vehicle and are difficult to remove both in terms of access and force required to be broken free.
- Clean heads of 10mm allen starter bolts thoroughly with a toothpick, dental pick etc. It is important to seat the allen key completely into the bolt.
- Spray out bolt heads with brake cleaner. Use the straw to direct the spray directly into the bolt head. Repeat.
- Spray bolt heads liberally with PB Blaster/Aero-Kroil etc. Spray Bolt #2 from the top-side.
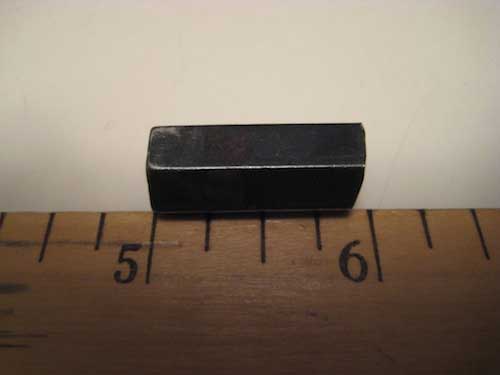
8. While the bolt loosening solvents are working, take one of the 10mm allen keys and cut a straight section of approximately 7/8†off the end using a dremel tool, angle grinder etc. This will be used on Bolt #2.
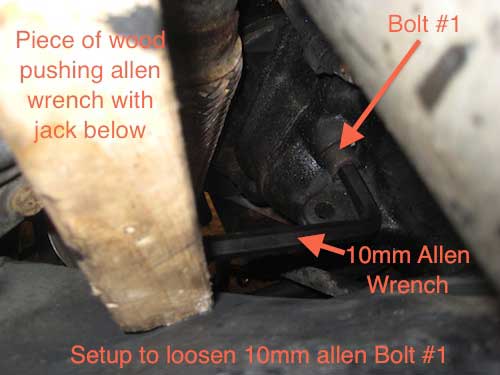
9. To loosen bolt #1:
- Place allen key with short end into M10 allen Bolt #1. Be sure wrench is engaged fully (about 1/4â€) into the bolt head to prevent stripping.
- Heat bolt head with propane torch for 2 minutes to loosen bolt.
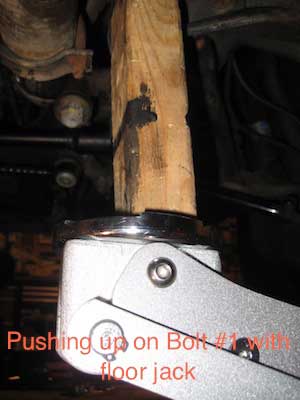
- Attempt to loosen allen wrench by hand. If unsuccessful, place a floor jack underneath wrench with a piece of wood. Use jack to put upward force on end of allen key; this will break allen bolt free.
- Once broken free, do not remove bolt yet. You will remove bolt #2 fully first.
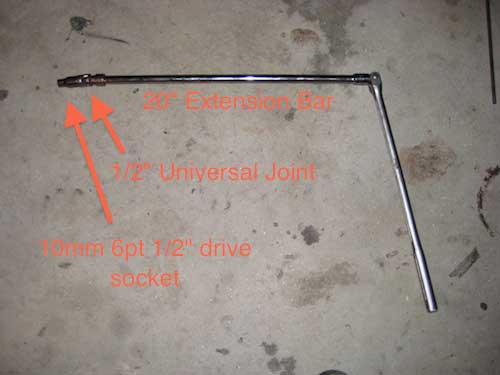
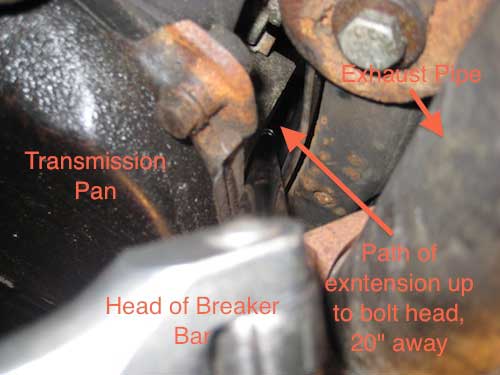
10. Now to remove bolt #2. The hard part of the job. Assemble the following combination of tools:
- 1/2†drive 10mm 6 pt socket
- 1/2â€drive universal socket
- 1/2†drive 20†extension bar
- 1/2†drive breaker bar
11. From top side, place 7/8†self made allen bit piece into head of Bolt #2. Be sure bolt fully engages into allen head approximately 1/4â€.
12. Heat bolt head from below with a propane torch for two minutes. A helper looking from the top side is very helpful to verify that the flame is directed at the bolt head - you can not see bolt head easily from below.
13. Thread tool assembly made in step #10 up to bolt from between exhaust and transmission pan. It is very helpful to have an assistant move the transmission dipstick tube out of the way. Engage 10mm socket to end of 10mm 7/8†piece of allen bolt.
14. Break bolt free (may take a lot of force). Remove bolt #2.
15. Remove bolt #1 while holding starter. After bolt #1 is removed, starter will fall free. It’s heavy, be careful. You can gently lower the starter out of position and rest it on the idler arm and tie rods.
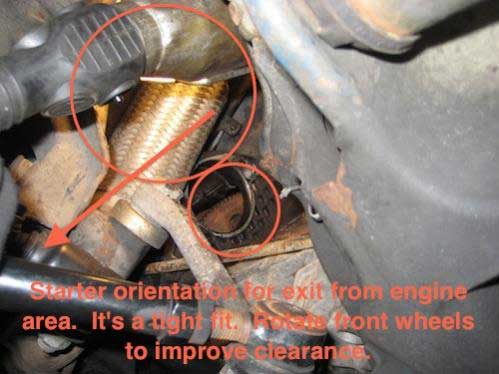
16. Extract starter from between the frame and steering linkages by doing the following:
- Turn front wheels to approximately 30 degrees to the right (as if you were turning right). This allows extra clearance between the tie rod and frame.
- Rotate starter and remove as shown in picture:
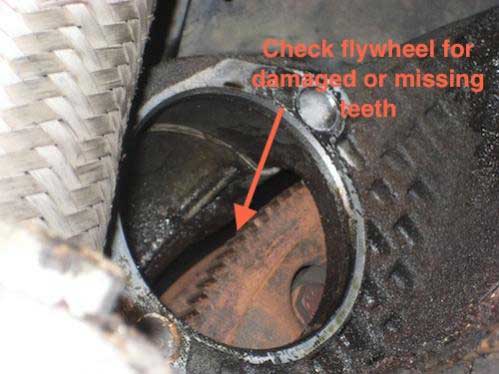
17. Inspect flywheel for damaged or missing teeth. Rotate engine clockwise by means of 27mm socket attached to crankshaft bolt at front of engine. If missing teeth are noted, it will need to be replaced: Consult forum for assistance.
18. Clean sealing surfaces around starter mount of accumulated dirt and grime with brake cleaner and rag.
19. Clean starter mounting bolts with a brass brush of rust. Apply a drop of engine oil or other light oil to prevent further corrosion and rust.
20. Clean starter electrical contacts with sandpaper or brass brush and rinse with brake cleaner.
21. Install new starter. Assembly is reverse of removal.
- Be sure to install starter flush to housing, hold in place while threading and tightening bolts.
- Torque for starter bolts is 50nm. There is no easy way to use a torque wrench - an estimate of this torque will need to be used.
- Place dielectric grease over starter connections once they are made and tightened.
- Make sure your 27mm socket + wrench are off the crankshaft bolt
- Don’t forget to re-secure the 13mm bolt that attached the transmission dipstick tube.
22. Enjoy your new starter! If you had an old tired one, the power of the new unit will be surprising.
Discuss this DIY here.
-dieseldan44
CategoryDiy