Water Pump Bypass Hose Replacement
on the OM617, OM616
by whunter
10/04/09
DIY Water Pump Bypass Hose Replacement, OM617, OM616
Changing the OM617 water pump bypass hose:
Disassembly:
#1. Loosen both clamps on the bypass hose.
#2. Loosen the radiator hose clamps at the thermostat housing, slide the clamp off the hose fitting area and tighten on the hose.
#3. Remove the radiator hoses at the thermostat housing.
#4. Remove the two thirteen millimeter bolts holding the thermostat housing to the cylinder head.
#5. A jolt/punch with the palm of your hand should separate the thermostat housing from the cylinder head.
#6. Remove the thermostat housing from the head.
#7. Wire brush the thermostat housing hose fittings until free from corrosion.
#8. Remove the bypass hose and clamps from the water pump.
#9. Wire brush the water pump bypass hose fitting until free from corrosion.
#10. Scrape the old gasket from the cylinder head and thermostat housing.
#11. Clean the threads on the two thirteen millimeter bolts that hold the thermostat housing to the cylinder head.
Reassembly:
#12. Install the bypass hose and clamps on to the water pump.
#13. Tighten the lower bypass hose clamp.
#14. Install the thermostat housing gasket on the cylinder head with dabs of permatex or your choice of alternative adhesive/sealer.
#15. Install the thermostat housing to the bypass hose and head.
#16. Install the two thirteen millimeter bolts holding the thermostat housing to the cylinder head.
#17. Tighten the two thirteen millimeter bolts holding the thermostat housing to the cylinder head.
#18. Tighten the upper bypass hose clamp.
#20. Install the radiator hoses at the thermostat housing.
#21. Loosen the radiator hose clamps from the hose, slide the clamp to the hose fitting area of the thermostat housing and tighten.
#22. Loosen the upper radiator hose clamp at the radiator.
#23. Slide the upper radiator hose clamp off the hose fitting area and tighten on the hose.
#24. Remove the upper radiator hose at the radiator.
#25. Use the upper radiator hose as a funnel to back fill the cooling system through the engine block.
#26. When coolant begins running out of the upper radiator fitting = the cooling system is almost full = stop.
#27. Install the upper radiator hose at the radiator.
#28. Loosen the hose clamp off the hose, slide the clamp to the upper radiator fitting area and tighten.
#29. Top off the coolant bottle.
#30. Test drive round trip 7 - 10 miles, and carry a gallon of pre-mixed coolant.
#31. Top off the coolant bottle.
#32. Monitor the coolant level and temperature for at least three days = you should open the hood at least two times per day, and carry a gallon of pre-mixed coolant.
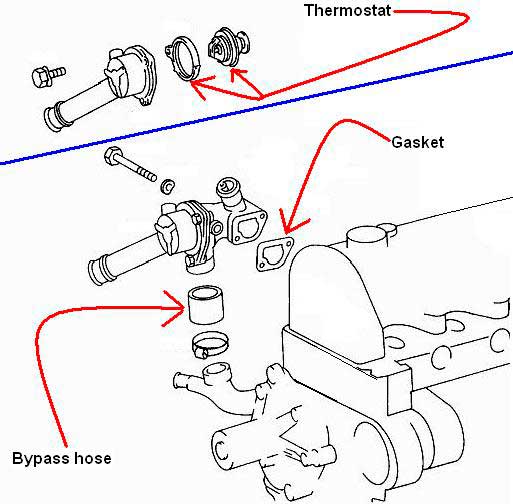
Gasket
MB# 616 203 02 80
Bypass hose
MB# 900271 042012
Preventative maintenance note:
The following service should be done while the thermostat housing is off.
#A. Replace the thermostat if engine temperature averages higher than eighty degrees Celsius.
#B. Replace the three ten millimeter bolts holding the thermostat cover (they are known to corrode and snap with age).
#C. Replace any bad hoses and/or clamps on the cooling system.
#D. Flush the cooling system if it needs it.
#E. Check the breather tube is not blocked with lime/corrosion, replace as needed.
#F. If you have one: Check the mono valve diaphragm, replace as needed.
Thermostat
MB# 617 200 18 15
Screw, thermostat cover (x3)
MB# 000933 006123
Breather tube, cooling system (water pump to head)
MB# 115 200 00 58
Seal ring, cooling system breather tube (water pump to head)
MB# 007603 008100
Mono Valve repair kit
MB# 000 835 06 44
Discuss this DIY here.
-whunter
CategoryDiy