Revision [353]
This is an old revision of W123SteeringCoupling made by WebMaster on 2005-12-27 20:24:53.
Steering Coupling Replacement
on the 1984 300D (W123 Chassis)
by whunter
12/25/05
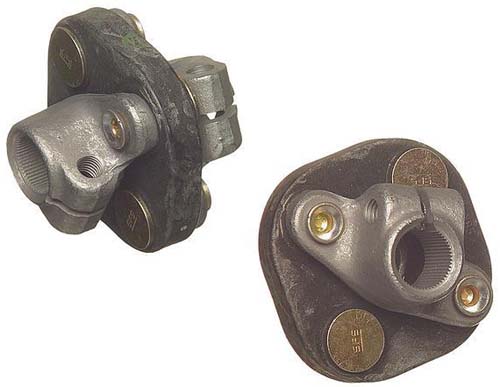
Here's what a bad steering coupling looks like. Note the cracks:
 |
 |
Here's what a good steering coupling looks like:
Procedure:
Remove lower coupling cap screw.
Rotate steering wheel only enough to bring upper coupling bolt head to exact top position.
Paint mark gear box shaft, and column shaft in line, this is critical to return steering to the exact same position.
Remove upper coupling bolt.
Loosen wheel lug bolts.
Jack up, and support the driver front.
Remove driver front tire.
Going through wheel well, remove the three bolts mounting the gear box.
Remove gear box shaft from coupling, it will hang from pressure hoses for a few moments.
Gently rotate coupling enough to access the upper bolt crimp slot.
Insert a pry bar, chisel or large screwdriver.
Pry the slot open slightly as you wiggle the coupling off.
Install the new coupling on the column.
Apply Loctite® to the threads of the upper coupling bolt.
Install the upper coupling bolt, and tighten.
Raise the gear box, and match your alignment marks, pliers may be needed as the shaft generally does turn out of position slightly.
Insert the gear box shaft into the coupling, wiggling the coupling or gear box may help.
Use a pry bar between engine cross-member and gear box to help hold position.
Apply Loctite® to the threads of the lower coupling bolt.
Install the lower coupling cap screw, do NOT tighten yet.
Two people make the next part easier.
Apply Loctite® to the threads of the three gear box bolt threads, and insert into mounting holes.
One person lifts the gear box into bolt mounting position.
Second person going through wheel well, installs each bolt as possible.
Tighten all three mounting bolts.
Gently rotate the steering wheel, enough to access the lower coupling cap screw.
Tighten the lower coupling cap screw.
Install driver front tire.
Tighten wheel lug bolts.
Remove the vehicle support
Remove the Jack.
With proper tools, and help = one hour DIY.
- whunter
CategoryDiy