Revision [501]
This is an old revision of W124ShiftBushings made by WebMaster on 2007-02-24 19:33:38.
Shifter Bushing Replacement
on the 1991 W124 300D Turbo 2.5 (OM602.962)
by jbach36
2/18/07
There was a rattle on my W124, 1991 300d. I’d been working on a house when it started, sounded like I dropped a screw into the shifter area. Really annoying rattle. After using a magnetic pick up tool in the shifter area to look for a loose screw, I couldn’t figure out what else would be rattling.
Others on the forum said it was probably the shifter bushing, a 90 cent part. There are two bushings, one top, one lower, but it’s usually the one underneath they said. I thought this couldn’t be right, because it really sounded like it was coming from the inside of the car, not the underside, but everyone said it’s probably the one underneath.
First, you have to jack your car up from the front (I guess the side would work if you don’t have a floor jack), as high as you can get it. Chock both rear wheels and use safety jacks because you’re going to be waaaay under the car.
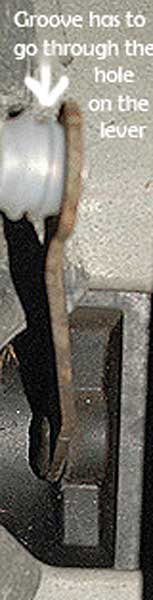
The problem is directly underneath where your shifter is, in this tunnel area. There are 2 parts that come together. One is the shift lever that comes through from up above, the other is a shift rod that leads to the transmission. For ease of description, let’s call them the shift lever and the rod. The rod comes straight from the transmission, then makes that short 90 degree turn to go through the hole in the shift lever.
When I looked at mine, it was a no brainer; I touched it, it rattled, so I knew that was the problem. Here comes the hard part … since mine was broken, probably like yours will be, what I was seeing, isn’t the way it goes back together. That’s why I had so much trouble trying to figure out what the others on the forum were saying. With mine, the bushing was simply in-between the rod and the lever, with a clip holding it on. I thought, this is easy. I used a screwdriver to slide the clip off, pulled the rod back, the bushing fell right off, put the new bushing on the rod, tried to clip it back on, and …. it wouldn’t go. The new bushing was so fat compared to the old one, the rod wouldn’t go through the shift lever far enough to put the clip back on.
After a lot of forum replies and pictures they posted for me, I finally realized the center of the plastic bushing, where the groove is, is supposed to be in the center of the hole on the shift lever. I didn’t know that, since my original one was busted. So the bushing has to be pressed in to the center of the hole on the shift lever. Some people take the shifter compartment from inside the car so they can get the whole piece out and work on it on their workbench. I wanted to avoid that if at all possible. Through my struggle, I found an easier way for you to do the repair, if you’ll just get a set of different ended needle nose pliers.
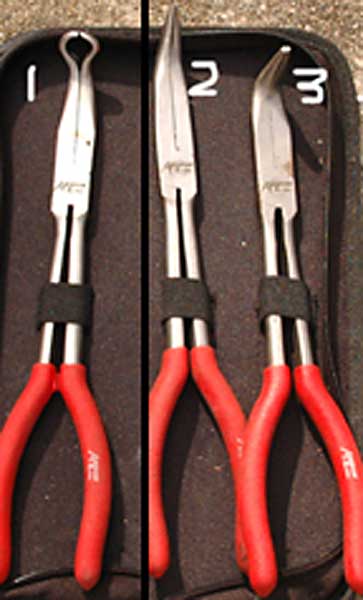
They cost about $10 or $20 for the whole set. I used #2 and 3 in the photo.
From underneath the car, what you want to do is take off the old bushing, and let the rod to the transmission hang down. Then get a bolt that will fit through the new bushing, about 1 ½ long or so, and a washer. The washer will help protect the bushing, and help even out the force of the pliers. From under the car, put the bushing, washer and bolt in the hole in the shift lever. Use 2 angled needle nose pliers on the left and right side of the washer, pressing them to force the bushing through the hole. Be careful that the pliers aren’t blocking the very hole you’re trying to get through. You’ll need a fair amount of force, and a bit of oil in that area might help. Some heat the plastic bushing in hot water first to make it real pliable, but I did mine in 35 degree weather with just a touch of oil, no heating needed.
Once the bushing is centered through the hole on the shift lever, put the rod through the bushing. Next, use something to hold the rod in snug while you put the clip on. I think I wedged the handles of a smaller needle nose plier in there. Snug is good enough. Now comes the clip.

This is confusing, but simple. It clicks on, it does not slide on. You may be able to use something else to hold the clip, but I used the circular pliers (#1 in the photo) to hold the clip at the folded part, and they worked great. Put the large hole of the clip over the rod. Use a screwdriver or something to slide the clip forward so it slides over to the smaller hole. You’ll probably hear it click into place. That’s it! You’re done!
Discuss this DIY here.
-jbach36
Replacing Shifter Bushings
on the 1992 300E (W124)
by Robert Ryan ( r_p_ryan on the forum )
4/24/05
I just replaced the two gear selector bushings in my 89 300TE (W124) and wanted to share some lessons learned.
This required some tedious work under the car and some tedious work from inside the car. I would guess the total time for me was about 90 minutes. The work under the car was pretty dirty. Prior experience and a lift would have dramatically simplified the operation. While I can't provide the lift I hope to save you some time on the 'experience' side.
Parts:
From under the car:
With the brake on and the wheels chocked crawl under the car with a good light, a rag, some goggles, a slotted screwdriver and a pliers. Basically there's a rod that runs from the gear selector to the transmission with a bushing at each end. Find the gear selector-side of the rod - this lives above the driveshaft, just at the back of the tranny. It's pretty straight-forward to find. There's a little clip that needs to be popped off with the screwdriver or the pliers to free the shifter rod from the gear selector. Then trace the shifter-rod to the transmission. There's a small lever on the left side of the tranny that is fastened to the shifter-rod with the same style of clip. Don't waste your time trying to remove this clip at this point. Just remove the lever completely. It's easy to do, just a 10mm nut/bolt, using a socket with a 6" extension. It helps the shift the lever to a point that facilitates getting the socket on. Remove the bolt COMPLETELY and then the lever will slide off. Crawl out from under the car with the shifter-rod and the lever still attached to each other.
From the inside:
Pry up the little piece of carpet that is under the armrest. Remove the Phillips head screw that secures the wooden console. Gently pry up the edges of the black, rectangular, plastic bezel that surrounds the gear selector. This is the tricky part: gently and evenly work the wooded console up. It helps to push and prod all around the edges of where the wood meets the vinyl. Once the wood is removed you'll see two phillips head screws and four 10mm bolts around the plastic selector housing. Remove these screws and bolts. Are the wheels still chocked? Becuase it actually helps to release the parking brake at this point. The cable is drawn tight over the left side of the plastic housing. Your job is to remove the plastic selector housing. I needed to remove a wire tie on the right side. It's not simple but with a little perseverence and patience you'll get it out.
At the workbench:
Armed with the selector housing and the shifter rod/lever grab a big socket, like something in the 20mm range Look at the shifter-rod/lever and remember how the lever goes (draw a pic). Take the viton bushing and press it into place with the help of a little oil, a bench vise (or even a big c-clamp would work) and the socket. The bushing is on one side and the socket is on the other. After pressing it in take a screwdriver and work around the socket-side of the bushing to flip the edge over. Do the same for both bushings. Put the lever back on the shifter-rod with the new clip. This is a pain in the ass from under the car and it's not necessary (that'll save you about 10 minutes).
From the inside:
Replace the shifter housing (I didn't replace the fasters yet) and reset the parking brake
From under the car
Fish the shifter-rod back into place and first do the lever side then do the selector side. It helps to use a screwdriver/pliers to get the clip back on at the selector end of the shifter-rod
From inside the car:
Replace the fastners and put the console back together.
- Robert Ryan
CategoryDiy