I just finished building an injector pop tester. I thought I would post instructions here on how it was made since I couldn’t find anything online written for people like me who want to build one but don’t know anything about anything. (
 <-- me
 )
The reason for building a tester is to see what pressure your injectors spray at (they should be matched to each other within 3 bar), to see their spray pattern (the spray should be well atomized and narrow), and to see if they leak. You can pay a diesel shop to do this, but it is costly ($60-$70 for the test, and $60+ per injector to adjust if needed). I actually took mine to a shop earlier this year and they said they were fine, but I wanted to see for myself.

If improperly built or used this tool could explode or squirt you in the eye or something, so the usual disclaimer applies:
- What worked for me may not work for you. Use common sense and stop if something looks wrong – don’t just blindly follow the instructions without thinking.
- Take all necessary safety precautions and don’t do anything that is beyond your level of expertise.
- If you hurt yourself or break something while building or using your homemade tester, it’s not my fault! You made a choice to follow instructions you got off the internet from someone you don’t even know.
Design Considerations
Bottle Jack vs. Grease Gun
There appear to be two common designs for homemade injector testers – they are either based on a grease gun or a bottle jack to generate pressure. I initially tried the grease gun approach because it seemed easier (it has threaded fittings on it, a reservoir to hold fluid, etc.) but after unsuccessfully trying 3 different models of grease gun, and after using the bottle jack version, I would advise against using a grease gun. The grease guns don’t seem to be designed to pump something as thin as diesel, and their seals leak all over the place. They can’t hold pressure for more than a fraction of a second so rapid continuous pumping is required. The best grease gun I got could only reach 75 bar of pressure with diesel fuel, and fuel was seeping from it everywhere at the time.
The main challenge with building a bottle jack tester is that you need to have a means of attaching a threaded fitting to the giant nut at the top of the jack. You must either have the tools to drill and tap giant holes (3/4” to 1”), or you need to have welding equipment. I had neither so I had to take the parts to a welding shop and pay them to do it. This isn’t the place for plastic pipe and epoxy; you need a proper connection here due to the high pressures involved (potentially over ~150 bar / 2000 PSI). Come up with a plan before you start buying stuff! This was the most time consuming part of the project. The home depot plumbing aisle won’t help you no matter how long you stare at it…
edit: here's a good animation of how a bottle jack works -
http://www.hyjacks.net/animation.htm
Gauge Sizing
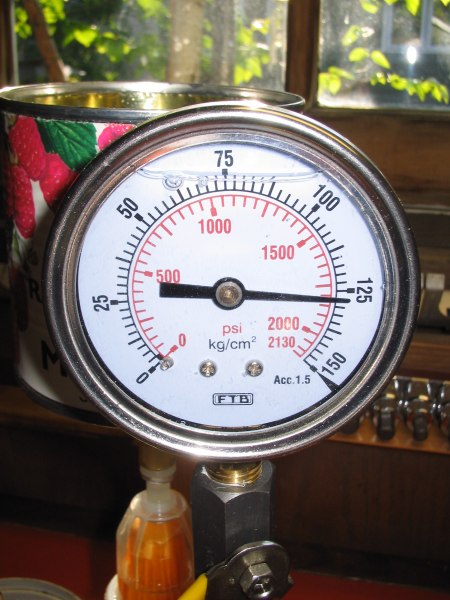
Many of the commercial injector testers you can buy seem to come with a 5000PSI (350 bar) gauge. In my opinion, this seems useless for Mercedes injectors; you want to balance the injectors to within 3 bar, but the scale markings on a 350 bar gauge are 10 bar apart, so the scale of the gauge is too large to let you measure something as small as 3 bar in a repeatable manner. I went with a 150 bar gauge (my injectors are supposed to be set to 115-125 bar). On this gauge, the markings are 2.5 bar apart and you can easily measure to ~1 bar. Don’t get an incorrectly sized gauge or your tester will be useless. The gauge I used was inexpensive, however the pressures I measured from my injectors were within 1 bar of what was reported by the diesel injection shop that tested them earlier this year, so the gauge appears to be reasonably correct.
 Instructions
Parts List
Instructions
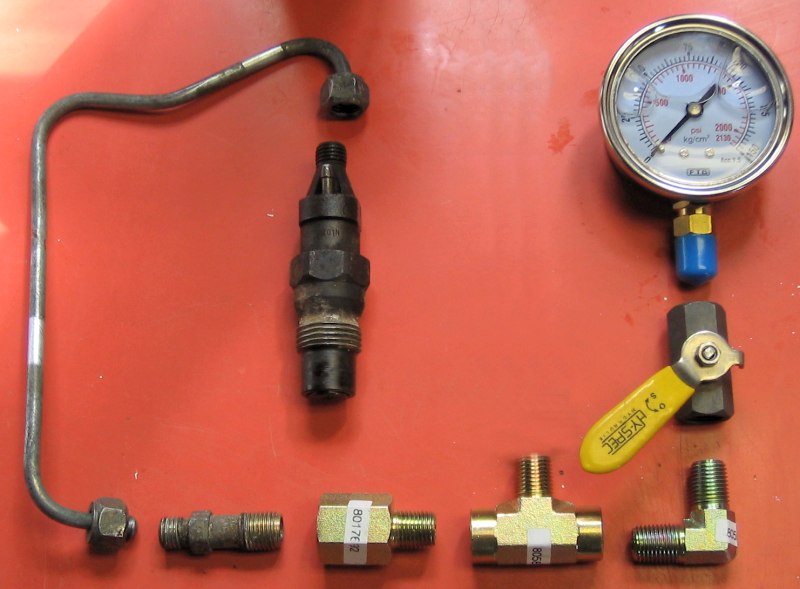
Parts List (see picture below). Most parts are available at Princess Auto.
- Gauge, 150 bar, ¼” NPT male, glycerin-filled
- Shutoff valve, 3000PSI, ¼” NPT female
- Coupler, 90°, ¼” NPT male
- Tee, ¼” NPT
- Coupler, ¼” NPT male to #6 ORB (ORB = O-Ring Boss)
- Pressure valve holder / delivery valve holder (is that the right name?) from a 1980s VW diesel. This is the thing on the VW injection pump that the injector lines attach to.
- Metal injector line from an older VW diesel or Mercedes. The VW ones are nice because they are pre-bent with the ends 90° apart. The Mercedes ones have the ends parallel. This part plus the one above plus a VW diesel injector were $4 at the auto wrecking yard.
- Bottle jack, 2 ton (not pictured)
- Coupler, 1” NPT male to ¾” NPT female (not pictured)
- Inline fuel filter (important, not pictured)
- JB Weld (http://jbweld.net/products/jbweld.php)
- Teflon tape, misc. screws, plastic tubing, wood, etc. (not pictured)
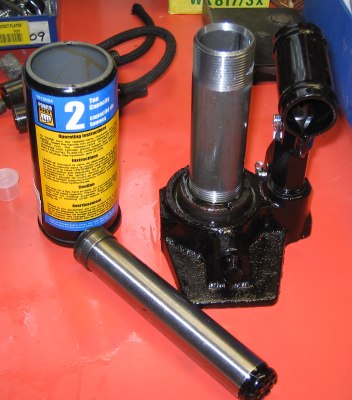
The first step is to disassemble the bottle jack by loosening the giant nut on the top. Remove it carefully and do not hang on to the jack by the outer cylinder. It is full of disgusting oil and the only thing holding it to the jack is the nut you’re removing.
Carefully pick the jack up by the base and dump out the oil. The outer cylinder should just pull off – it is not fastened in any way. Be sure to keep the plastic seal at the base. Pull out the piston and dump out any additional oil inside. You won't be reinstalling the piston.
End of part 1 of 2 (split due to forum post length limit)