Back at it!
I used a Megasquirt II V.3.0 PCB kit which I assembled for the ECU which will be mounted under the passenger side dash behind the glovebox. I purchased a Megasquirt relay box and their cable for simplification of wiring. You could use a standard GM ECU for the conversion with a couple of small additions. You need to add a road-speed sensor and a lot of the connections won't be used.
I liked the ability to program the ECU using a laptop computer and the tuning programs. The relay board and wiring bundle was a big selling point. The labels are printed on the wires themselves and that made it so much easier.
The first thing was mounting the relay board. I removed the old emissions solenoids from their bracket, removed the bracket, straightened the fold, drilled mounting holes for the board, painted it and re-installed to the fender.

The wiring mess beneath the new board is from an electric fan installation. It'll be cleaned up with the TBI conversion.
The next step was to route the relay board to ECU cable, cut it for length, solder the wires and connection. I ran the cable through the existing rubber grommet and soldered the connection but it's a pain and not reccommended unless you are adept at soldering and have the proper soldering pencil. You can solder the end on a bench and finesse the cable through the hole gently. I had to cut the center rubber on the grommet and will need to re-seal it when I am done.
The left over, clearly labeled, wire is used for the connections between the sensors and the relay board. Sweet! The relay and switch to the front of the board are for the electric fan. The O2 sensor is in an easy to access location. A few wires are already connected in the picture.
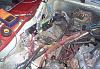
Spaghetti anyone? It's not as bad as it looks but imagine trying to do this without colored, labelled wires! I stripped the wires from their loom for length, routing and bundling purposes.

All right! That's better! The main bundle has been routed neatly, the wires are separated, coiled and located in their approximate locations. The battery 12V line is connected at the starter, routed through the bundle and connected to the board. The provided ground wire in the bundle was partially pulled out of the cluster, spliced to the main ground strap (braided copper wire between the engine and the body, right rear of the engine), connected to the relay board and fed back through the loom for the fuel pump ground.

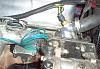
It's starting to look like an engine again as opposed to a misfit yarn repository. Here's the GM standard coolant temperature installed in the thermostat housing. You lose the overheat fan sensor if you install it here. I didn't care because I already have a thermostatically controlled electric fan. It would be easy enough to install a short section of PVC tubing with a 3/8" NPT bung in the upper radiator hose. The M115 does not have any available plugs in the head to simply remove and install the sensor. You have to drill the housing with a 9/16" bit and tap it to 3/8" NPT. Not an easy task as there isn't much excess metal to work. I'd suggest taking it to a machine shop and having them do it.
The sensor wires are just twisted together in a loop until I have all the sensor wiring in place.
So far, the most aggravating part of this conversion is the routing of the wires. You get everything in place and you look back and think," How did I miss those wires rubbing up against that vacuum line/brace/ tangled together,etc."?
I've spent at least three hours pulling wires out of the loom, rerouting them and stuffing them back into the loom. PITA but it's gotta be done right if you're going to do it.
p.s. Notice the Sanden A/C compressor with the adapter bracket. Best thing you can do for your older A/C system. uses very little power and works better than the old York "thumper".