So I went and renovated my wife's '72 250C's passenger side window (RS). Replaced the moldings, rubber mounts, weather stripping, window seals, cleaned, adjusted and lubed the mechanism and it sure worked fine. Goes up and down smoothly, seals nicely, no rattles regardless of window position, etc.
Of course, since the window worked so nicely it immediately drew my attention to the fact the driver's side (LS) window was a bit "creaky". It had seemed fine before but with the freshened window as a comparison it now appeared to move as clunky as I do in the mornings.

Nothing for it but to re-do the window works.
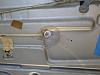
Pulled the door card and immediately found the problem.

Someone had attempted to repair the common problem of fatigued metal using a flat washer and epoxy. It probably worked for a while but was a "body shop" fix. You know, make it work, look good and get it out the door. I found some evidence of body repair inside the door, some filler protruding, replaced door check strap, etc., so I imagine this was when it was done.
It MIGHT have worked if they had considered the fact the door stresses in BOTH directions! The weakened metal simply couldn't handle the strain and pulled through. It didn't help they didn't replace the rubber mounts of the regulator mechanism itself. Instead of using the sleeved, fitting bushing they used a bolt with flat rubber washers. Without the fitted bushing the regulator was able to move/flex further enlarging the holes.
Nothing for it but pull the door apart and repair. You could do it without completely stripping the door as I did but I had other work planned and didn't want to work around the guide rail and window.
Got my tools of destruction.

Removed the epoxy using the heat gun and removed the seriously compromised metal bits. Make sure you get the "crown" which will be on the underside/interior of the hole. Notice the dolly and file. I used both of these to ensure I had a flat solid surface for my weld.
Upper hole cleaned up with all the crumbly bits removed. Use care here, keep in mind of how large the inside washer will be. Don't remove more than you need to.

Cleaned up and ready for plate.

Install regulator with washer, align and secure. Note the clearance on the mounting washer's center hole. I used a 1/4" washer. Do NOT mount a washer which is a tight fit! You'll have a dickens of a time trying to mount the regulator with no clearance. Results in a lot of angry words and the re-drilling of a larger hole.
Tack the washer to secure it and remove regulator.
Here's where I wish I was capable of brazing with brass. For you skilled individuals, simply braze around the metal edges. Vary the distance of the flame from the torch to slowly allow the area to cool.
For us lesser folk, use a heat gun to get the area HOT. Not red hot but a "do NOT touch that" hot. Weld the washer and use the heat gun to slowly reduce the temperature of the weld. Start with the gun on "high" a couple of inches from the metal, slowly pull it away and switch to low to cool the metal.
The heat from the welding and rapid cooling will cause the metal to become brittle or "hardened". Cooling it gradually will reduce the amount of hardness. Hardened metal is not a good thing when you are dealing with vibration and lateral stress. You need a certain amount of flex in this application.