EDIT: For the record, I created this post to show how to remove the OM60x ALDA with the intake manifold in place. The idea is to remove it, adjust with shims or the setscrew, and re-install.
I do NOT endorse removing the ALDA permanently!
Now back to our regulary scheduled programming:
======================================
Hi all,
Well, I finally finished twiddling with the ALDA on my blue car (you know, the one that isn't totaled). I pulled it in & out so many times I could almost do it blindfolded. I took some photos, and figured I'd write a little explanation for them (see below). But first the results of the adjustment:
This ALDA wasn't leaking, but it wasn't perfectly sealed either. I took it apart and replaced the seal (thanks, Jim!) and made it seal perfectly. Then, adding a 1.25mm shim was too much. 0.75mm equals 1 full turn, 1.25mm is equivalent to 1.67 turns. As I had no other shims to play with, I pried the plastic seal out and managed to save the metal cap intact. One full turn out was pretty good, with no visible smoke leaving a stop sign. An extra quarter turn (1.25 turns total) gave the little black puff leaving a stop, which is what I was aiming for, with good power. I might turn it back a hair but for now I'll leave it. With just the shim (~1.67 turns), it smoked VERY noticeably at almost all speeds, spewing a large black cloud while leaving a stop sign, and part-throttle acceleration in 3rd/4th gear also left a good smoke trail. Not good - way too rich! Note that my sister's car didn't smoke like this, and my 84 doesn't either, even with their ALDAs turned WAY up. I think both of those were limited by the internal full-load setting, where my blue car has a higher internal limit? This is the first car where I was actually able to MAKE it smoke, like Marshall keeps saying it should, when too rich! ;-)
OK, here's the procedure:
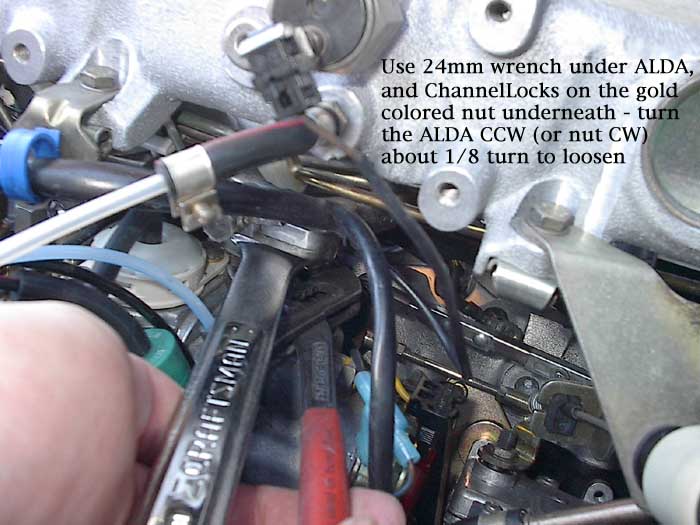
Required tools: 24mm open-end wrench, Channel-Lock pliers or similar, Phillips screwdriver (for pressure hose clamps), 10mm socket and flat screwdriver for adjustment (if you don't use shims). Preceding work - remove the windshield washer reservoir, and ALDA signal line. Now:
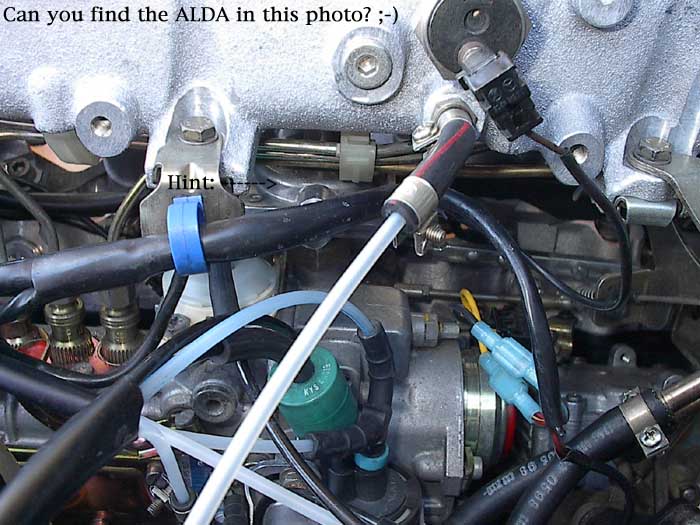
1- Do some reconnaissance and locate the enemy (er, ADLA) and study it:
2- Slide the 24mm wrench under the ALDA, so it's up tight against the body (away from the nut underneath). Get the pliers on to the nut. Make sure the wrenches are not touching the same flats or it won't loosen. Turn the ALDA slightly CCW, or turn the nut slightly CW, to loosen. Should be less than 1/8 turn to break them free:
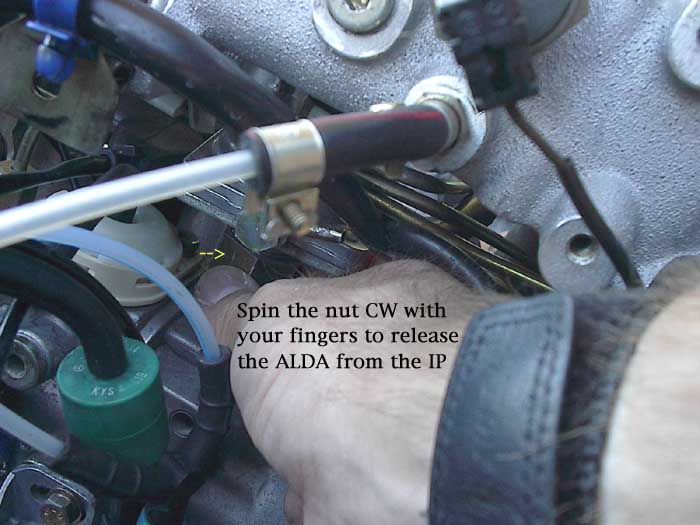
3- Now that the nut is loose, squeeze you hands in there and spin the nut off the ALDA (spin nut CW).
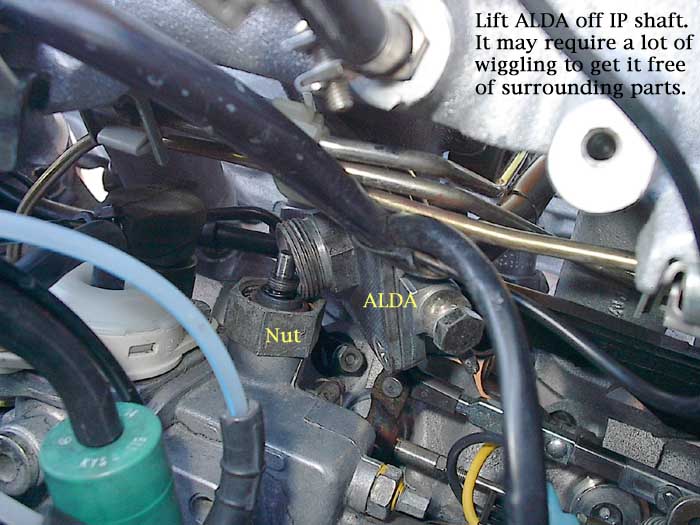
4- The ALDA is now free of the IP. However there are lots of hard parts trapping it down there. Wiggle it all over and it should eventually come out. Worst case, if it absolutely won't come free, you will need to loosen and/or disconnect the rear 3 metal injection lines - then it WILL come out:
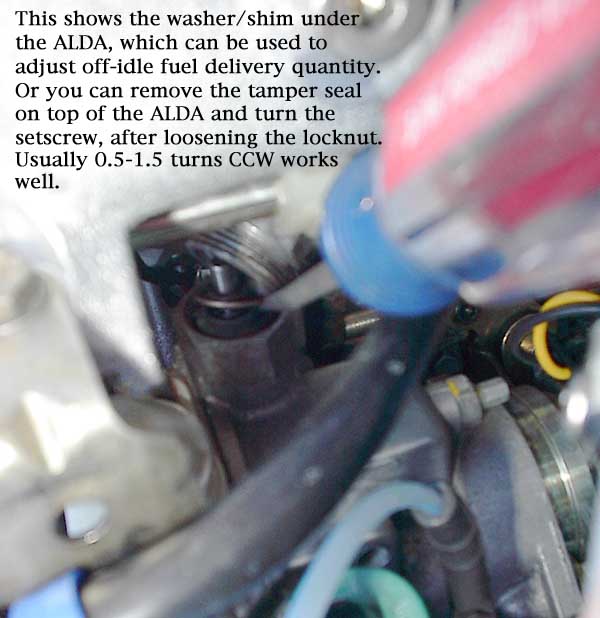
5- The typical factory shim is 1.00-1.25mm thick. My one car had an extra 0.10mm shim as well. One turn of the setscrew equals 0.75mm of shim thickness. More shims richens the mixture (same as turning setscrew CCW). Try 0.5-1.0 turns to start, or 0.37-0.75mm in shims, depending on your preference:
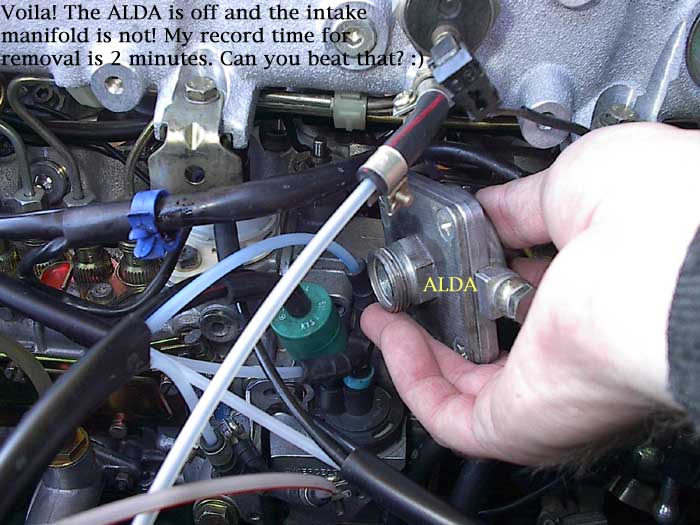
6- Proof that yes, it CAN be removed with the intake manifold in place. I timed my last R&R. With the tools in hand, hood up, ready to wrench... It took under 2 minutes to have the ALDA loose in my hand, another 1 minute to adjust (via setscrew), then 3 more minutes to re-install. That's 6 minutes total, ready to re-start the engine & drive. Not bad, eh? The OM617 guys just lost one more item to gloat about being "difficult" on the 603... ;-)

Best regards,