

|
|
|
|
|
|
#1
 04-20-2008, 11:08 AM
|
|||
|
|||
|
W114/115 subframe restoration
This week's project. Reworking a subframe for my 280C project car (I "project" I'll be done with it in about 2009, or so).
"El nasty" subframe from a '71 250C donor.  Look at all the crap on the ground and I've just STARTED to disassemble and clean it! 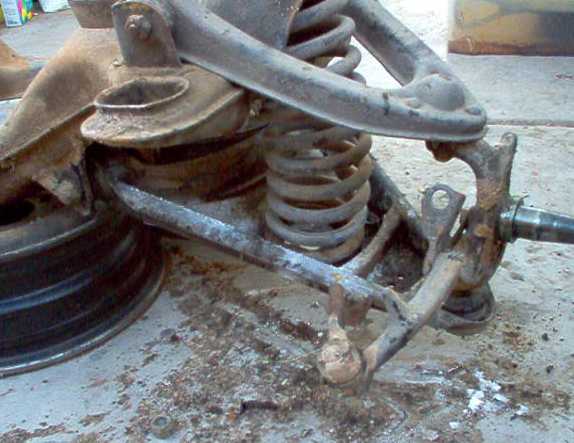 A view from above. Look at the subframe bushing sockets. A common and much overlooked problem is the corrosion of the rear cups. For some reason, the coupes seem to be more prone to this.  Notice the difference of the center mounting holes.  

|
|
#2
04-20-2008, 11:34 AM
|
|||
|
|||
|
Control arm a'bubbling away in the rust removal tank.
 Control arms primed and curing. I got lucky and only had to replace one lower ball joint. Rustoleum Clean metal primer brushed on. I could have sprayed it but I'm a lazy SOB and I didn't want to mess with cleaning my spray gun for a part which isn't going to be seen.   Subframe mounting bushing cups repaired. I use the fitted washers supplied with the subframe bushing kits, raised side UP, welded to the cups and the centers drilled to accept the mounting bolts. No comments on my welding please! Grind as much of the old rusty cup mounting lip away as possible.  Cross member repaired, primed and ready for paint 
|
|
#3
04-20-2008, 12:14 PM
|
|||
|
|||
|
This is the washer I am referring to in the subframe bushing kit.
 Control arm bushings installed, ball joint changed and painted. Just one picture since I figured you could imagine the rest.  First control arm installed on the painted crossmember. I painted the crossmember using two coats of Rustoleum black satin paint. I painted/treated the repaired mounting sockets with POR 15 but at $6.95 a pint I wasn't going to treat the entire crossmember!  Upper control arm, spring and spindle installed. The trick to the spring is the compressor upper plate goes into the THIRD coil down from the rubber insulator and the lower plate goes into the second coil from the bottom. It only took me about four tries to get THAT little bit figured out. I AM the resident expert on speedy removal and installation of the coil spring, now!  And there baby is! All purtyfied and ready to go!  My next project is cleaning up all the mess! Hopefully I'll be installing it next weekend. I'll post.
|
|
#4
04-20-2008, 05:04 PM
|
||||
|
||||
|
Excellent thread! You ARE ambitious.
__________________
I never go far without a little Big Star 1994 E500 199/Gray 82k 84 300D (Salty) Orient Red/Palomino 141k 88 300CE (Ersatzhammer) 904/Java 163k -- Turbo Technics twin turbo kit, AMG Gen I body kit, Sportline steering box and steering wheel, Sportline/Eibach /Bilstein Sport/500E suspension, Quaife LSD in 210 mm diff case, Silver Arrow brakes. 88 300CE Brabus 3.6 199 on Black 44k
|
|
#5
04-26-2008, 12:45 AM
|
|||
|
|||
|
Replacement time.
Getting ready.  Engine cradle in place (Thank you Keith Brooks, European Import Service, posts as "Desert Pagoda", for the loan of the cradle).  Engine bolts out and engine suspended.  The reason WHY I am doing this. Note the cam adjusting ear broken off on the first pic. The second pic is what it should look like, minus the nasty bushings of course.  
|
|
#6
04-26-2008, 09:26 AM
|
|||
|
|||
|
Bolts, lines, shocks, stabilizer links and tie rod ends all disconnected. It's helpfull if you have the drain bucket handy BEFORE you undo the brake line!
  Old subframe out. If you leave the tire on one side it's easier for one person to move it from beneath the car. You can't get it clear with both tires installed.  Rebuilt subframe ready to go back into place. Here's a tip. Move the unit back past the stabilizer arm, tilt the arm down past the upper control arms, tilt the front of the crossmember up and lift the unit from the main cross brace. A little wiggling and it'll slip into place so easy you'd swear you missed a step or two.  Two more shots of the broken ear and also what it is supposed to look like (complete with "war wound".  
|
|
#7
04-27-2008, 09:31 AM
|
|||
|
|||
|
And it's done! Next stop, alignment shop.
Front brake replacement is the next project. I'm going to attempt to rebuild the existing calipers but I have the feeling I'll end up replacing them. I won't know until I tear them apart.   
|
|
#8
11-05-2012, 12:44 PM
|
||||
|
||||
|
WOW!!! Thank you for this post, I am nearing my time to do this.
|
 |
| Bookmarks |
|
|


 Linear Mode


