

|
|
|
|
|
|
|||||||
 |
|
|
LinkBack | Thread Tools | Display Modes |
|
#16
 08-24-2011, 09:58 AM
|
||||
|
||||
|
Hello subframe my old friend...
I see you're off the car again...
 Today I got the subframe out (again). This time I used Charmalu's method of simply lifting the rear end of the car high enough so that you don't need to use a spring compressor. Works quite well on the back - don't try this on the front though. I also used jt20's method of wheeling the subframe out from under the car. This also works quite well. Look I didn't even remove the callipers or the anti-sway bar... All good fun eh?
__________________
1992 W201 190E 1.8 171,000 km - Daily driver 1981 W123 300D ~ 100,000 miles / 160,000 km - project car stripped to the bone 1965 Land Rover Series 2a Station Wagon CIS recovery therapy! 1961 Volvo PV544 Bare metal rat rod-ish thing I'm here to chat about cars and to help others - I'm not here "to always be right" like an internet warrior  Don't leave that there - I'll take it to bits! 
|
|
#17
08-24-2011, 10:09 AM
|
||||
|
||||
|
Cheap caravan axle stands - verdict? NOT GOOD
Whilst there has been some progress on the subframe removal front I have had a bit of a nervous time putting the car on those cheapo caravan axle stands.
I really don't like them - the whole car wobbles on them. The problem is that they are designed in a real cost cutting crappy way. The cast aluminium (well the box says aluminium - probably monkey metal though) stand has a half arsed hexagonal shape in the top to hold a nut. This nut is attached to a bit of M20 (far too shiny) threaded bar with a spinning foot at the top. There is nothing to stop the bar from wobbling in the top of the poorly fitted stand. I've bought some extra nuts to fit on the underside of the threaded bar to clamp the bugger in place. I do not want to be the subject of one of whunter's man crushed under car threads...  So why am I using them? Well I need to adjust the heights of the supports under the car before I remove the spot welds. At the moment the body is so stiff that you can get it to dance about on three stands instead of four if you are not careful. I don't expect it to be that stiff when I remove the sills / longerons / rockers... Ideally I'd like large bottle jacks with locking collars that stop the jack from collapsing... but I can't em here for love nor money...
__________________
1992 W201 190E 1.8 171,000 km - Daily driver 1981 W123 300D ~ 100,000 miles / 160,000 km - project car stripped to the bone 1965 Land Rover Series 2a Station Wagon CIS recovery therapy! 1961 Volvo PV544 Bare metal rat rod-ish thing I'm here to chat about cars and to help others - I'm not here "to always be right" like an internet warrior Don't leave that there - I'll take it to bits!
|
|
#18
08-25-2011, 03:12 PM
|
||||
|
||||
|
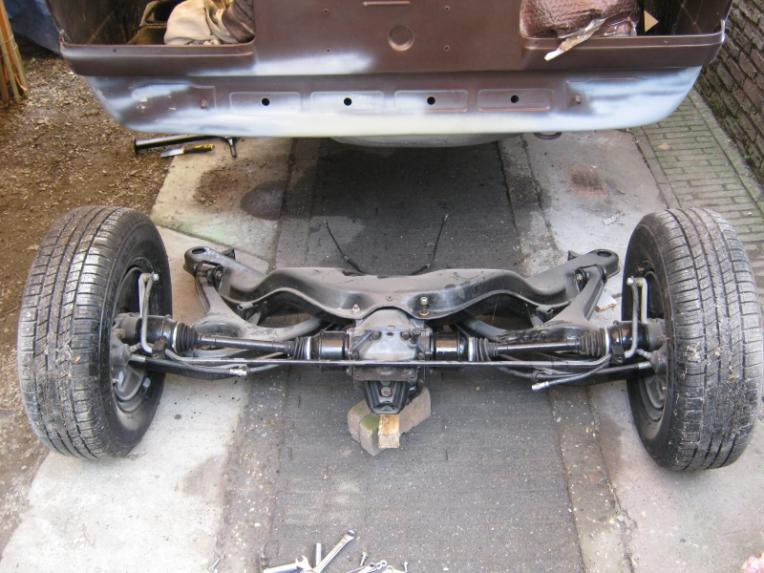
Only had time to mess about with the camera today...
...but I got a nice shot here...
 All good fun eh?
__________________
1992 W201 190E 1.8 171,000 km - Daily driver 1981 W123 300D ~ 100,000 miles / 160,000 km - project car stripped to the bone 1965 Land Rover Series 2a Station Wagon CIS recovery therapy! 1961 Volvo PV544 Bare metal rat rod-ish thing I'm here to chat about cars and to help others - I'm not here "to always be right" like an internet warrior Don't leave that there - I'll take it to bits!
|
|
#19
08-27-2011, 02:14 PM
|
||||
|
||||
|
Stripping out the inside
Dash had gone some time ago but I wanted to get all of the sound proofing out so I can
1) See the rust 2) Not catch it on fire when welding  Here's a little seen view too  And of course 'cos I'm welding I took out the whole wiring loom...  ...I don't want to play the now where did I weld through that wire? game...
__________________
1992 W201 190E 1.8 171,000 km - Daily driver 1981 W123 300D ~ 100,000 miles / 160,000 km - project car stripped to the bone 1965 Land Rover Series 2a Station Wagon CIS recovery therapy! 1961 Volvo PV544 Bare metal rat rod-ish thing I'm here to chat about cars and to help others - I'm not here "to always be right" like an internet warrior Don't leave that there - I'll take it to bits!
|
|
#20
08-27-2011, 02:21 PM
|
||||
|
||||
|
Replacement left hand floor panel turned up yesterday
The Klokkerholm reproduction floor panel came in some chap's car yesterday.
I'm not sure I can use this one - it looks like someone had shortened it to use it as a cover rather than a replacement. It seems to be a few cm too short.  I'm not too fussed by the inboard bit that is poorly made - I'm more worried about the length of it. It should butt up nicely to this step cross member that I've been trying to source. I want to spot weld it in place I don't want to patch a new panel to make it reach the joint on the cross member. I've asked them to exchange it for another one that hasn't been cut for a weld over job. We'll see what happens...
__________________
1992 W201 190E 1.8 171,000 km - Daily driver 1981 W123 300D ~ 100,000 miles / 160,000 km - project car stripped to the bone 1965 Land Rover Series 2a Station Wagon CIS recovery therapy! 1961 Volvo PV544 Bare metal rat rod-ish thing I'm here to chat about cars and to help others - I'm not here "to always be right" like an internet warrior Don't leave that there - I'll take it to bits!
|
|
#21
08-30-2011, 07:21 AM
|
||||
|
||||
|
Klokkerholm update and "real" MB parts update
I asked the supplier to replace the floor panel that seemed to have been cut by someone else and they say I'll get a new panel by the end of next week - so far so good!
I've just got back from the dealer and got the front left hand cross member that goes under the driver's seat (front seat bolts) and two gucci little panels that go over the rockers / sills / longerons. Needless to say the MB parts were more expensive than the large klokkerholm bit. Ho hum...
__________________
1992 W201 190E 1.8 171,000 km - Daily driver 1981 W123 300D ~ 100,000 miles / 160,000 km - project car stripped to the bone 1965 Land Rover Series 2a Station Wagon CIS recovery therapy! 1961 Volvo PV544 Bare metal rat rod-ish thing I'm here to chat about cars and to help others - I'm not here "to always be right" like an internet warrior Don't leave that there - I'll take it to bits!
|
|
#22
08-31-2011, 07:25 AM
|
||||
|
||||
|
Gold plated floor pieces - some real bling bling...
...well it must be gold plated looking at the receipt... I'm not sure why they sprayed all that expensive gold black though...

__________________
1992 W201 190E 1.8 171,000 km - Daily driver 1981 W123 300D ~ 100,000 miles / 160,000 km - project car stripped to the bone 1965 Land Rover Series 2a Station Wagon CIS recovery therapy! 1961 Volvo PV544 Bare metal rat rod-ish thing I'm here to chat about cars and to help others - I'm not here "to always be right" like an internet warrior Don't leave that there - I'll take it to bits!
|
|
#23
09-01-2011, 07:01 AM
|
||||
|
||||
|
Fruit of the devil!
I've decided that the original Mercedes rubberised undercoat is the fruit of the devil - I had previously gone through the front of the car patching stuff up a little bit like JamesDean is doing in this thread
300SD Rust Restoration Project #2 I could have sworn I'd got a rust free front end last year when I did the work... ...needless to say I found some more. Teddy got chucked out the cot - blow torch got dusted off and I went all Pulp Fiction http://en.wikiquote.org/wiki/Pulp_Fiction#Dialogue " I'm gonna call a couple of hard, pipe-hitting niggas to go to work on the homies here with a pair of pliers and a blow torch " Please note:- Don't do this to a car that still has sound insulation on the other side of the bit of metal you are burning off - it will melt and it will catch on fire. So remember the fire triangle?  http://en.wikipedia.org/wiki/Fire_triangle Here's a repeat of the picture showing what the wheel arch looked like before teddy got chucked out of the cot => And after the blow torch treatment...  ...and after a quick going over with the wire brush and angle grinder...  Last year I spent hours and hours doing a much smaller area on this part of the car with just the angle grinder and the wire brush attachment. It does get the job done eventually but the rubberised coating tends to ball up and get stuck - you kind of end up pushing the coating off of the car when you are using just an angle grinder and wire brush attachment. Last year I wasn't planning on stripping everything out - I thought I'd get away with doing a smaller amount of work. How naive! Now that the wiring has gone, and the sound proofing is gone, and the suspension is gone, and all the other bits have gone the blow torch approach makes the most sense to me. I guess you could get a similar but much slower effect from an electric hot air gun - but then again I guess you'd still have to be super careful that you didn't melt something on the other side of the metalwork.
__________________
1992 W201 190E 1.8 171,000 km - Daily driver 1981 W123 300D ~ 100,000 miles / 160,000 km - project car stripped to the bone 1965 Land Rover Series 2a Station Wagon CIS recovery therapy! 1961 Volvo PV544 Bare metal rat rod-ish thing I'm here to chat about cars and to help others - I'm not here "to always be right" like an internet warrior Don't leave that there - I'll take it to bits! Last edited by Stretch; 09-01-2011 at 07:27 AM.
|
|
#24
09-01-2011, 07:43 AM
|
||||
|
||||
|
Blow torch method does have disadvatages...
Whilst this blow torch method is the quickest way I've found so far for removing this pesky undercoating it does make one heck of a mess of the any seam sealant...
 This didn't come as a surprise to me - but I thought I'd better warn you all just in case.
__________________
1992 W201 190E 1.8 171,000 km - Daily driver 1981 W123 300D ~ 100,000 miles / 160,000 km - project car stripped to the bone 1965 Land Rover Series 2a Station Wagon CIS recovery therapy! 1961 Volvo PV544 Bare metal rat rod-ish thing I'm here to chat about cars and to help others - I'm not here "to always be right" like an internet warrior Don't leave that there - I'll take it to bits!
|
|
#25
09-01-2011, 07:49 AM
|
||||
|
||||
|
Comparison of the sills...
This thread is in danger of becoming a blog - rather than a thread. So here's something that should hopefully promote some discussion (just in case taking a blow torch to a car doesn't do it)...
Take a look at the picture below.  This is a split view from the front of the car (looking towards the back) [This side] The passenger's side of the car doesn't have any accident damage - the driver's side does [This side] The sill has been whacked a bit out of shape. I've got a plan to fix it. But what would you do?
__________________
1992 W201 190E 1.8 171,000 km - Daily driver 1981 W123 300D ~ 100,000 miles / 160,000 km - project car stripped to the bone 1965 Land Rover Series 2a Station Wagon CIS recovery therapy! 1961 Volvo PV544 Bare metal rat rod-ish thing I'm here to chat about cars and to help others - I'm not here "to always be right" like an internet warrior Don't leave that there - I'll take it to bits! Last edited by Stretch; 09-01-2011 at 07:50 AM. Reason: A cunning bit of editing
|
|
#26
09-02-2011, 04:33 PM
|
|||
|
|||
|
You know, you are crazier than I was when I was young. I thought I was crazy when I had my '73 450 SLC apart. It looks like you dissassembled the whole car!
Yes, I've always found that the torch is the the best way to get rid of the undercoating. Put some POR on those spots, and use my roofing tar technique to fill in the holes. After driving around a little you wont even see those patches. This should be a great car once you are done.
__________________
___________________________________________ 2010 Toyota matrix '93 500 SEL A bad addiction. Takes all of my cash. '12 Volvo S80 T6 Needed something that wasn't as hard to deal with as my bad addiction '18 Mazda Miata No more boring cars for everyday transport!
|
|
#27
09-03-2011, 05:25 AM
|
||||
|
||||
|
Quote:
I've always wanted to do something like this and the way things have panned out at the moment now is the time to do it. I'm planning to replace as many of the larger parts of the car with whole body parts. I want to resistance / spot weld them in place as my welding skills are still quite young... I've got a little arc welder that goes down to 25 amps which is meant to be good enough to weld sheet metal. I've been practising laying down beads on 0.7mm plate and some of them look half decent. When I've got them to a standard that I'm happy with I'll post some pictures. I'm planning to patch small holes with this arc welder but I'm not prepared to use it on the serious parts of the structure - that's just not sensible.
__________________
1992 W201 190E 1.8 171,000 km - Daily driver 1981 W123 300D ~ 100,000 miles / 160,000 km - project car stripped to the bone 1965 Land Rover Series 2a Station Wagon CIS recovery therapy! 1961 Volvo PV544 Bare metal rat rod-ish thing I'm here to chat about cars and to help others - I'm not here "to always be right" like an internet warrior Don't leave that there - I'll take it to bits!
|
|
#28
09-06-2011, 05:19 PM
|
|||
|
|||
|
Do not forget to treat around the welds. When welding, you will break the integrity of the ecoat on the new parts. You will need to renew the area around the welds. I've never used POR before, but I cannot see why it would not coat over spot welds (someone correct me if I am wrong). Then reundercoat. You should have great repairs at that point.
__________________
___________________________________________ 2010 Toyota matrix '93 500 SEL A bad addiction. Takes all of my cash. '12 Volvo S80 T6 Needed something that wasn't as hard to deal with as my bad addiction '18 Mazda Miata No more boring cars for everyday transport!
|
|
#29
09-07-2011, 04:57 AM
|
||||
|
||||
|
Quote:
The plan was to coat with POR-15 after rust removal / treatment and then apply a good seal sealer (probably Eastwoods) and then start priming and painting as before. I have dreams of a beautiful clear coat undercoat... ...I might get there - we'll see.
__________________
1992 W201 190E 1.8 171,000 km - Daily driver 1981 W123 300D ~ 100,000 miles / 160,000 km - project car stripped to the bone 1965 Land Rover Series 2a Station Wagon CIS recovery therapy! 1961 Volvo PV544 Bare metal rat rod-ish thing I'm here to chat about cars and to help others - I'm not here "to always be right" like an internet warrior Don't leave that there - I'll take it to bits!
|
|
#30
09-07-2011, 12:51 PM
|
||||
|
||||
|
Original parts with costs (good for date of the post)
I've just a quote from the dealer for some more body panels.
Some of the prices are hideous - but others are really quite surprising.  Item number 32 inner wheel arch inner side A 123 637 02 75 right hand side 193 Euros plus tax A 123 637 01 75 left hand side 194 Euros plus tax Item number 35 inner wheel arch outer side A 123 637 02 76 right hand side 73 Euros plus tax A 123 637 01 76 left hand side 73 Euros plus tax  Item 11 Front cross member A 123 622 02 04 right hand side => UNOBTAINIUM A 123 622 01 04 left hand side 39 Euros plus tax {This one is surprising it isn't too complicated to make yourself but as 1mm thick mild steel plate costs in excess of 70 Euros a square meter here - well it is hardly worth the effort} 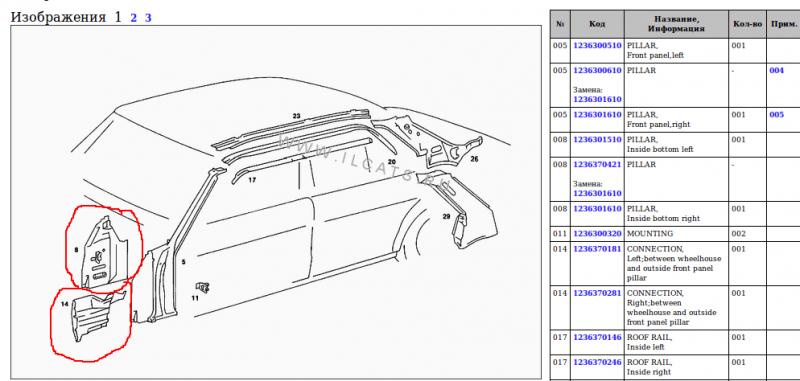 Item 8 inner front wheel arch bit that also makes up the spring pocket / drain A 123 630 16 10 right hand side => UNOBTAINIUM A 123 630 15 10 left hand side => UNOBTAINIUM Item 14 inner front wheel arch part between number 8 above and the sill / rocker / longeron A 123 637 02 81 right hand side 57 Euros plus tax A 123 637 01 81 left hand side 57 Euros plus tax {Quite expensive but not really stupid in my opinion}  These two parts make up the chassis rails that run above the rear wheels / sub frame etc Item 68 translated from German as "pipe" A 123 611 04 21 right hand side - still available but current day price isn't known - most recent known price about 400 Euros plus tax A 123 611 03 21 left hand side - still available but current day price isn't known - most recent known price about 400 Euros plus tax Item 65 side member A 123 610 02 10 right hand side - still available but current day price isn't known - most recent known price about 750 Euros plus tax A 123 610 01 10 right hand side - still available but current day price isn't known - most recent known price about 750 Euros plus tax
__________________
1992 W201 190E 1.8 171,000 km - Daily driver 1981 W123 300D ~ 100,000 miles / 160,000 km - project car stripped to the bone 1965 Land Rover Series 2a Station Wagon CIS recovery therapy! 1961 Volvo PV544 Bare metal rat rod-ish thing I'm here to chat about cars and to help others - I'm not here "to always be right" like an internet warrior Don't leave that there - I'll take it to bits! Last edited by Stretch; 09-07-2011 at 01:05 PM. Reason: Added more
|
|
| Bookmarks |
|
|


 Linear Mode


