

|
|
|
|
|
|
#1
 06-09-2013, 02:44 PM
|
|||
|
|||
|
W114 rocker panel repair
I'd noticed a few small bubbles in the paint on the lower rocker panel while I was doing an earlier repair on my (wife's) coupe. Never being smart enough to leave well enough alone I went poking about with a pick and discovered the dreaded rust.
 Upon further investigation I found evidence of some slap-dash previous body repair. Not surprising on a 40+ year old car but aggravating just the same. Stripped the paint from the lower rocker and this is what I found. #1 front section 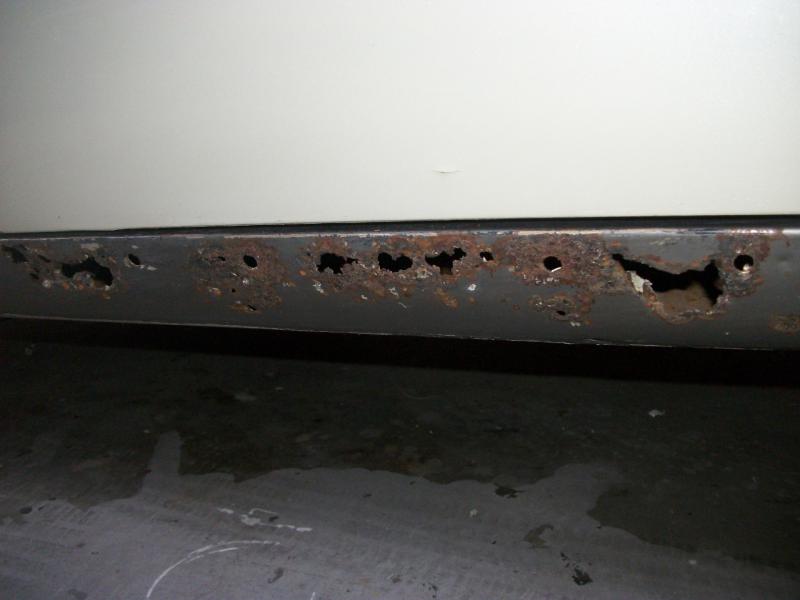 #2 middle 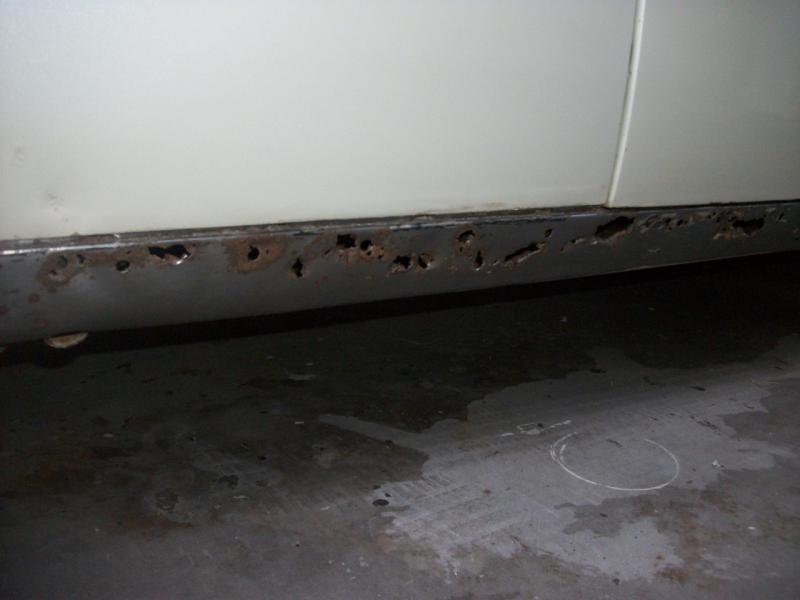 #3 rear  Aaaarrrggghhhh! Well, nothing for it but repair. A little history on this car. It sat for a couple of years as a shell with no interior. I got it as a package deal, the wife loved the color, it has a sun roof and her '69 W114 was on its last legs. Engine, transmission, interior got transferred and she was happy. In the previous body repair they must not have had the access or knowledge to replace the trim retainers so they used silicone to secure the lower trim strips. It obviously worked because I've had the car for 5 years and they never fell off. Of course the hidden danger waited a few years to arise. Notice how the rot coincides with the line of trim holes and where the silicone was in contact along the trim strip? Silicone becomes acidic as it cures. This etches the metal and opens it up for rust. Now, not only was the metal compromised but the silicone trapped between the trim and the metal became a "dam" which caused moisture to accumulate. Every time it rained or the car was washed the water collected into the space between the plastic strip and the actual chrome trim. DON'T USE SILICONE as an adhesive on sheet steel! I shudder every time I read about someone using it. This IS what happens! Okay, okay, enough with the sermon. On with the show. I had to decide what to do. I could replace the entire rocker panel with a new/used section but that comes with its own problems. To remove the entire rocker the car should be supported in a jig because the rocker is a structural component in the W114. The body WILL sag when you remove the rocker. I could fab one up but then the car would be immobile sitting in my work shop. You know that 20 seconds after I cut the rocker out a situation would arise which would require the access to my work shop. Murphy's Law is a constant in my world. So I'm left with two options. I could cut the bad stuff out, use fiberglass with mesh or replace with 18 gauge cold rolled sheet metal. Because I wasn't sure of how much of the original metal was compromised I decided to cut the bad sections out and replace with sheet. This seemed to be the best option because it allowed me to do the repairs in stages and yet I could move the car if required. #4 The first section cut out. You can see the metal is mostly sound and if they hadn't used the silicone this would have never happened. 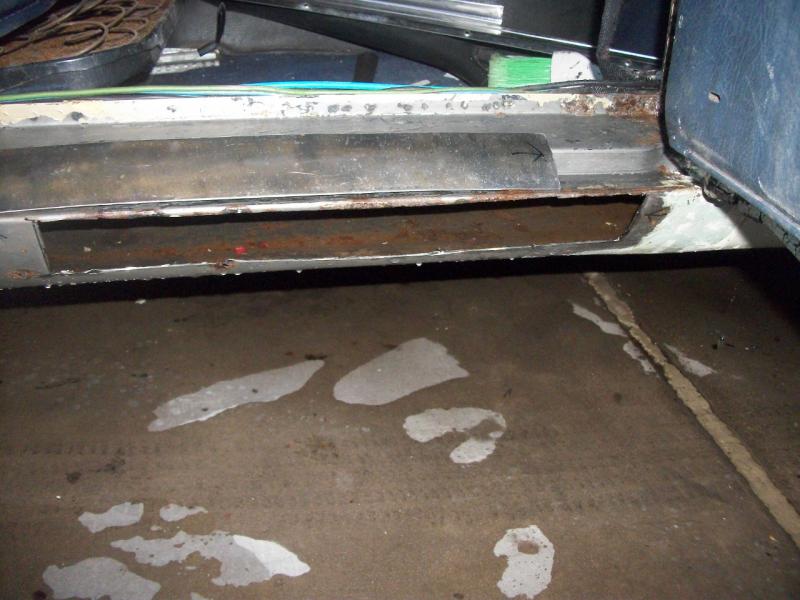 #5 Fitting the first panel. Thanks to "Stretch" for the tip of using magnets to get the panels aligned.  You can see the body filler they used to the right of the fitted panel. Sigh, something else to fix.
__________________
Whatever story you're telling, it will be more interesting if, at the end you add, "and then everything burst into flames. ― Brian P. Cleary, You Oughta Know By Now Last edited by Mike D; 06-15-2013 at 03:42 PM. 
|
|
#2
06-09-2013, 03:27 PM
|
|||
|
|||
|
Next phase
First piece replaced, tacked and ground.
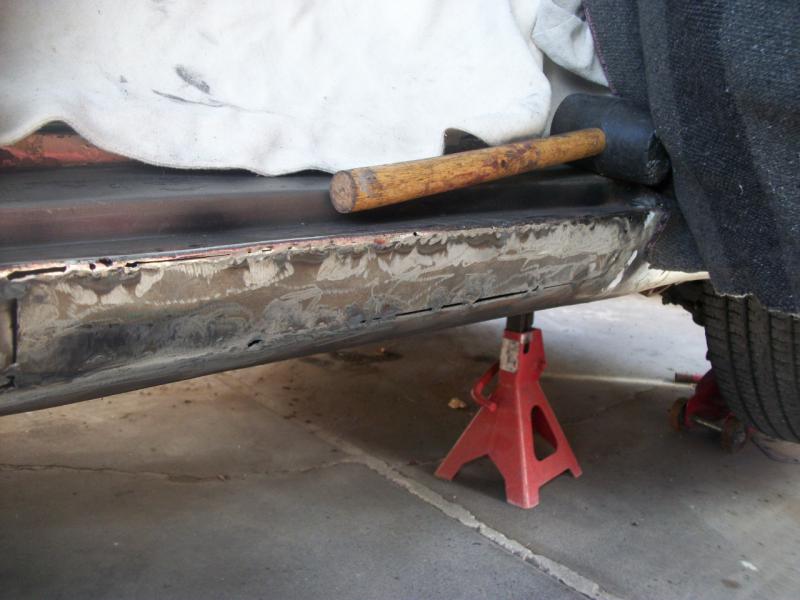 Center bits removed. You can see the integrity of the metal is still good. 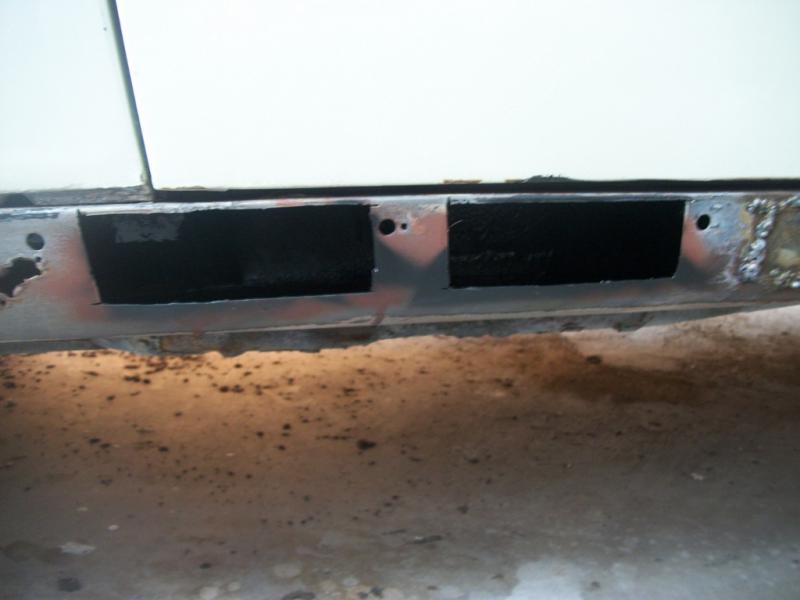 The rest of the panels replaced. Note the quality of the welds have deteriorated. 105F and my muscles beginning to spasm from laying down, welding over my head, etc.  Ah well, it's the metal workers mantra, "What the welder giveth, the grinder taketh away". It's the 12 Commandment I believe. On a side note, it's amazing the sound a bit of weld spark makes when it lands inside your ear hole and sputters out due to the amount of sweat accumulated in there. Ah well, it's the metal workers mantra, "What the welder giveth, the grinder taketh away". It's the 12 Commandment I believe. On a side note, it's amazing the sound a bit of weld spark makes when it lands inside your ear hole and sputters out due to the amount of sweat accumulated in there. Just glad to be sweating in THIS incident! Just glad to be sweating in THIS incident!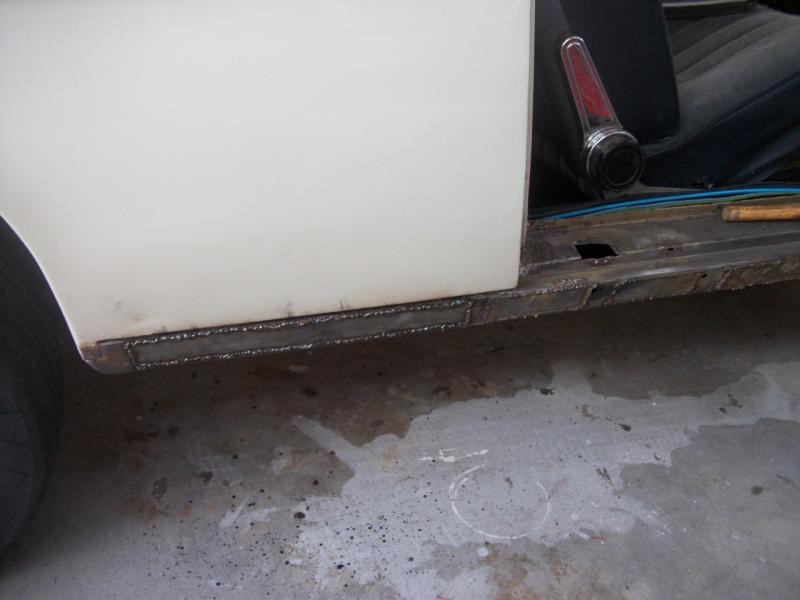 First grind. Had to go back and spot up quite a bit after this one. 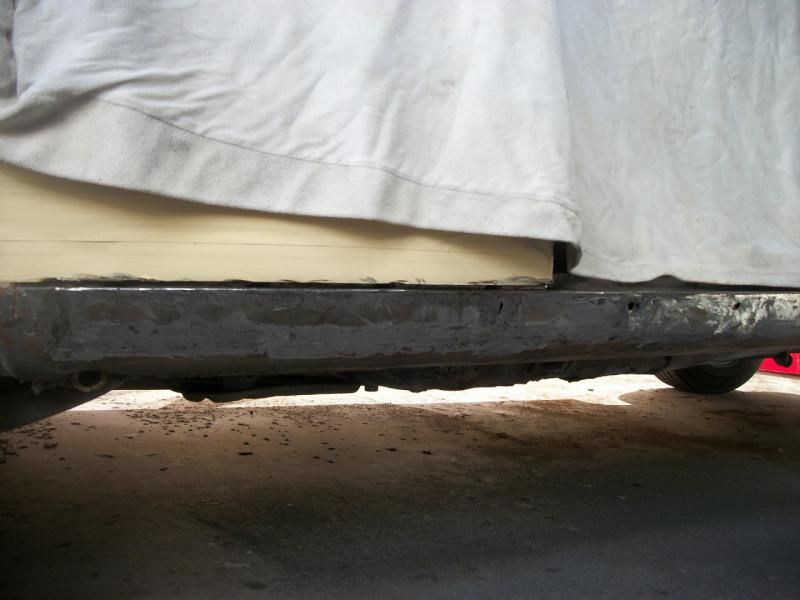 First sand. Not as good as I'd hoped but better than I expected. 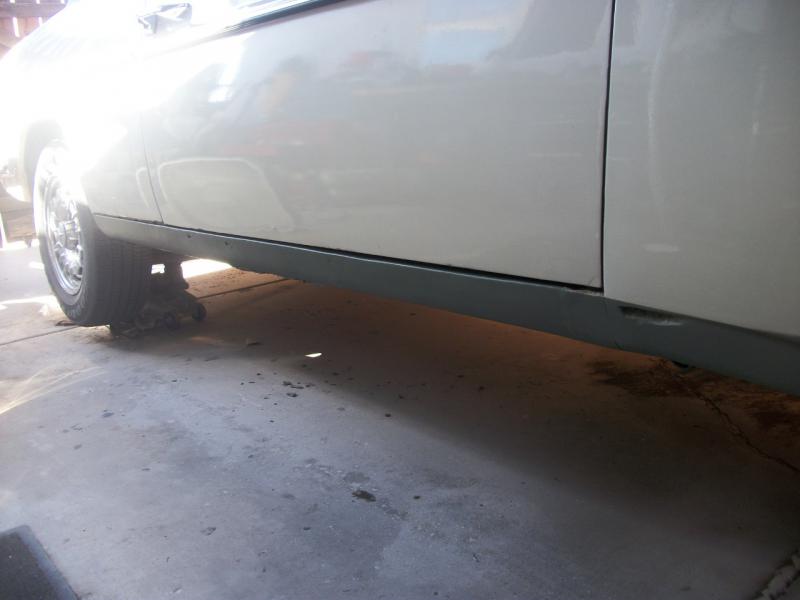 That is the fender mounting access hole in the front part of the picture. It is covered by the trim. Next step is to make up a jig to drill the trim holes. Guess I could just use silicone as an adhesive instead. ") Gotta make up a gauge to get the original shape back using a bit of filler. That'll be for NEXT weekend though. I've had enough fun for this week and it'll probably be three days before I can lift my arms over my head again. Gotta make up a gauge to get the original shape back using a bit of filler. That'll be for NEXT weekend though. I've had enough fun for this week and it'll probably be three days before I can lift my arms over my head again.
__________________
Whatever story you're telling, it will be more interesting if, at the end you add, "and then everything burst into flames. ― Brian P. Cleary, You Oughta Know By Now
|
|
#3
06-16-2013, 11:15 PM
|
|||
|
|||
|
Day #3. Didn't get a day #4 because of the temperature. At 105F you can't mix body filler fast enough! As I was mixing, it was curing. No time to apply it. Gave it up as a bad job around 1:00PM. Got back on it at 6:00AM (probably much to my neighbors' displeasure
 ) when the temperature had cooled. ) when the temperature had cooled.Spent an hour trying to locate my contour gauge. It's one of those things you use once in a blue moon but nothing else fits the bill. #1. Getting the curve. I actually did better forming the pieces than I thought as will be shown.  #2. Used an old spreader for the gauge. You can see the curve. Would have been nice if the rocker panels were flat but nooooo! You need the notch as a guide for the rear part of the panel where the coupe model has drains.. 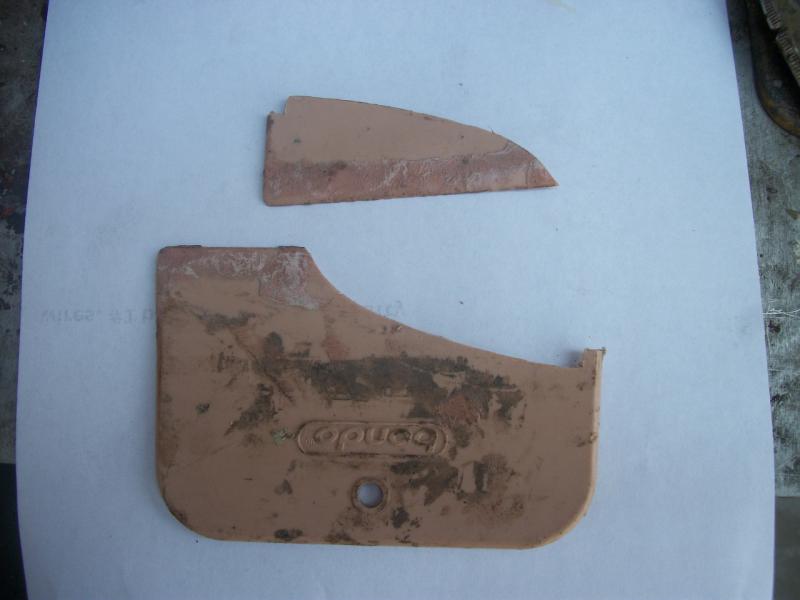 #3. Getting the jig set up was a pain in the butt (literally because I was sitting on concrete trying to get all the measurements!). The holes for the retainers are 9MM which equates closest to 11/32" When will the U.S. get around to getting their measuring scheme simplified? 9MM is roughly .354, which is closest to 11/32". Hurt my brain though tracking everything down. For whatever reason there are twice as many holes in the original panel as there are in the trim. Beats me. I double checked with the '74 and it's the same. Perhaps both cars have had their trim replaced and the new trim only uses half. I only drilled the required amount. Got me a yardstick from Ace Hardware which conveniently had metric measurements. The holes are 170MM center to center. That's 6 and 11/16's + a smidgen. Using the metric stick made it so much more simple. I used the only two remaining holes on the panel for alignment. I drilled the holes on the drill press. Only two holes were full size.The rest were 3/16" so I could use my panel clips.  #4. The jig. I probably should have reversed pictures 3 and 4 but you get the idea.  #5. First fill and sand. Not too shabby considering the conditions. Although I wasn't too pleased with my welding previously I did surprise myself considering I free handed the curve using an old king pin and an expansion joint in the concrete. They say even a blind pig finds an acorn occasionally!  I got it primed and first sanded but I'll wait until I have 5 pictures to post them. Going to cover it all with "Rock Guard" paint and then probably an Anthracite Gray because the wife wants the car "two-toned".
__________________
Whatever story you're telling, it will be more interesting if, at the end you add, "and then everything burst into flames. ― Brian P. Cleary, You Oughta Know By Now
|
|
#4
06-17-2013, 03:23 AM
|
||||
|
||||
|
Mike I can't believe my radar failed me and I missed the first time you posted this - you would have thought that being online for 24 hours a day is enough not to miss anything wouldn't you?
Great job it looks really good in the photos - how does it stand up to the rubbing along with your hand test? Can you feel any longer wave length undulations? Are you planning to squirt some dinitrol in the cavity when you are done? (If so I guess you know to wait until the paint has cured before you do that!) I am amazed at the damage caused by silly-cone - I had no idea it was that bad.
__________________
1992 W201 190E 1.8 171,000 km - Daily driver 1981 W123 300D ~ 100,000 miles / 160,000 km - project car stripped to the bone 1965 Land Rover Series 2a Station Wagon CIS recovery therapy! 1961 Volvo PV544 Bare metal rat rod-ish thing I'm here to chat about cars and to help others - I'm not here "to always be right" like an internet warrior  Don't leave that there - I'll take it to bits!
|
|
#5
06-17-2013, 09:21 AM
|
|||
|
|||
|
Quote:
It's very hard to tell. At the moment I think my arms are numb from the elbows down due to all the vibrations from sanding. I'm sure there is a bit of inconsistency in the finish which wouldn't be had I replaced the entire panel but it is the lower rocker we are talking about here. Structural integrity was my main concern. Once I cover it with the rock guard (it's a spray on textured product much like the original PVC undercoating) I think you'll be hard pressed to locate the repair. I'm sure there is a bit of inconsistency in the finish which wouldn't be had I replaced the entire panel but it is the lower rocker we are talking about here. Structural integrity was my main concern. Once I cover it with the rock guard (it's a spray on textured product much like the original PVC undercoating) I think you'll be hard pressed to locate the repair. In fact I dare you to come over to my place (I'd suggest you schedule it for the winter time due to your inexperience with what we refer to as being a "tad warmish" in the summer), lie down and let me drive the car by you at speed to see if you can detect the "undulations"  Heck, I'll even buy the beer. Heck, I'll even buy the beer. I haven't decided which product I'll be using for the interior rust proofing. I primed and painted the patch panels and inside of the frame rails but I'm sure the welding and grinding took a big bite out of the coating. I did cut an opening in the top of the rail to install a floor "courtesy" light so I still have access (I'll post that procedure after I'm done with the painting pictures). I'm guessing "dinitrol" is much like "Waxyoil"? It will be a non-hardening agent in any case. I've experienced what happens when you clog the built in drains on these W114's. Silicone is a fine product when it is used as designed. It is NOT designed for sheet steel and it definitely is NOT designed as an exterior adhesive.
__________________
Whatever story you're telling, it will be more interesting if, at the end you add, "and then everything burst into flames. ― Brian P. Cleary, You Oughta Know By Now
|
|
#6
06-17-2013, 01:50 PM
|
||||
|
||||
|
Here's a link for Dinitrol
DINOL - Kleben - Schützen - Dichten: Corrosion Protection I once saw it described as the next best thing to leaving the car in the middle of the Sahara. It is good stuff but like you say it does need to be applied with care - blocking drains is just stooooopid. If I ever get to the USA I'll most certainly drop you a line (and give you plenty of time to leave town!).
__________________
1992 W201 190E 1.8 171,000 km - Daily driver 1981 W123 300D ~ 100,000 miles / 160,000 km - project car stripped to the bone 1965 Land Rover Series 2a Station Wagon CIS recovery therapy! 1961 Volvo PV544 Bare metal rat rod-ish thing I'm here to chat about cars and to help others - I'm not here "to always be right" like an internet warrior Don't leave that there - I'll take it to bits!
|
 |
| Bookmarks |
| Thread Tools | |
| Display Modes | |
|
|


 Linear Mode


