

|
|
|
|
|
|
#31
 02-03-2007, 09:53 AM
|
||||
|
||||
|
My solution works too:
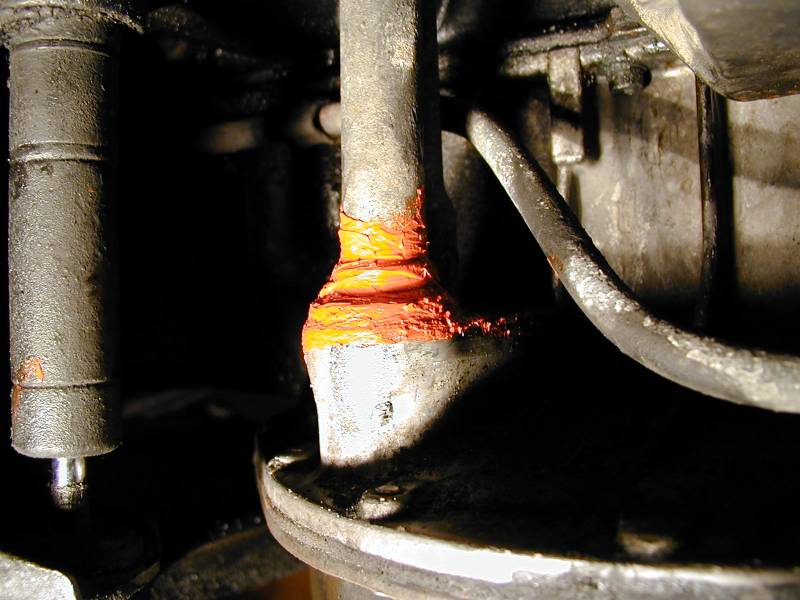 I did this over 1.5 years ago, hasn't leaked a drop since!  Cost: $4.29 for big tube of High-Temp Silicon, lots left for fuel filter sealing too!  Repair time: 5-7 minutes (clean off, apply, let it dry) Parts needed: 0
__________________
-diesel is not just a fuel, its a way of life-  '15 GLK250 Bluetec 118k - mine - (OC-123,800) '17 Metris(VITO!) - 37k - wifes (OC-41k) '09 Sprinter 3500 Winnebago View - 62k (OC - 67k) '13 ML350 Bluetec - 95k - dad's (OC-98k) '01 SL500 - 103k(km) - dad's (OC-110,000km) '16 E400 4matic Sedan - 148k - Brothers (OC-155k) Last edited by whunter; 01-02-2010 at 12:23 AM. Reason: attached picture 
|
|
#32
06-03-2008, 05:02 PM
|
|||
|
|||
|
So I changed the Air Cleaner Mount Bracket, Mounts, and added heat shields so that my turbo would not vibrate so much. While the housing was off, I noticed that the underside had a little cup with a hole cut in it and some fuel tube poking out of it. My charger still vibrates enough to shake off the U-boot after about 20 minutes of driving, though it's not as bad as it was before I replaced the broken bracket. I have an 81300SD Turbo and have replaced the engine mounts and engine shocks before I replaced the bracket. Do I need to go to the junkyard and get a new housing???
|
|
#33
08-11-2008, 04:05 PM
|
|||
|
|||
|
Oil separator tube o-ring
For those of you who are looking for the o-ring that goes on the oil drain tube from the air cleaner to the block the part number is 0069972645. If you search on that number in Fastlane you'll see it's the same one used on the oil dipstick.
|
|
#34
09-12-2008, 11:02 PM
|
|||
|
|||
|
I wish i had tried that.
Quote:
What if a few chunks fall into oil pan? Won't they just get caught in the filter? Can i wait till next oil change to get them out? I would just pull pan, but i did not order an oil pan gasket and i just changed my oil last weekend. I'd rather wait. G
__________________
What Would Rudolph Do? 1975 300D, 1975 240D, 1985 300SD, 1997 300D, 2005 E320 , 2006 Toyota Prius
|
|
#35
09-16-2008, 07:00 PM
|
|||
|
|||
|
Wasted weekend
I did this job. After getting it off friday night, put it on saturday. Forcing pipes to mate, got them finally. Looked at new grommet, it was busted. Had to silicone anyway. At least the silicone red rtv worked. Next time, i'm pulling the turbo.
That has got to be what mb had in mind. Not worth it doing it this way for me. Stresses grommet to much and is a pita.
__________________
What Would Rudolph Do? 1975 300D, 1975 240D, 1985 300SD, 1997 300D, 2005 E320 , 2006 Toyota Prius
|
|
#36
10-18-2009, 12:24 AM
|
|||
|
|||
|
Turbo Drain Gasket Replacement
I just finished replacing my lower rubber gasket that sits on top of the oil pan. What a PITA!! So brittle, I couldn't pull the attached pipe up and out. I had to drain the oil and drop the oil pan to get to it. Then, a 5mm allen head bolt stripped as I was unscrewing it from the pan. Two hours to figure out how to remove it. Finally, I just drilled it till the head torqued off. Now, I have to replace the bolt, but no biggie, there's about 20 other good ones holding the pan in place. The $2.10 turbo drain rubber part I replaced no longer leaks, nor does the oil pan gasket leak, but on the way home from the garage, I noticed my oil pressure was dropping. I got home and checked the oil level, and it's full, and no leaks, either. What's up? I suspect a filter or a screen is clogged? Which one? I don't want to damage my engine. It's got over 425k lovely miles, and is my grocery getter. Any thoughts? Skaa 1982 300SD 426k miles and counting
|
|
#37
03-18-2012, 12:25 AM
|
||||
|
||||
|
airbox and turbo drains
I just finished this job on ramps.
For the turbo drain tube.... First of all big thanks to Roy for helping with the order list that day. Those lower drain tube o-rings from Fastlane fit perfect and setup is nice and tight. Having a new grommet in your hands is like magic, compared to El Crusto you're taking out of you car. Getting the upper piece off the lower one and out of the engine compartment took what amounted to a Eureka moment when I hit the right angle with it and out she went. For the lower I had to cut off as much of the old grommet as I could, and strap up two hose clamps and leverage off whatever I could to pull the bottom tube up and out of the crankcase. When it came out I instantly realized why this job is better when you drop the pan and do the check valve all in one shot. All kinds of crud and the lower half of the bushing still in the crankcase!!!!!! Suctioned it down with the brake bleeder and vac, cleaned it out so gently, had to pick the bottom of the old grommet out.   I checked out the shape of the inside of the pan where the tube goes a little bit and went on to the turbo gasket. The old gasket was like a layer of rock, I scraped and wound up just scratching the old gasket, repeated spritzes with PB and scrapes of the razor and finally it was clean. Putting it back - I found a rather poorly tagged video hosted on youtube on the forums that gave me the visual of it happening. I chose to put the grommet on the tube first, I think it was easier. After monkey with it and straining on it the hose clamps I used to pull it out....I ended up folding up some card board into a pad and getting under it with both hands and pulling it STRAIGHT down with the pad. THUNK it slid in. Another Eureka moment. I pressed the grommet into and around the pipe and into the crankcase. I gave the new gasket a thinly dabbed with copper high temp sat it on the upper tube piece and got in there with the screws..again some twisting and fitting, AND I had to jump up on top of the car and nudge the gasket into place to fit the second bolt.  That was easy enough, I maybe should have done the airbox drain line first instead of the turbo. Didnt help my trans cooler line isnt quite right either. Routing that airbox drain line behind the bracket and under the wires and around the airbox bracket had me trying to remove the air box bracket...wow this whole airbox thing has to go I hate it. The air box tube kind of slides on the nipple sticking out of the crankcase with almost the same boomp as the lower turbo tube, it's like training for what you deal with reattaching the top.  In between looking for a wrench, cleaning everything..figuring out how to get the airbox drain tube back in, and routed around everything...it was my first time doing the job and my car is an '82 with an '85 motor, mismatched airbox if that contributed...and the breaks, all total I spent 6 hours from start to finish, way too long..I'm glad it's over
__________________
-SpecialDelivery 1985 300CD Silver/Blue H&R Suspension (Sold, still cryin over that) 1982 300SD Silver/Blue '85 OM617 (Sold) 1982 300D - Blue/Blue (Sold) Last edited by SpecialDelivery; 03-18-2012 at 01:57 AM.
|
|
#38
03-18-2012, 02:16 AM
|
|||
|
|||
|
The reason for leaks after the repair is the lower tube is not forced all the way up into the upper tube, locking the lower seal in place to fully expand the rubber fitting in the pan.
This job can be done without removing the upper tube, at least on a SD. The lower tube must be forced down into the pan removing the "O" ring from its seat in the rubber fitting. Now easy to pry the rubber fitting up the tube and out of the pan. The top of the lower tube will be below the cup end on the upper tube.(still in place) With the rubber fitting out of the pan, riding on the tube, there is just enough wiggle room to pull the lower tube up and out past the end of the upper tube. Now clean the tube, apply some grease slide on the new rubber fitting and a new "O" ring in the bottom grove. Keep the "O" ring and grove dry, no grease. This helps to keep the "O" ring in place. Grease the "O" ring seat in the rubber fitting. Sneak the tube back down the pan hole. Seat the new fitting all the way down into the pan. I use a crows foot for this from the top with a long extension. Now the tube must be forced up into the upper tube ALL THE WAY. Same crows foot under two gear clamps on the tube. Tap up with a small weighted hammer. You can see up into the upper tube with a flash light to see if the tube is all the way up.
__________________
1984 300SD turbo 126 "My true love" God made me an atheist and who am I to question His wisdom
|
|
#39
03-18-2012, 02:52 AM
|
||||
|
||||
|
Thank you so much for posting this... I had made that classic mistake. After reading your post, I thought about my lower tube where it went into the upper...nope it wasnt right....I rerigged the hose clamps and went prying...BOOMP it slid right to top-most in the upper tube. Pulled the lower grommet up several milimeters, so I reseated it in the crankcase.
 Quote:
__________________
-SpecialDelivery 1985 300CD Silver/Blue H&R Suspension (Sold, still cryin over that) 1982 300SD Silver/Blue '85 OM617 (Sold) 1982 300D - Blue/Blue (Sold)
|
|
#40
08-18-2013, 07:51 PM
|
||||
|
||||
|
Recycled
for new members
__________________
ASE Master Mechanic asemastermechanic@juno.com Prototype R&D/testing: Thermal & Aerodynamic System Engineering (TASE) Senior vehicle instrumentation technician. Noise Vibration and Harshness (NVH). Dynamometer. Heat exchanger durability. HV-A/C Climate Control. Vehicle build. Fleet Durability Technical Quality Auditor. Automotive Technical Writer 1985 300SD 1983 300D 1984 190D 2003 Volvo V70 2002 Honda Civic https://www.boldegoist.com/
|
|
#41
09-02-2013, 11:53 AM
|
||||
|
||||
|
I have tried the hi temp silicone treatment twice so far and still have some leakage. There is an area where it's hard to get a finger at on top of the oil pan. When this rain shower subsides I will try again. If that fails I will get the parts and try the gears method.
|
|
#42
09-03-2013, 10:45 PM
|
||||
|
||||
|
Well I put a 2nd coating of silicone over the drain and it still leaks. I should have tried to peel off the 1st coat entirely and then prepped the area with isopropyl alcohol. That is how I will proceed with the 3rd attempt. Onward!
|
|
#43
09-23-2013, 09:01 PM
|
|||
|
|||
|
Just removed the oil pan, removed the upper bent tube, broke the grommet off and pulled the lower straight tube from the upper bent tube.
??? Can't I just assemble the 2 tubes together while there out? I can slip the larger grommet on to the straight tube then proceed by slipping the upper and lower seal on such tube. I would then tap the lower and upper tubes together. Finishing up I would then push the joint tubes down into the lower opening and then pull out by holding the lower tube and install and secure at the upper flange using the 2 bolts. I haven't seen anything mentioning that the upper bent pipe needs to be seated and secured before adjusting the lower straight tube. After reading all of the replies it seems that it is super important to be sure that the lower pipe completely seats with the upper pipe. Please advise. I don't feel like playing around so if securing the top tube first then I will start there.. I only have 2 tube seals and the larger grommet. Own a w116 1979 300sd and was reading an earlier post that indicated some kind of valve (A6170180029) had to also be replaced. I believe the diesel was a 1984 300SD.. . Last edited by whunter; 09-23-2013 at 09:10 PM. Reason: spelling, readability
|
|
#44
12-19-2013, 02:33 PM
|
|||
|
|||
|
What's this knob do, for my turbo??
I have a 82 300sd. It has had multiple upgrades before i got it and I dint know what this adjustable (it turns clockwise and counter) knob is on the drivers side below the break release. And it has 2 thick hoses bout the size of a finger and I think they go to the turbo one connects up top the other below Hopefully the pic will help (i cant figure out how to upload more than 1 pic at a time). also are there different types of this knob?
The tubes run along the front of the fire wall and then down to the turbo
|
|
#45
12-19-2013, 03:18 PM
|
|||
|
|||
|
Quote:
__________________
Sam 84 300SD 350K+ miles ( Blue Belle )
|
 |
| Bookmarks |
|
|


 Linear Mode


