

|
|
|
|
|
|
#1
 12-03-2008, 12:54 AM
|
||||
|
||||
|
124 in-car pitman arm shaft seal repair, part 2
With confirmation from the forum that it's possible, I set out to replace the pitman arm shaft seal in the 87 300D. What I concluded as I got deeper into the job is that the pitman arm shaft seal is not the primary cause of fluid in the PS reservoir dropping 1cm every 3000 miles (between oil changes). The pitman arm shaft bearing carrier as viewed from below is rectangular with a bulge on one long side. That bulge accommodates the journal that lubricates the pitman arm shaft lower bearing. There's an o-ring between the main steering box case and the carrier. It's this o-ring that I suspect has failed.
I wasn't sure if the carrier would come out without the shaft but I'd have to remove the carrier while resealing the steering box on a bench and it's the first step in dpetryk's fabulous write-up so I thought I'd get a head start. a) Measure the gap between the bottom of the steering box and the top of the pitman arm. I measured 17.6mm. Heaven knows how I'll set the gap that precisely on installation. b) Remove the circlip holding the pitman arm to the shaft. It's not really holding anything since in my car the pitman arm sits a couple mm above the circlip. Looks like it's a safety net. Really? What are the chances that circlip will hold if an 8mm transverse bolt fails??? c) Remove the nut that takes a 17mm socket on a bolt that goes transverse to the pitman arm shaft. If you keep the head of the bolt pushed against the pitman arm, you won't need to keep the bolt from turning as you remove the nut. d) Use a pitman arm puller to draw off the pitman arm unless you're so lucky that your pitman arm comes off with hand pressure. I had to draw the pitman arm as far as the puller would go then reset with a spacer to get it off completely. It was not coming off with hand pressure. Push the pitman arm aside. I don't talk about tie rods and drag links because I left the pitman arm attached to the steering linkage. It's not in the way. There's a mark in the pitman arm shaft that points to the center of the break in the pitman arm. I'm using this as an alignment mark so I didn't make other marks. Make sure you have alignment telltales before you separate the pitman arm. e) I tried to remove the old shaft seal with a pick that's slightly beefier than the typical dental pick. No joy. If that was my objective, I'd take a long screwdriver, ram it into the seal and pry it out, hoping to not damage anything on the other side of the seal or gouge the pitman arm shaft. I didn't spend but a couple of minutes before moving on. f) Remove the 4 bolts that take a 13mm socket holding the carrier to the steering box. One of the bolts is in an unfriendly location so I removed the ground strap and used an extension through a notch in the car's frame and a u-joint on the socket. Worked like a charm. Removing the bolts was an odd experience because they became more difficult to spin a few turns after breaking the thread lock. They continued to be difficult to turn until the bolts were completely off. The bolts were soaked in hydraulic fluid, the awful smelly kind, and not corroded in any way. g) The carrier was no less willing to come off the steering box than the pitman arm. I thought the better of prying after trying a little bit  I took a punch and tapped one of the bolt holes, then tapped it the other direction. Then I wiggled it by hand a couple thousand times until it worked its way down the pitman arm shaft and off the steering box. I took a punch and tapped one of the bolt holes, then tapped it the other direction. Then I wiggled it by hand a couple thousand times until it worked its way down the pitman arm shaft and off the steering box.Here's how I left things. The journal to the right of the pitman arm shaft provides oil to the lower bearing in the carrier - 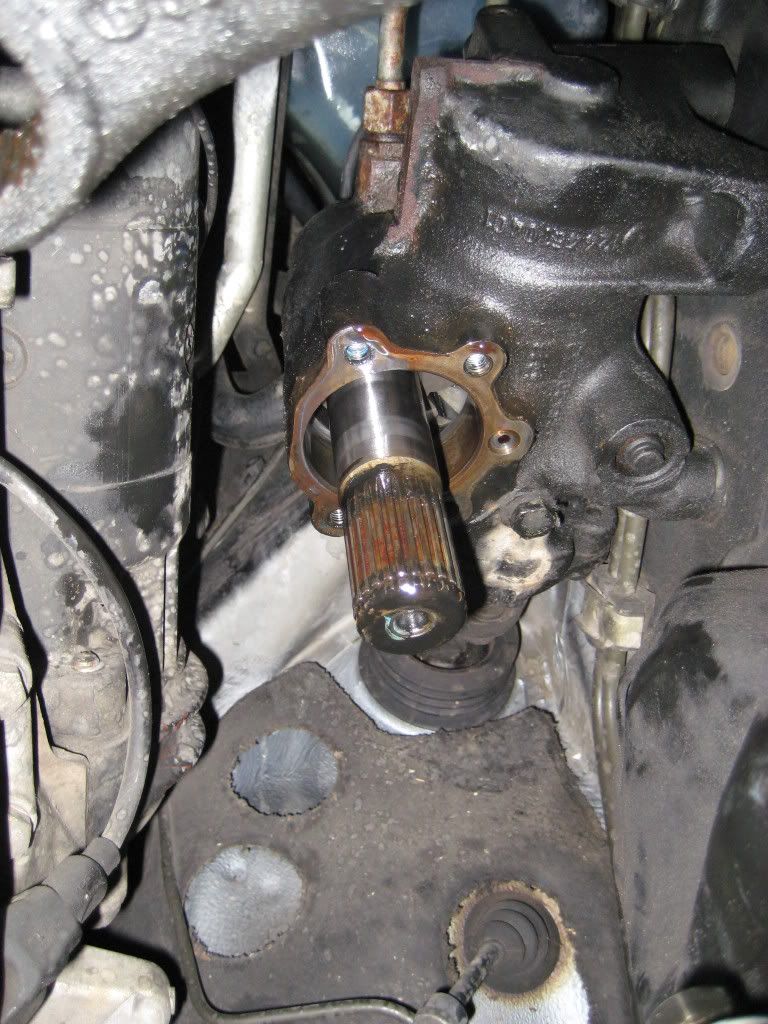 The hose fittings are bone dry, the area around the input shaft are bone dry, everything is dry except around the pitman arm shaft. Reason enough for me not to attempt a complete reseal. Resealing the pitman arm shaft bearing carrier calls for a seal and 3 o-rings: 019 997 50 47 008 997 60 48 009 997 42 45 021 997 16 48 (on-line EPC still shows 013 997 37 48) About $10 list price or $35 for a steering gear box seal kit from FastLane which contains these seals and 22 other bits. Fitting the seal and o-rings is uneventful. I tapped the seal with the butt of a 32mm socket after lubing with SilGlyd. You can check the seal to ensure it bottoms against the ridge in the carrier all the way around as you go. Don't forget the circlip over the seal though you can do it anytime before the pitman arm is attached. The big and medium o-rings are straightforward replacements. The smallest o-ring goes in a depression in the steering gear box. Sacrifice stray animals or neighbors' pets to ensure the o-ring stays in place as the carrier goes back in place. On the bench the steering gearbox would be upside down which removes the risk of the small o-ring moving. As the authors at Haynes say, installation is the reverse of removal - a) I wrapped the pitman arm shaft splines with clear plastic food wrap, lubed the plastic wrap, seal and o-rings with SilGlyd (dpetryk prefers petroleum jelly) then slid the carrier into place. It hits several snags as the seal and inner and outer o-rings contact the surfaces they seal. I couldn't find a socket deep enough to clear the pitman arm shaft so I tapped around the carrier until it was close enough to engage the bolts. Then I tightened each bolt a half turn at a time in sequence to draw the carrier to the steering box. Oh, at the point the seal was past the upper ends of the splines, I removed the plastic wrap. BTW, the frame member with the notch that allows a socket and extension to fit squarely on the forward right bolt is the frame member that houses the left rear lower control arm bushing. As I write this I remember that I didn't reattach the ground strap that bolts to this frame! b) Move the pitman arm into place keeping in mind the alignment marks or telltales. I used the notch in the pitman arm shaft against the gap in the pitman arm. Seeing as the pitman arm required the puller until it was completely free, it wasn't going to back easily. I used a 36mm socket as a drift. In retrospect I might have helped things by spreading the gap. The FSM calls for LokTite 270 which a google search indicates is red LokTite. I hope that interpretation is correct I got the pitman arm to 17.2mm of the steering box vs a pre-removal measurement of 17.6mm. I offered, to use another Haynes term, the pitman arm transverse bolt and it happily slid all the way through. I let the 0.4mm discrepancy slide. Tighten the nut on the transverse and fit the circlip at the lower end of the pitman arm shaft. That's all I had time for today. No need for a picture because it looks like it did before started work... except it's dryer and just a little cleaner A weak later the steering box is still dry edit - combined parts 1 and 2 into this thread as requested Sixto 87 300D Last edited by sixto; 12-09-2008 at 10:26 PM. 
|
|
#2
12-03-2008, 10:00 AM
|
|||
|
|||
|
Thanks for the effort
That was a great writeup all around. Since part2 was just one post with no pictures how about adding it to the part1 thread so all the information is one place? Once again thanks for taking the time to document the procedure.
|
|
#3
03-01-2010, 07:21 PM
|
||||
|
||||
|
Sixto, this is excellent info... I just have two questions:
1) Did you drain the power steering fluid from the reservoir and/or hoses prior to pulling the bearing cover? If not, how much fluid came out of the box when you got the cover loose from the housing? 2) Can you post a link to "dpetryk's fabulous write-up"? I was unable to locate it. 3) Armed with your writeup, I just did this on my E500 steering box, which is similar (but not identical) to the 6-cylinder boxes. I will post photos and more info here when I have it all compiled in a few weeks. Thanks! 
|
|
#4
03-02-2010, 01:14 AM
|
|||
|
|||
|
Quote:
The link to David Petryk's write-up is http://www.davidpetryk.net/Mercedes/Steering.htm and it is well worth saving. If you could post the sizes of the 3 "O" rings and the Oil Seal number, or O/D, I/D and width of it, for the pitman arm flange, when you have it apart, I would really appreciate it. I would guess they are all standard seals available at any specialist store and a fraction of the price of the complete kit. Thanks
__________________
Beagle
|
|
#5
03-02-2010, 01:21 AM
|
||||
|
||||
|
dpetryk's tutorial
How to repair the steering gear and not loose your balls.
EDIT: Ah well, the foxhound beat me to the reply.
__________________
'84 300SD sold 124.128
|
 |
| Bookmarks |
|
|


 Linear Mode


