 |
 |
 |
 |

|


|
|
|
|
|
|
#1
|
||||
|
||||
|
W123 Subframe bushing seating
In replacing the subframe bushings I am able to get the flange of the bushing up against the body with a jack and a saddle that presses on the edge of the flange, but by the time I get the jack out from under it, the plate on and the bolt in, the bushing is sitting about 1/4" from the body of the car.
How do I get it seated so that it will stay there?
__________________
Tim Irwin 1983 300D 1994 Miata R Package unnamed family car |
|
#2
|
||||
|
||||
|
Quote:
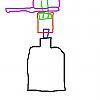
I was in such a hurry I didn't get any pictures, here's a quick drawing:  Black: jack; Blue: stub of 1/2" square bar stock; Red: socket; Green: bolt; Purple: bushing and spider plate. Doing it this way is a delicate operation as it would be entirely too easy to force the bolt into place and get it cross threaded. I can't remember how I avoided that.. maybe I turned the bolt backwards until it "clicked" and I knew it was meshed into the threads? I also think I used a sacrificial piece of wood between the top of the jack and the 1/2" bar stock stub as it was catching on the bumpy surface of my jack and not wanting to turn.. it's also more likely to compress if you jack too hard, although whether it will be enough to protect the bolt threads seems doubtful.
__________________
'83 300DTurbo http://badges.fuelly.com/images/smallsig-us/318559.png Broadband: more lies faster. |
|
#3
|
||||
|
||||
|
The bolt isn't the problem
I can get the bolt in fine using your method (already did that). The problem is that the "shoulders" of the bushing are still about 1/4" from the frame, which make it impossible to attach the droop stop (or whatever that "J" hook is). The bolt is torqued to spec w/ the shoulder still not against the frame.
__________________
Tim Irwin 1983 300D 1994 Miata R Package unnamed family car |
|
#4
|
||||
|
||||
|
I drove mine a bit, kept a 18" breaker bar and proper socket in the car. tightened it up every now and again for a week or two- it wore in.
__________________
1984 123.193 372,xxx miles, room for Seven. 1999 Dodge Durango Cummins 4BTAA 47RE 5k lb 4x4 getting 25+mpgs, room for Seven. |
|
#5
|
||||
|
||||
|
Picture
Worth a thousand words perhaps?
__________________
Tim Irwin 1983 300D 1994 Miata R Package unnamed family car |
|
#6
|
||||
|
||||
|
Mine would go into position, but they wouldn't stay in. I had almost to lift the car off the jack stand before it would go in, and then it'd pop back out as I dropped the jack to put the bolt in place.
Eventually, I figured that I was just compressing the rubber and it would never fit all the way in until it had collapsed. What I did got it together and it hadn't changed in the month before the cold weather set in. It has held all winter, but as soon as it warms up enough to handle tools confortably I do need to get under there and figure out what was really going on. As for the stops, I just set them so they were not touching but wouldn't allow any further movement.
__________________
'83 300DTurbo http://badges.fuelly.com/images/smallsig-us/318559.png Broadband: more lies faster. |
|
#7
|
||||
|
||||
|
Tim,
I had the same problem too. Take a look at the factory service manual and the tool they specify, that will give you an idea of what type of tool you will need to make up. The first thing - you need to lube the bushing up to get i to go fully in. Silicone spray or KY work. Second - you need to apply pressure to the outside of the bushing, not the middle. Out of 1" thick wood sheets I made two square cut outs with a hole in the middle to clear the center of the bushing. Then, using a solid piece of wood, I could push directly on the outside of the bushing, and not the middle. I lifted the car up on this jig to shove the bushing in. I can take from pics if you need em. Hopefully I have explained it clearly enough. Good luck, dd
__________________
------------------------------- '85 300D, 'Lance',250k, ... winter beater (100k on franken-Frybrid 3 Valve Kit) '82 300D, 'Tex', 228k body / 170k engine ... summer car '83 300TD Cali Wagon 210k, wife's car |
|
#8
|
||||
|
||||
|
pressing in subframe bushing ?
well what I do is take my ball joint kit and take out the largest ring in the kit and the top solid ring to set in the large ring, spray the bushing with lithiam grease and now set pump jack on block of wood put solid ring on top of jack and the large ring it will catch both sides of the metal in the bushing start pressing it in ,it always presses in very good for me, works every time now if you have a press you can drop the subframe and do the same thing in the press.
|
|
#9
|
|||
|
|||
|
I did this repair today and had the same results as Tim Irwin. You can substitute his pic for what mine currently looks like.
Any other follow-ups or long-term results? Do they settle in over time? I can keep the 24 mm socket and breaker bar on standby and re-visit the repair, as required. |
 |
| Bookmarks |
|
|