

|
|
|
|
|
|
#32
 08-29-2009, 06:17 PM
|
||||
|
||||
|
Quote:
 Be careful how you handle a head with the cam in place. Sixto 87 300D 
|
|
#34
08-29-2009, 08:48 PM
|
||||
|
||||
|
Sorry to hijack, do you know the M-B part number for the timing-chain tool?
__________________
 Gone to the dark side - Jeff
|
|
#35
08-29-2009, 10:57 PM
|
||||
|
||||
|
Quote:

|
|
#36
08-30-2009, 12:48 PM
|
||||
|
||||
|
Thanks, I'll be pricing one as I don't like the master-link method.
__________________
Gone to the dark side - Jeff
|
|
#37
08-30-2009, 12:53 PM
|
|||
|
|||
|
Lojacking right back. I loaded my tools into another car and drove to where my diesel is parked (near the indy's shop) early this morning, planning to compression test the engine. Yesterday afternoon I went to Harbor Freight and got their diesel compression test kit $25, and their socket kit for fuel injectors (29mm and 27mm). I removed the front 3 fuel lines, the turbo-maniforld connector, and the flexible fuel return lines - zeroing in on the noisy #2. Unfortunately the 29mm socket was formed with a split (to accomodate an Oxygen sensor?) that caused it to spread and slip under the hight torque - 1/2" breaker bar and 2' cheater tube. (Harbor Freight said I could return them, even if used.) So I'm waiting for Sears to open at 11am.
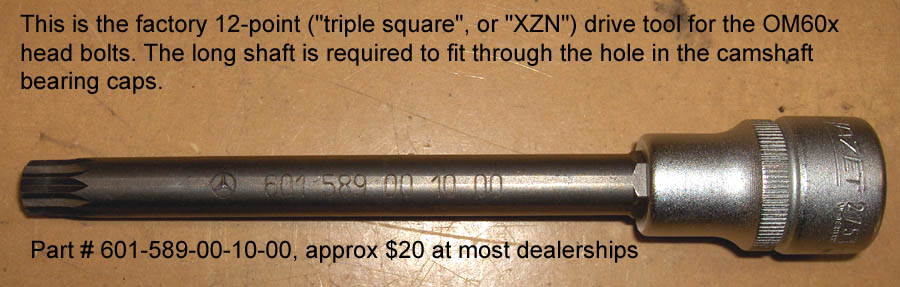
Tomorrow I'll get the "triple sq." at the dealer. (Do I need the timing chain tools that Jeff is lookng for, to remove the head? gsxr, thanks for the advice "to remove prechambers, do so BEFORE removing the head". I assume that means both the glowplugs and the injectors, right? Anyone know what both of these are torqued to? I was told by a local MB shop mechanic that he thought the injectors were about 125 lbs, and that the breaker/cheater sould work. I don't want to do harm to the alum head. And I assume they are LEFTY LOOSEY.
|
|
#38
08-30-2009, 01:01 PM
|
||||
|
||||
|
Quote:
And finally, make sure you're sitting down when you get the numbers... the basic tool + diesel swage jaws will set you back $375-$400. The assembly jaws (to press the center plate) will be $150, the case $45, temp master link set another $45, and retainer $30. Now you see why most folks don't buy the complete set, lol... 
|
|
#39
08-30-2009, 01:03 PM
|
||||
|
||||
|
You don't need to break the chain to remove the head. You need some way to pull the pins holding the upper chain guide. Search eBay for 'Mercedes pin puller.' Or you can stack washers (old injector heat shields work well) on a 6mm bolt to extract the pins.
Injectors are torqued to 75 Nm/55 lbft or something close to that. You won't harm the head because the injectors screw into prechambers, not the aluminum head casting. When fitting a regular deep socket over an injector, make sure you don't damage or deform the return line nipples. That's the value of a proper injector socket (27mm). If you get a generic deep socket, pick one with as little internal shoulder as possible. In many deep sockets the hex goes only about halfway up. You can't lower the socket completely over the injector. Sixto 87 300D
|
|
#40
08-30-2009, 01:12 PM
|
||||
|
||||
|
Quote:
Quote:
Quote:
Torque specs are in the factory manual. Injector spec is 60-70Nm (about 45-50 lb-ft), not 125 lb-ft, sheesh! The lock rings for the prechambers are 100Nm for vertical injection, 130Nm for angular injection. PLEASE read the factory manual procedures before tearing into any 60x engine. These do not respond well to "wrench first, ask questions later". 
|
|
#41
08-30-2009, 01:23 PM
|
||||
|
||||
|
Can the pre-chambers be removed with a plastic mallet from the piston side? Bad idea?
__________________
Gone to the dark side - Jeff
|
|
#42
08-30-2009, 01:38 PM
|
||||
|
||||
|
Quote:

|
|
#44
08-30-2009, 04:05 PM
|
||||
|
||||
|
Smoke after idle
Quote:
The car came to me in November 2007 with an indicated 134,000 miles and zero service history (yes, I shouldn't have bought it). Because the engine smoked a little on acceleration and because it used about 1 quart of oil per thousand, I had suspected leaking valve stem seals as one possibility. Local inquiries as to the easy availability of a valve spring compressor came up negative so I instead had the indy do a compression and leakdown test. The results were compression (cyls 1 --> 6) 400 - 300 - 460 - 410 - 420 - 380 and leakdown 20% on cyl #2 past the rings.  This was at sea level on a warm engine. This was at sea level on a warm engine.From this I inferred that a PO had overheated the engine, cracked the head, and slightly melted the #2 piston, which got some aluminum in the ring lands, preventing the rings from completely sealing. The PO replaced the head with another #14 (probably locally rebuilt with aftermarket valve seals) but went no deeper into the engine (yes, I shouldn't have bought it). Since the engine starts and runs well and gets 25-30 mpg, I chose to ignore the problem. The car now has 150,000 miles and continues to perform well except for the oil usage, which I can live with. Smoke upon acceleration has actually diminished (although it comes and goes) except after extended idling, which I rarely do. Given gsxr's experience with aftermarket valve seals, I'm wondering whether it's worth the bother (and expense!) of having the seals replaced, given that it won't do anything to the #2 compression/leakdown problem (yes, I shouldn't have bought it). If the head does have leaky valve seals, replacement might reduce the oil usage (a feel-good sort of thing). So, how much work is required to tell the kind of seals? Jeremy
__________________
 "Buster" in the '95 Our all-Diesel family 1996 E300D (W210) . .338,000 miles Wife's car 2005 E320 CDI . . 113,000 miles My car Santa Rosa population 176,762 (2022) Total. . . . . . . . . . . . 627,762 "Oh lord won't you buy me a Mercedes Benz." -- Janis Joplin, October 1, 1970
|
|
#45
08-30-2009, 04:29 PM
|
||||
|
||||
|
You can't see the seals unless you remove the valve spring retainer, so the same work as replacing them.
__________________
Gone to the dark side - Jeff
|
 |
| Bookmarks |
|
|


 Linear Mode


