

|
|
|
|
|
|
#1
 12-06-2009, 11:05 AM
|
||||
|
||||
|
Shocks questions
I have my new Bilsteins and am now trying to schedule when to get this done. At this point I don't see having an entire day to do all 4 for some time. I know it's going to take two or three times as long as any of you think it should due to our newbie-ness and the methodical way I do things. I'm now thinking that I'll do two at a time and wonder if it would be better to do the fronts or the backs first. Since they're all leaking pretty good and my indy says he thinks they're the originals, would there be a control issue after doing only the backs first, assuming the car'd be driven for a few days before doing the fronts? I really want to get started on this but with all this silly merriment and unpleasant socializing that's going on this time of year it's hard to find a nice stretch of uninterrupted time.
__________________
You're a daisy if you do. __________________________________ 84 Euro 240D 4spd. 220.5k sold  04 Honda Element AWD 1985 F150 XLT 4x4, 351W with 270k miles, hay hauler 1997 Suzuki Sidekick 4x4 1993 Toyota 4wd Pickup 226K and counting 
|
|
#2
12-06-2009, 11:25 AM
|
||||
|
||||
|
I don't think it will take that long, even for a newbie, but if so, do the fronts first, they are more important for proper handling of the car.
__________________
 "Buster" in the '95 Our all-Diesel family 1996 E300D (W210) . .338,000 miles Wife's car 2005 E320 CDI . . 113,000 miles My car Santa Rosa population 176,762 (2022) Total. . . . . . . . . . . . 627,762 "Oh lord won't you buy me a Mercedes Benz." -- Janis Joplin, October 1, 1970
|
|
#3
12-06-2009, 11:54 AM
|
|||
|
|||
|
Contrary opinion: I'd recommend the rear first, since they're easier and you're less likely to get distracted by "Hey - what's this? Should it be like this? Let me see..."
You'll undoubtedly want to putter around and look at stuff and even with methodically cleaning and checking stuff out doing both rear shocks should only take a 2-4 hours, max. I can't imagine causing any handling problems by fixing a leaking shock. The "danger" I've found in doing small repairs is that there's never just one repair and you get drawn into fixing the previously unknown problem.
|
|
#4
12-06-2009, 12:02 PM
|
|||
|
|||
|
I'd suggest that you do the rear shocks first for the simple reason that they are relatively easy to do and there is little chance for failure.
The front shocks are a PITA because of the restricted space, the requirement for a 1/4" drive, 10mm, 12 point socket and universal joint, and the risk of snapping the screws that secure the shock to the lower control arm. Do yourself an extreme favor and soak the screws in Kroil for a few days before making the attempt. Some heat will also assist. This is a procedure where knowing the limit for applied torque is very valuable. Snapping those screws will ruin your day.
|
|
#5
12-06-2009, 12:09 PM
|
|||
|
|||
|
Quote:
__________________
84 300D 255K "Mr B" ("Mr Becker") 79 300D 265K "Mrs B" 85 300TD 175K "Mali" (Sold) 74 Ford F-100 74K "Bonnie" (Sold) 67 Jeepster Commando (Sold) 
|
|
#6
12-06-2009, 12:17 PM
|
||||
|
||||
|
This one came with a set of front Bilstiens, 3/8 inch drive.
__________________
83 SD 84 CD
|
|
#7
12-06-2009, 12:41 PM
|
|||
|
|||
|
That must be the 12 point socket. I bought a set of 12 pointers at harbor freight, but they were 1/2" and they didn't have any smaller, so I had the craziest series of adapters I've ever had, going from 1/2 to 3/8 and back to 1/2 with a 10" extension in between!
Anyway, I just did the front and the passenger side was a pain, but the driver side literally took like twenty minutes. I don't know why. You likely already know, but at least on a 300D removing the coolant expansion tank is very helpful if not necessary. removing the air filter housing might make it even easier but I didn't do that. I figured the rears were harder because of the self leveling hardware, but I guess not, so I'll be paying attention to this thread. I haven't done the rear yet. Oh yeah, I replaced those 12 point bolts with automotive grade hex bolts. Probably sacrilege for some reason unknown to me, but I did it. White KYB's and shiny new hardware is a sure contrast to the rest of the front end.
__________________
 84 300D, 303K 71 MGBGT, ?K 96 GMC C1500, 115K
|
|
#8
12-06-2009, 01:15 PM
|
|||
|
|||
|
My 3/8 drive, 12-point Craftsman socket worked fine on the fronts. You'll also need a 17 mm wrench, and a 7 mm or 8 mm wrench to keep the shock shaft from spinning. The problem I had on removing the original fronts on my '83 was that the locking nut and fastening nut were stuck together. I ended up using the dremel cut-off wheel on the top nut. I had no troubles on the rear.
Do yourself a favor and take it to the pressure washer before working on either end. Even in rust-free AZ, you're going to have oil-saturated dust on most of the parts. Regardless if you choose the fronts first or rears first, the penetrating oil is a good tip. Clean the parts, assemble the tools and soak the parts one weekend, then do the repair the next. That way you can tinker for a few hours, then festivize and have sparkling party conversation about fixing your 30-year old car.
|
|
#9
12-06-2009, 02:55 PM
|
||||
|
||||
|
Quote:
__________________
83 SD 84 CD
|
|
#10
12-06-2009, 05:17 PM
|
||||
|
||||
|
I think the fronts are easier too. I use a 1/2" drive socket with an extension and breaker bar. To get it in you must take the top out and swing it forward and backward to get a straight in shot at the 12 point fastener.
If you do it this way it is a piece of cake.
__________________
[SIGPIC] Diesel loving autocrossing grandpa Architect. 08 Dodge 3/4 ton with Cummins & six speed; I have had about 35 benzes. I have a 39 Studebaker Coupe Express pickup in which I have had installed a 617 turbo and a five speed manual.  [SIGPIC] [SIGPIC]..I also have a 427 Cobra replica with an aluminum chassis.
|
|
#11
12-06-2009, 05:29 PM
|
|||
|
|||
|
Quote:
If the W123 accepts the larger 3/8" drive with no difficulty, the available space is definitely greater.
|
|
#12
12-06-2009, 05:31 PM
|
||||
|
||||
|
^I don't think so, haven't worked on the SD's shocks yet.
__________________
83 SD 84 CD
|
|
#13
12-06-2009, 05:59 PM
|
|||
|
|||
|
I replaced all the shocks on my W116 in less than 2 hrs. Needed to jack the back of the car up pretty high to drop the shock out. I used a box end wrench for the funny bolts on the front shocks. Can't turn it a lot with each bite but entirely doable.
Schedule the job when your mother in law is visiting and you'll be happy to take your time.
__________________
1977 300d 70k--sold 08 1985 300TD 185k+ 1984 307d 126k--sold 8/03 1985 409d 65k--sold 06 1984 300SD 315k--daughter's car 1979 300SD 122k--sold 2/11 1999 Fuso FG Expedition Camper 1993 GMC Sierra 6.5 TD 4x4 1982 Bluebird Wanderlodge CAT 3208--Sold 2/13
|
|
#14
12-06-2009, 06:31 PM
|
|||
|
|||
|
I'll post again on this thread instead of thew one I started two days ago. I thought the 300D sedan was self leveling as well, but that shows what I know. I look forward to replacing the rear shocks now!
Here is a pic of my old shock and the new KYB. You can see how much longer the threaded top screw is. I thought maybe a bushing went underneath the mount and then one more on top, but realized today that it makes no sense as the shock has a raised area that actually slots into the underside of the hole in the top mount (does that make any sense?) so I double bushed the top so I wouldn't run out of thread. I placed a metal cap between the two bushings. Couldn't figure out any other way to solve that particular issue. Anyway, I tightened everything up today and its pretty nice. Something else is loose down there (control arm bushings possibly) so my work continues, but I'm done until new years anyway. Good luck to everyone else. 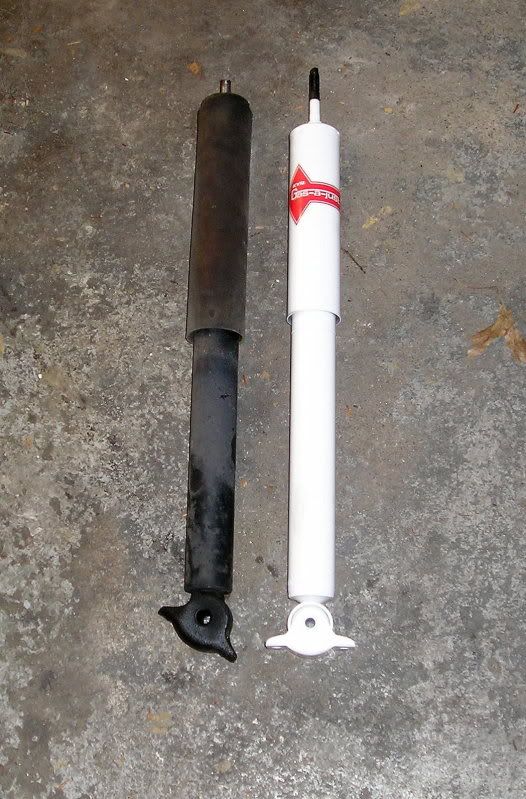
__________________
84 300D, 303K 71 MGBGT, ?K 96 GMC C1500, 115K
|
|
#15
12-06-2009, 06:33 PM
|
|||
|
|||
|
Quote:
Not owning either a W124 or a W126, I can't say for sure. I think the accumulation of advice for the OP stands, though: a good 10 mm 12-point socket is required; maybe a 1/4 or a 3/8 drive - having both wouldn't hurt; probably an extension and/or u-joint. One advantage of going with Bilsteins was they provide new 12-point bolts with the shocks so you can test fit the size of the sockets before trying the repair. If you don't have anything in the tool box that'll fit, you can do the tool run early.
|
 |
| Bookmarks |
|
|


 Linear Mode


