

|
|
|
|
|
|
#76
 08-14-2010, 01:17 PM
|
||||
|
||||
|
Quote:
I was thinking to just leave those bolts slightly loose, bolt up the subframe/trailing arms, install the axles, and then use floor jacks to achieve the straightened position as outlined in FSM article 35-110. I would install the springs afterward with the spring compressor. Does this make sense?
__________________
------------------------------- '85 300D, 'Lance',250k, ... winter beater (100k on franken-Frybrid 3 Valve Kit) '82 300D, 'Tex', 228k body / 170k engine ... summer car '83 300TD Cali Wagon 210k, wife's car 
|
|
#77
08-14-2010, 01:25 PM
|
||||
|
||||
|
Rear Wheel Bearings
My two rear wheel bearings have different amounts of force needed to turn them. They both roll fine, but the difference it takes to turn them by hand is noticeable.
I have seen dmorrisons DIY write up on rear bearings and I don't know if I have the time and tools needed to deal with that right now (I'm in pretty deep right now, dont you think ?  ) )Could I take my uninstalled trailing arms to an indy and have them re-pack the bearings and put new races in? Or should I not worry about it until it presents a problem?
__________________
------------------------------- '85 300D, 'Lance',250k, ... winter beater (100k on franken-Frybrid 3 Valve Kit) '82 300D, 'Tex', 228k body / 170k engine ... summer car '83 300TD Cali Wagon 210k, wife's car
|
|
#78
08-14-2010, 01:55 PM
|
||||
|
||||
|
Quote:
If you do that it won't be a weekend job anymore... Take a look at what I did:- W123 rear wheel bearing removal help needed In the end I took them apart and re-greased as the bearings were fine. However, it is a fiddly job and you need dealer supplied spares (if you're not prepared to buy a whole bearing kit just for the seals / crush washers / rings)
__________________
1992 W201 190E 1.8 171,000 km - Daily driver 1981 W123 300D ~ 100,000 miles / 160,000 km - project car stripped to the bone 1965 Land Rover Series 2a Station Wagon CIS recovery therapy! 1961 Volvo PV544 Bare metal rat rod-ish thing I'm here to chat about cars and to help others - I'm not here "to always be right" like an internet warrior  Don't leave that there - I'll take it to bits!
|
|
#79
08-14-2010, 01:56 PM
|
|||
|
|||
|
Quote:
I don't think you can tighten the bolts when the ass'y is installed. You just don't want to tighten them with the trailing arms in the fully up or down position. The need to be close to resting (car on the ground) position.
|
|
#80
08-14-2010, 01:58 PM
|
|||
|
|||
|
Quote:
|
|
#81
08-14-2010, 02:00 PM
|
||||
|
||||
|
Quote:
I put the springs in last after I got everything aligned.
__________________
1992 W201 190E 1.8 171,000 km - Daily driver 1981 W123 300D ~ 100,000 miles / 160,000 km - project car stripped to the bone 1965 Land Rover Series 2a Station Wagon CIS recovery therapy! 1961 Volvo PV544 Bare metal rat rod-ish thing I'm here to chat about cars and to help others - I'm not here "to always be right" like an internet warrior Don't leave that there - I'll take it to bits!
|
|
#82
08-15-2010, 02:02 PM
|
||||
|
||||
|
Im at the degreasing and washing stage now prepping for paint...
Regarding the diff - I covered the holes as best I could and plugged the axle holes with paper towels. I don't think any water got in it. Regardless, would it be a bad idea to clean it out with brake cleaner before re-assembly to make sure everything is dry? Things are looking great....
__________________
------------------------------- '85 300D, 'Lance',250k, ... winter beater (100k on franken-Frybrid 3 Valve Kit) '82 300D, 'Tex', 228k body / 170k engine ... summer car '83 300TD Cali Wagon 210k, wife's car
|
|
#83
08-15-2010, 03:30 PM
|
||||
|
||||
|
Great stuff
Quote:
Here's a picture of the inside of my diff after I cleaned it out
__________________
1992 W201 190E 1.8 171,000 km - Daily driver 1981 W123 300D ~ 100,000 miles / 160,000 km - project car stripped to the bone 1965 Land Rover Series 2a Station Wagon CIS recovery therapy! 1961 Volvo PV544 Bare metal rat rod-ish thing I'm here to chat about cars and to help others - I'm not here "to always be right" like an internet warrior Don't leave that there - I'll take it to bits!
|
|
#84
08-15-2010, 05:50 PM
|
||||
|
||||
|
So brake cleaner in the diff is OK?
Now im debating whether to replace the side seals...they dont leak.
__________________
------------------------------- '85 300D, 'Lance',250k, ... winter beater (100k on franken-Frybrid 3 Valve Kit) '82 300D, 'Tex', 228k body / 170k engine ... summer car '83 300TD Cali Wagon 210k, wife's car
|
|
#85
08-15-2010, 10:35 PM
|
|||
|
|||
|
Quote:
Couldn't be any worse than the nasties that I found in there when I pulled the cover. Last edited by Whiskeydan; 08-15-2010 at 11:02 PM.
|
|
#86
08-15-2010, 11:59 PM
|
||||
|
||||
|
Quote:
All the big parts are now de-resuted, stripped and sanded, degreased, acid etched and ready for POR-15. Rain moving in prevented any additional progress. Tomorrow I rebuild the axles, and prep the bottom of the car for paint. I also have a spun bolt mount to attend to, and I'll pull the rest of the driveshaft in preparation for the re-install. It'll be raining, no POR-15 work :-( Thanks agin Army, charmalu and Whiskeydan...
__________________
------------------------------- '85 300D, 'Lance',250k, ... winter beater (100k on franken-Frybrid 3 Valve Kit) '82 300D, 'Tex', 228k body / 170k engine ... summer car '83 300TD Cali Wagon 210k, wife's car
|
|
#87
05-04-2012, 08:58 PM
|
|||
|
|||
|
FYI
For anyone who is looking to replace the rear subframe mounts in their w123... An easy way to seat the new mounts to the subframe is to use a 6" C clamp. I didn't see it mentioned anywhere in any of the DIY write ups. FSM calls for a special tool for the job but the c clamp worked great.
__________________
Current fleet 2006 E320 CDI 1992 300D - 5speed manual swapped former members 1984 300D "Blues Mobile" 1978 300CD "El Toro"
|
|
#88
06-17-2012, 12:48 AM
|
|||
|
|||
|
I've got to replace the rear subframe mounts (front donuts) and also the rear trailing arm bushings (all 4 bushings). Do I have to take out the rear axle/diff to do this job? I'm hoping to just lower each side. Car is on a 2 post lift and I've got a transmission jack, screw post style. Any help would be appreciated. Also, any tips on removal and replacement on the trailing arms? I would not think a car should be designed to remove such a large assembly to replace these parts.
|
|
#89
06-17-2012, 01:11 PM
|
||||
|
||||
|
Quote:
I think you are going to find it easier to remove the whole sub frame with the differential still attached to the sub frame especially if you are doing the trailing arm bushings. Haynes says that if you are just doing the sub frame bushings you can do one side at a time by dropping them down on a jack. My problem with this recommendation is that this will (in my opinion) twist the mount to the rear of the differential excessively. OK if you are replacing it anyway (and do it as the last thing) but the sub frame mounts get twisted quite a bit doing it this way too. Using this method you'll be twisting one new sub frame mount quite a bit to get the last mount in place. I've read that some people have done trailing arm bushings without removing them all the way from the car - I say make your life easier! You'd have to lower the sub frame quite a way to be able to remove the nuts on the bolts that hold the sub frame in place anyway... Removing 25+ year old bushings on a trailing arm under a car? No thanks - much easier on a bench! Best tip I've picked up since starting this thread is to leave the wheels on the hubs and roll the whole sub frame with everything still on it out from under the car. It works a treat so long as you can raise the car up high enough at the back.
__________________
1992 W201 190E 1.8 171,000 km - Daily driver 1981 W123 300D ~ 100,000 miles / 160,000 km - project car stripped to the bone 1965 Land Rover Series 2a Station Wagon CIS recovery therapy! 1961 Volvo PV544 Bare metal rat rod-ish thing I'm here to chat about cars and to help others - I'm not here "to always be right" like an internet warrior Don't leave that there - I'll take it to bits!
|
|
#90
06-17-2012, 01:28 PM
|
||||
|
||||
|
Here's a picture showing what I mean about the sub frame just being wheeled out
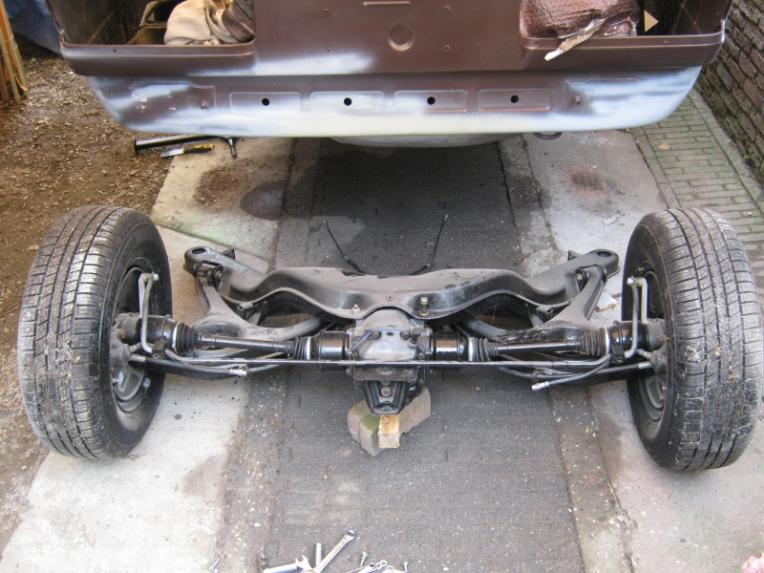 Does anyone want step by step instructions for this?
__________________
1992 W201 190E 1.8 171,000 km - Daily driver 1981 W123 300D ~ 100,000 miles / 160,000 km - project car stripped to the bone 1965 Land Rover Series 2a Station Wagon CIS recovery therapy! 1961 Volvo PV544 Bare metal rat rod-ish thing I'm here to chat about cars and to help others - I'm not here "to always be right" like an internet warrior Don't leave that there - I'll take it to bits!
|
 |
| Bookmarks |
|
|


 Linear Mode


