

|
|
|
|
|
|
#46
 11-09-2010, 05:06 PM
|
|||
|
|||
|
Quote:
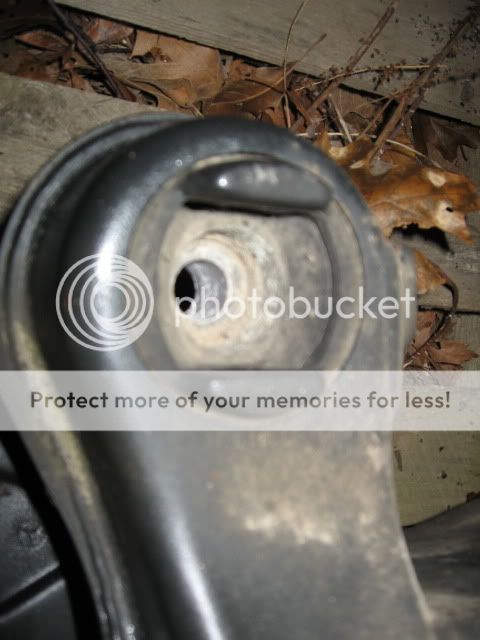 The one from above shows why that approach won't work; until you stretch the rubber enough youll never reach the mounts metal bushing. So forget that for now, although some penetrant in and onto the stud could only have helped. From below does your view match this picture? 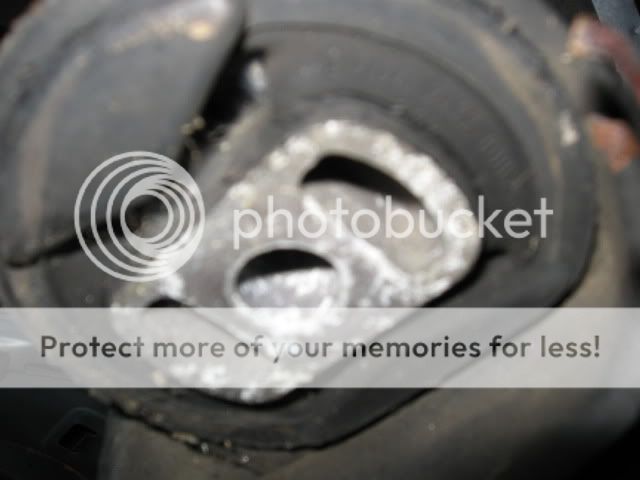 If so that is where your efforts should be directed! It looks like the entire metal bushing is exposed. What you need to accomplish is to hit that hard with a decent hammer and punch/drift/chisel. You want to hit it so that you are rotating it around the tubular stud at its center. Give it a hard whack on one side and then the other, you just need it to break free and move a little. You want to direct your blows in the direction of the poorly drawn Chartreuse arrow points and attempt to get the mount to move in that rotation. 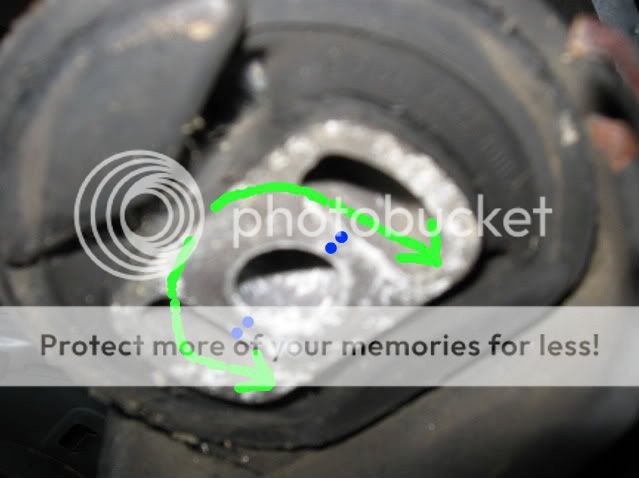 Before doing that if you're worried about the subframe falling just reinstall a couple of the mount bolts, the other rear one and the diagonally opposite front one, that way it can't come crashing down. You don't need them turned all the way home just a couple rotations, clean any residual thread lock off before you do and it will make it a little easier, just be careful and make sure the bolts are straight and square you don't want any cross threading. With everything secured try and hit the metal bushing to turn it, if you dont get some results after the first ten or twenty hits, you could try heating the metal bushing with a torch, just have some water or an air blowgun at hand to keep things from getting out of hand and of course a fire extinguisher so you don't burn the place down. Get it hot, it doesn't need to be red or anything like that, just too hot to touch. Then give it the heavy hammer treatment again. If by some chance you still are unsuccessful, you can destroy the metal bushing itself, hopefully you've got a decent drill and a cobalt bit or two. Depending in the size of the bit you have drill a hole or holes straight upwards in parallel with the tubular stud. I put a couple blue spots in the general place which appears to be the weakest part of the metal bushing where you would drill! That alone might do the trick, especially is you carefully wobble the spinning drill gouging the sided of the hole/holes some. If not after you've removed as much material as possible with the drill, it's time for a cold chisel and a hammer. Put the chisel across where you drilled and there are only webs of material holding it together and use the chisel to destroy the remaining webs. If you have shop air a pneumatic impact hammer might well work in substitute for a swung hammer and chisel n both these methods, trying to turn/loosen the mount and later if need be splitting the mount off the stud. Usually Harbor Freight has them for around $10-15. I'd try it old school first, but your size and strength might not be enough and the air tool will allow you to use its power and your brain to get it done easier perhaps. Good Luck, don't get discouraged, this stuff is the real deal, anyone can change oil and brake pads! Youre doing great! When it gets time to install your nice pretty new rehabbed sub frame , are we going to slather the inside of those metal bushing and the outside of those tubular studs with Permatex Never-Seize? Your damn right we are!!!! 
|
|
#47
11-09-2010, 05:20 PM
|
||||
|
||||
|
Quote:
 You better believe it! I want this to go a lot smoother when I do it again in 250,000 miles. You better believe it! I want this to go a lot smoother when I do it again in 250,000 miles. Thanks so much for the ideas ... I hadn't thought of using a punch to rotate the metal part. I tried whacking it from underneath just thinking it might knock something loose but, a side blow would probably help a lot more. That's why I thought sawing it apart might help ... but I'd much rather not enter that battle if I can get it loose while intact. I'll try it tomorrow! I appreciate the encouragement ... it's so frustrating when one gets really, really close to completing a big step and then one little thing (or big thing) gets stuck! Then again I guess the more gets stuck, the more I learn about design and physics. 
__________________
1987 300D, arctic white/palomino--314,000 miles 1978 240D 4-speed, Euro Delivery, light ivory/bamboo--370,000 miles 2005 Jeep Liberty CRD Limited, light khaki/slate--140,000 miles 2018 Chevy Cruze diesel, 6-speed manual, satin steel metallic/kalahari--19,000 miles 1982 Peugeot 505 diesel, 4-speed manual, blue/blue, 130,000 miles 1995 S320, black/parchment--34,000 miles (Dad's car)
|
|
#48
11-10-2010, 01:20 AM
|
||||
|
||||
|
I tried hitting it rotationally a few times tonight, but it didn't budge. I'll try again tomorrow ... I didn't want to keep the neighbors away with incessant whamming at 1 a.m. I may have to resort to the drilling.
I think these mounts are trying to top the dreaded '78 UCA bolt for the Most Obnoxious Stuck Thing in my history of DIYing.
__________________
1987 300D, arctic white/palomino--314,000 miles 1978 240D 4-speed, Euro Delivery, light ivory/bamboo--370,000 miles 2005 Jeep Liberty CRD Limited, light khaki/slate--140,000 miles 2018 Chevy Cruze diesel, 6-speed manual, satin steel metallic/kalahari--19,000 miles 1982 Peugeot 505 diesel, 4-speed manual, blue/blue, 130,000 miles 1995 S320, black/parchment--34,000 miles (Dad's car)
|
|
#49
11-10-2010, 09:11 AM
|
|||
|
|||
|
Quote:
Another thought, are you swapping in a new (or should I say a more corrosion free) replacement subframe? If the old subframe is going to be scrapped you have lots of new possibilities for non-standard (read destructive) removal options. Sawzall, cut-off wheel, plasma cutter, torch, ect, ect.
__________________
98 Dodge-Cummins pickup (123k) 13 GLK250 (135k) 06 E320CDI (323K) 16 C300 (62K) 82 300GD Gelaendewagen (54K)
|
|
#50
11-10-2010, 12:36 PM
|
||||
|
||||
|
Quote:
__________________
1987 300D, arctic white/palomino--314,000 miles 1978 240D 4-speed, Euro Delivery, light ivory/bamboo--370,000 miles 2005 Jeep Liberty CRD Limited, light khaki/slate--140,000 miles 2018 Chevy Cruze diesel, 6-speed manual, satin steel metallic/kalahari--19,000 miles 1982 Peugeot 505 diesel, 4-speed manual, blue/blue, 130,000 miles 1995 S320, black/parchment--34,000 miles (Dad's car)
|
|
#51
11-10-2010, 04:36 PM
|
||||
|
||||
|
No luck. I did not try the drilling yet, because I'm concerned the drill will go right up into the post (the post overlaps the hole in the bottom of the mount). But I have hammered the life out of it, pried at it to the point that the car frame is getting deformed by the bar, tried putting hard objects down the top of the mount and pushing on those, torched it, hit it HARD from the side (to rotate it loose) and the bottom and put about half a can of Kroil in it. I tried a sawzall to cut the rubber but it won't fit or work right, and hand sawing I've cut into about 2 mm in a half hour. I can try the drilling but would have to be super precise -- and lucky -- not to hit that post. My only other idea was to drill large holes in the rubber, then hand saw between those.
This is really eating at me. 
__________________
1987 300D, arctic white/palomino--314,000 miles 1978 240D 4-speed, Euro Delivery, light ivory/bamboo--370,000 miles 2005 Jeep Liberty CRD Limited, light khaki/slate--140,000 miles 2018 Chevy Cruze diesel, 6-speed manual, satin steel metallic/kalahari--19,000 miles 1982 Peugeot 505 diesel, 4-speed manual, blue/blue, 130,000 miles 1995 S320, black/parchment--34,000 miles (Dad's car)
|
|
#52
11-10-2010, 05:06 PM
|
||||
|
||||
|
I feel for you, hope it falls out while you're reading posts.
Heat should be your friend, the aluminum will expand much more than the steel post when heated. It's unfortunate that Mercedes chose to put aluminum and steel together, they don't play nice. I had the opposite situation with aluminum in steel once, ... a little time in liquid nitrogen cured it. Hopefully heat will cure yours.
__________________
 Gone to the dark side - Jeff
|
|
#53
11-10-2010, 05:58 PM
|
||||
|
||||
|
Quote:
It's been a "when it rains ..." kind of week. If this subframe would just come out for me, it would really bring the sunshine out ...
__________________
1987 300D, arctic white/palomino--314,000 miles 1978 240D 4-speed, Euro Delivery, light ivory/bamboo--370,000 miles 2005 Jeep Liberty CRD Limited, light khaki/slate--140,000 miles 2018 Chevy Cruze diesel, 6-speed manual, satin steel metallic/kalahari--19,000 miles 1982 Peugeot 505 diesel, 4-speed manual, blue/blue, 130,000 miles 1995 S320, black/parchment--34,000 miles (Dad's car)
|
|
#54
11-10-2010, 06:56 PM
|
|||
|
|||
|
How about trying to use a harmonic balancer puller on your subframe?
You could thread the bolt into the post and then use the bolt head as a center pulling point for the threaded piece of the puller. The arms of the puller could then catch the lip on the subframe and you could put quite a bit of force directly down on the subframe.
__________________
98 Dodge-Cummins pickup (123k) 13 GLK250 (135k) 06 E320CDI (323K) 16 C300 (62K) 82 300GD Gelaendewagen (54K)
|
|
#55
11-10-2010, 08:01 PM
|
|||
|
|||
|
then hit it with a hammer while its under said force. With luck..."pop" and off it comes.
__________________
Hanno '79 6.9 Sold (after 27 years) '83 280SL, 5 spd. '94 E320 Sdn. 5 spd conversion '02 E320 Sdn.(on loan to mom!) '87 300E (5 spd. conversion) Sold '05 E500 Wagon
|
|
#56
11-12-2010, 04:08 PM
|
||||
|
||||
|
No luck. I've been at this for five days now and made zero progress. I did try to basically drill out the rubber portion of the bushing, but it's much harder than I thought, and all I've done is weaken the rubber, so there's no hope of pulling the bushing off using force applied to the rubber. I torched the metal part quite a bit and hammered the living heck out of it and it won't even wince. Also tried clamping it in vice grips and prying at it with every bar, screw driver, wedge, punch, etc. in the garage. The only thing I haven't tried is drilling straight into the metal part of the bushing like billybob suggested, which is basically the last resort. I run the risk of damaging the post, but at this point, it's the only way to get it off, and if I don't, the car is finished anyway. This is ridiculous. If I had any idea this would happen, I would never have attempted this.
I will also pick up an air chisel at HF tomorrow, and see if there's any puller or spreader that looks like it might work. I don't quite understand the harmonic balancer puller approach, since it would just put force on the rubber and I need something to pull on the metal (especially now that I destroyed the rubber ). But maybe if I actually look at the pullers, I'll get a brainstorm. I think I'll end up trying the drilling tomorrow evening, and just be very careful to measure where to drill to try my best to avoid hitting the post itself. I practiced drilling in the spare, and it is a pretty easy material to drill into.
__________________
1987 300D, arctic white/palomino--314,000 miles 1978 240D 4-speed, Euro Delivery, light ivory/bamboo--370,000 miles 2005 Jeep Liberty CRD Limited, light khaki/slate--140,000 miles 2018 Chevy Cruze diesel, 6-speed manual, satin steel metallic/kalahari--19,000 miles 1982 Peugeot 505 diesel, 4-speed manual, blue/blue, 130,000 miles 1995 S320, black/parchment--34,000 miles (Dad's car)
|
|
#57
11-13-2010, 05:39 PM
|
||||
|
||||
|
Celebrate!
You guys won't believe it, but I have good news to report this evening ... well, 50% of it at least. One of the bushings came off! The air chisel was the magic wand. $16.99 at Harbor Freight ... thanks for the idea billybob! Even with the power tool, it took a LOT of chiseling ... from every angle I could fit the chisel. I even just stuck it up those slats and wiggled it back and forth while holding the trigger, so it just kind of rattled the bushing every which way. The metal got all torn up, but finally, I stuck the pry bar in and gave a little push and it popped off. Funny thing is, it doesn't look that rusty, but I guess the combination of it being a tight fit with some light corrosion was enough to hold it on there. It wouldn't budge in any direction until I put the air tool on it, and even then it took a bit of persistence.
Of course ... there's the other one now ... think I'll get a coffee and clean the blood off my hand first (which I'm not sure the origin of).  At least now I know it's possible to get the other one off ... I was starting to have my doubts. At least now I know it's possible to get the other one off ... I was starting to have my doubts.
__________________
1987 300D, arctic white/palomino--314,000 miles 1978 240D 4-speed, Euro Delivery, light ivory/bamboo--370,000 miles 2005 Jeep Liberty CRD Limited, light khaki/slate--140,000 miles 2018 Chevy Cruze diesel, 6-speed manual, satin steel metallic/kalahari--19,000 miles 1982 Peugeot 505 diesel, 4-speed manual, blue/blue, 130,000 miles 1995 S320, black/parchment--34,000 miles (Dad's car)
|
|
#58
11-13-2010, 07:25 PM
|
|||
|
|||
|
Quote:
"Any ways, the key to this plan is the giant laser." Dr. Evil!
|
|
#59
11-13-2010, 09:57 PM
|
||||
|
||||
|
Well, I got the other one off too ... not surprisingly it was much easier. For one, I knew to go straight to the air chisel, and also that side of the car is a bit less rusty in general so it probably wasn't as stuck.
I tried to lower the frame down from the car, using the floor jack and a scissor jack under the front, gradually lowering each jack. I realized I needed to remove the shocks to pull the frame out the back, so I went to just lower the frame to the floor first ... it kind of slipped off the jacks a little right near the end and dropped about three inches to one side, nothing violent, but I think I might have damaged the axle on that side. I'm not sure how because it landed pretty gently on a wadded blanket I had placed under the wheel carrier. I just was inspecting it and noticed a crack with a lump under it on the wheel end of the axle. I guess it's possible it was already there, but I don't think so. I attached a picture. So, I guess I'll be replacing the axles too. Other than that my big puzzle is how to move the subframe out from under the car because it won't balance on the single jack. I might put dollies under the wheels, lower it onto those and slowly move it out on those and the jack. Right now I left it on short jackstands and will continue on tomorrow.A picture of the busted axle:
__________________
1987 300D, arctic white/palomino--314,000 miles 1978 240D 4-speed, Euro Delivery, light ivory/bamboo--370,000 miles 2005 Jeep Liberty CRD Limited, light khaki/slate--140,000 miles 2018 Chevy Cruze diesel, 6-speed manual, satin steel metallic/kalahari--19,000 miles 1982 Peugeot 505 diesel, 4-speed manual, blue/blue, 130,000 miles 1995 S320, black/parchment--34,000 miles (Dad's car)
|
|
#60
11-13-2010, 10:16 PM
|
|||
|
|||
|
Quote:
You can use dollies if you've got them or you can also put a wheel back on each hub and roll it out like that if you've got the rear end up high enough.
|
 |
| Bookmarks |
|
|


 Linear Mode


