

|
|
|
|
|
|
#1
 11-01-2010, 05:01 PM
|
|||
|
|||
|
Guide rod mounts are a challenge
The R part of R&R went easy. Pull a few bolts, no major rust & the carriers were in my hand. BFH failed me so I went to visit a friend that is a machinist and has a decent shop. 30 min later the old mounts were out and and the new ones were in.
Now I have to figure out how to swing the guide rod down or forward so that the mount will thread in. I'm thinking that a woodworking bar clamp will move it the necessary distance. I'll know tomorrow when I get the clamp from the other shop. Anyone that's done it have any suggestions. The local indy said he does the entire job without dropping the carrier. He beats them out then forces them back in using the bolts to pull the metal back. I'm thinking it may be better to not let him work on my car.
__________________
85SD 240K & stopped counting painted, putting bac together. 84SD 180,000. sold to a neighbor and member here but I forget his handle. The 84 is much improved from when I had it. 85TD beginning to repair to DD status. Lots of stuff to do. 
|
|
#2
11-01-2010, 05:05 PM
|
||||
|
||||
|
I've seen threads here where guys use a winch strap to pull the lower control arm forward to make room.
I removed the coil springs and took the whole rod out. That way you can tap the rod on the floor (on a block of wood) and the mount pops right out.
__________________
Chad 2006 Nissan Pathfinder LE 1998 Acura 3.0 CL OBK#44 "Pleasure in the job puts perfection in the work." - Aristotle (384-322 B.C.) SOLD 1985 300TD - Red Dragon 1986 300SDL - Coda 1991 - 300TE 1995 - E320 1985 300CD - Gladys
|
|
#3
11-01-2010, 07:03 PM
|
|||
|
|||
|
I have used a racketing strap to pull it forward. Kind of like a small come a long. I attached the front hook somewhere by the front bumper.
__________________
81 300D Turbo 190K sold 83 300sd 319K best $500 I ever spent-daily driverw/ 2 tank WVO set up
|
|
#4
11-01-2010, 08:11 PM
|
||||
|
||||
|
Just did this last week, major pain. Did not remove the carrier, did use ratchet strap on lower control arm. The hardest part after getting the old one out was threading the new one on while aligning the track rod.
|
|
#5
11-02-2010, 09:10 AM
|
||||
|
||||
|
... on the sd, you can take the entire mount down, thread in the bushing, and bolt it back to the subframe...
__________________
John HAUL AWAY, OR CRUSHED CARS!!! HELP ME keep the cars out of the crusher! A/C Thread "as I ride with my a/c on... I have fond memories of sweaty oily saturdays and spewing R12 into the air. THANKS for all you do! My drivers: 1987 190D 2.5Turbo 1987 190D 2.5Turbo 1987 190D 2.5-5SPEED!!!  1987 300TD 1987 300TD 1994GMC 2500 6.5Turbo truck... I had to put the ladder somewhere!
|
|
#6
11-02-2010, 11:46 AM
|
|||
|
|||
|
Quote:
I have ratcheting straps that I use to hold a 3500# boat on a trailer when towing. I'll see if those can be rigged to work. Have to see it I can connect to the frame somewhere so not to pull car off stands (Darwin Candidate????) Alternatively, I have some woodworking pipe clamps that perhaps can be reversed on 1 end and used to move the guide rod down. Edit: What worked: Press to remove old rod mounts. Friend has pretty decent shop so we sand blasted to clean the insides. The carrier is aluminum so treat it accordingly. 1st test bolt & threads to make sure all are as they should be ie bolts that mount carrier & those on guide rod and guide rod mount. Now use a ratcheting strap to pull the control arm forward. Install carrier loose and thread guide rod mount into guide rod. Use anti-seize. Once guide rod mount is well threaded into the rod, tighten mounting bolts so carrier is solid & in its normally installed position. Continue tightening guide rod mount so it pulls into the carrier. Mine kept going a little crooked and channel locks pulled it into position. Install back cover. Use a dab of anti-seize on the rubber backing piece & it slides into position. Tighten caster adjusting clamp. Check your work. You're done (with the 1st side). Don't spend a lot of time trying to pound the old mounts out. Go find a press. 1 or 2 ton manual worked fine. Don't pay much if you sub it out. One shop wanted $70 for what amounted to 15 minutes of work. The 1st time was time consuming because of the trials but it isn't a difficult job IF you have a press & strong ratcheting strap. Use anti-seize.
__________________
85SD 240K & stopped counting painted, putting bac together. 84SD 180,000. sold to a neighbor and member here but I forget his handle. The 84 is much improved from when I had it. 85TD beginning to repair to DD status. Lots of stuff to do. Last edited by Junkman; 11-02-2010 at 07:56 PM.
|
|
#7
11-02-2010, 08:42 PM
|
||||
|
||||
|
Quote:
Easiest way to do it.
__________________
I'm not a doctor, but I'll have a look.  '85 300SD 245k '87 300SDL 251k '90 300SEL 326k Six others from BMW, GM, and Ford. Liberty will not descend to a people; a people must raise themselves to liberty.[/IMG]
|
|
#8
11-02-2010, 09:03 PM
|
||||
|
||||
|
This is my "Guide Rod Fun Thread". It was no fun let me tell you.... I'm sure the SD is a lot different.... BUT, here it is if anyone needs some guidance on the "strap method" on a 123.
Guide Rod mount fun I'm still looking for a spring compressor that works on the 123 without modification to the "upper spring perch hole". I need to replace the LCA bushings soon. Any help with the Right Tool would be appreciated. I'm not grinding away my spring perch.
__________________
AJ 1985 300D (SOLD) 
|
|
#9
11-02-2010, 09:09 PM
|
||||
|
||||
|
On my 300TD, one side didn't need grinding and the other did. The metal slips over time and the holes don't line up anymore. In order to use the correct tool, you'll have to grind the spring perch hole a little bit. I used a Dremel with a 60 grit sanding wheel and it was done in less than 10 minutes. You can coat it with POR-15 when it's all done.
__________________
Chad 2006 Nissan Pathfinder LE 1998 Acura 3.0 CL OBK#44 "Pleasure in the job puts perfection in the work." - Aristotle (384-322 B.C.) SOLD 1985 300TD - Red Dragon 1986 300SDL - Coda 1991 - 300TE 1995 - E320 1985 300CD - Gladys
|
|
#10
11-02-2010, 09:37 PM
|
|||
|
|||
|
Quote:
I doubt that this mount would have popped out by tapping on the floor. It took a press. Taps from the BFH didn't move it at all.
__________________
85SD 240K & stopped counting painted, putting bac together. 84SD 180,000. sold to a neighbor and member here but I forget his handle. The 84 is much improved from when I had it. 85TD beginning to repair to DD status. Lots of stuff to do.
|
|
#11
11-02-2010, 09:46 PM
|
||||
|
||||
|
on the SD, when I changed mine, I made the mistake of instlling the bushing into the mount before putting it on the rod... simple thing to do is put the bushing on the rod, then use the bolts to pull the bushing into the mount and then bolt it to the body.
simple!
__________________
John HAUL AWAY, OR CRUSHED CARS!!! HELP ME keep the cars out of the crusher! A/C Thread "as I ride with my a/c on... I have fond memories of sweaty oily saturdays and spewing R12 into the air. THANKS for all you do! My drivers: 1987 190D 2.5Turbo 1987 190D 2.5Turbo 1987 190D 2.5-5SPEED!!! 1987 300TD 1987 300TD 1994GMC 2500 6.5Turbo truck... I had to put the ladder somewhere!
|
|
#12
11-02-2010, 09:47 PM
|
||||
|
||||
|
Quote:
Exactly!! 
__________________
AJ 1985 300D (SOLD)
|
|
#13
11-03-2010, 08:15 AM
|
|||
|
|||
|
Quote:
Yes, that is how mine ended up going in. I had to take the mount back out of the carrier, attach the carrier loosly & thread the mount into the guide rod. A little tightening on what is normally caster adjustment lined everything up. Then I finished tightening the carrier to the body. Channel locks straightened the carrier in the mount so it would pull in. One of the problems of DIY is the next time will be easier. There likely won't be a next time for a while - unless I find a really good deal on a car that needs it.
__________________
85SD 240K & stopped counting painted, putting bac together. 84SD 180,000. sold to a neighbor and member here but I forget his handle. The 84 is much improved from when I had it. 85TD beginning to repair to DD status. Lots of stuff to do.
|
|
#14
11-07-2010, 09:13 AM
|
||||
|
||||
|
Quote:
I removed the mount cup: 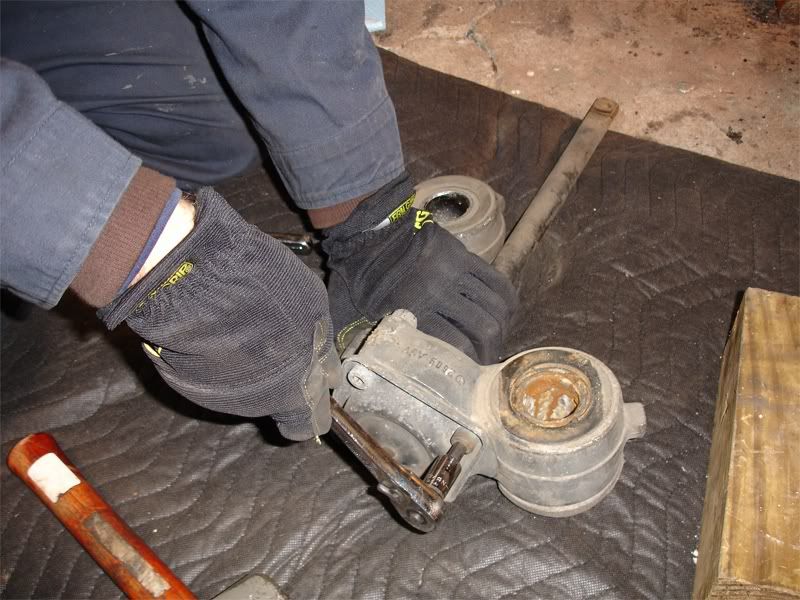 Slammed out the mount on the floor. (slammed is a better word than tapped). It took about 25 slams with as much strength as I could muster while maintaining control over the piece, but it came out. 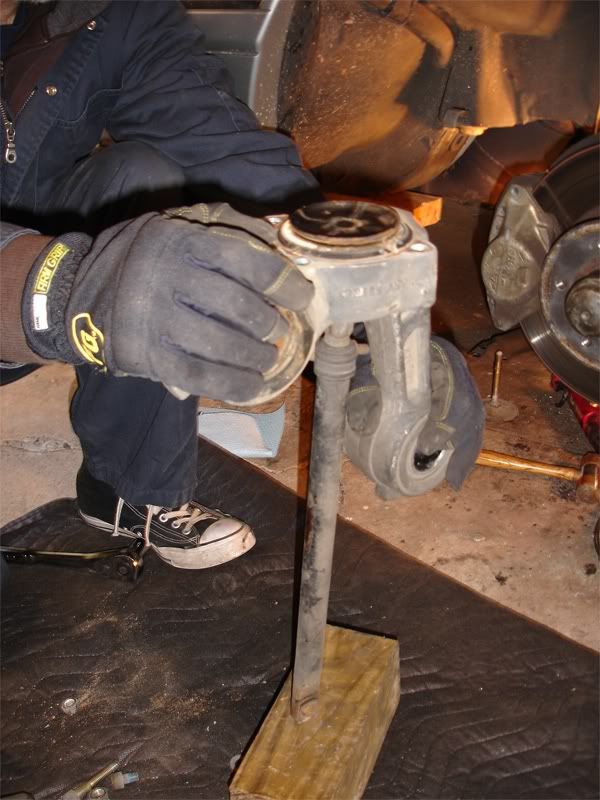 Released. The mount was fused to the bearing bracket and the metal plates of the mount were completely rotted. 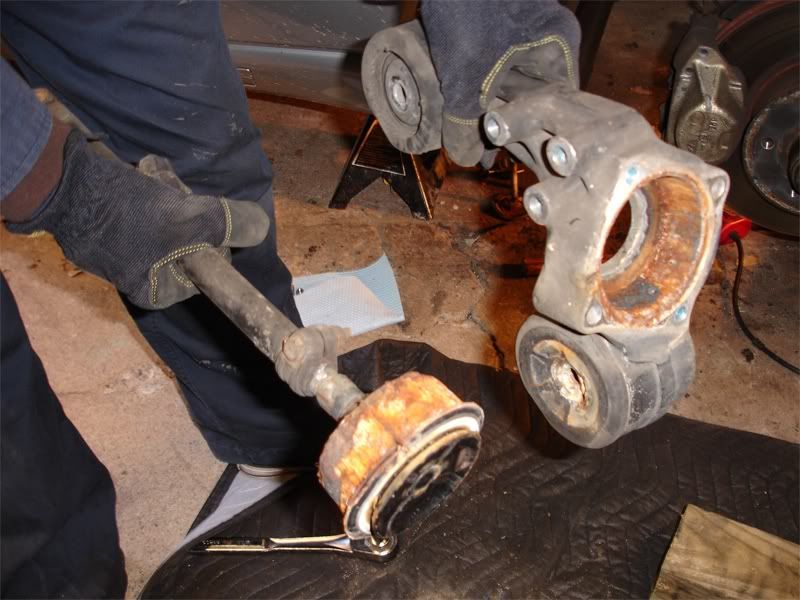 It took about 15 minutes with a flat blade screw driver and a 4" wire wheel in my drill to clean out the mount recess in the bracket. 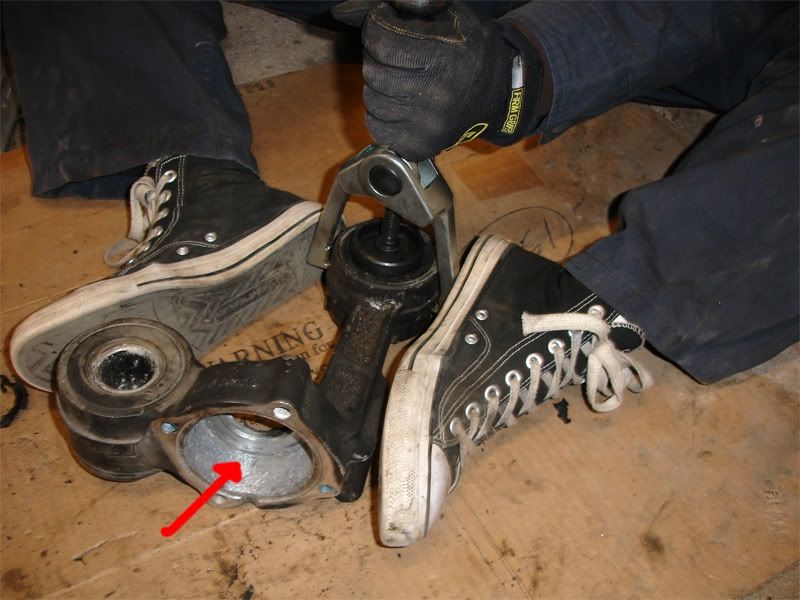 The thing that caused more problems than the mount removal was removing the guide rod from the mount. It required heat from an oxy acetylene torch and a HUGE bench vise to stabilize the rod to get the leverage needed. MAPP gas wasn't enough. This was on the passenger side. The driver side was MUCH easier.
__________________
Chad 2006 Nissan Pathfinder LE 1998 Acura 3.0 CL OBK#44 "Pleasure in the job puts perfection in the work." - Aristotle (384-322 B.C.) SOLD 1985 300TD - Red Dragon 1986 300SDL - Coda 1991 - 300TE 1995 - E320 1985 300CD - Gladys
|
|
#15
11-07-2010, 01:30 PM
|
|||
|
|||
|
i pulled the lower control arm forward a little with a ratcheting strap.. threaded the guide rod mount on to the bar before i bolted the bushing carrier on to the car.
__________________
R Martin Dallas, TX (Addison) 86 560SEL, 128K
|
 |
| Bookmarks |
|
|


 Linear Mode


