

|
|
|
|
|
|
#1
 11-20-2010, 09:47 PM
|
||||
|
||||
|
W126 complete rear suspension rebuild DIY
DIY for complete W126 rear suspension rebuild- trailing arm bushings, rear subframe bushings, shocks and springs. Should mostly apply to W123 as well, the trailing arms are the same but the subframe is different. Also, I don't know how hydro or SLS would complicate this, my 300SD doesn't have them. I took some pictures, and they can be found here-
http://picasaweb.google.com/layerbd/20101023RearSuspensionRebuild# I'll put them with captions in a later post... Here are some previous threads on the subject, I found them very helpful- W126, whunter http://www.peachparts.com/shopforum/diesel-discussion/112850-rear-sub-frame-bushings-w126-1985-300sd-diy.html#post796976 Trailing Arm Bushing W126 1985 300SD DIY http://www.peachparts.com/Wikka/W126RearShocksSprings w123, dmorrison, whiskeydan 300TD REAR suspension rebuild W123 1984 300TD wagon rear trailing arm bushings R&R Tools I used- vise grips pry bar 24mm standard depth (not deep) socket (15/16" worked for me, it's quite close to 24mm) 3' cheater pipe for 24mm socket long-handle 24mm combo wrench spring compressor trailing arm bushing press (self made imitation of Mercedes tool 116 589 13 43 00) subframe bushing remover (imitation of 126 589 00 33 00) subframe bushing installer (imitation of 126 589 01 33 00) 1) JACK UP REAR OF CAR Chuck the front wheels, break the rear lugnuts, then get BOTH sides of the rear as high as possible on a pair of jack stands. You want as much space as you can make for yourself. I was able to get a pair of 3 ton jack stands fully extended, plus the thickness of a 2x4 above and below the jack stands. 2) BREAK 2 TRAILING ARM BOLTS, ONE ON EACH SIDE There are two 24mm bolts holding each trailing arm to the subframe. Get the inner bolt (next to the diff/flex disc, not next to the wheels) started on each trailing arm. Right now these are the only two that you have access to, but that's ok. Starting/breaking the four 24mm bolts is the hardest part of the job IMO, the idea here is to find out as early in the job as possible whether or not you have the tools/strength to break those bolts. Better to find out first thing, that way if you find that you can't, you can put some kroil on them and re-attempt the job later, possibly with a longer cheater bar or a friend that's stronger than you. I used a 15/16" standard depth socket (fit the 24mm) on a breaker bar with a 3 or 4 foot long steel cheater pipe. It still wasn't easy and I'm a 6'3" in-shape 20-something, so consider yourself warned. That's why you want to get the car up as high as possible, so you can get more leverage on the bar. You'll still need to start the two outer 24mm trailing arm bolts next to the wheels later in the procedure after you've dropped that side of the subframe, but once you know you can do the inner ones, you'll probably be able to do the outer ones as well. *NOTE* From here on, I did the job one side of the car at a time, so the subframe is always attached to the car at two of the three attachment points (the diff and the side you're not working on.) 3) REMOVE SHOCK ABSORBER Remove the rear seat so you can get to the top of the rear shock absorber. Support the trailng arm with a jack so you're not fighting suspension as you're unscrewing the 17mm nuts on top. Then remove the two 17mm bolts that hold the shock to the trailing arm. Be careful, when I did it I broke one of the 17mm bolts holding the shock to the trailing arm, and I had to get the stub out with a torch and some vise grips. If the bolt is resisting, kroil is your friend... Odds are good that you'll want to put in new shocks while you're at it unless you replaced them recently. I installed Bilstein HD's in all 4 corners. 4) REMOVE BRAKE CALIPER This is straightforward- disconnect the two 19mm bolts, then hang the caliper from the sway bar using a coat hanger. Remember, don't let it hang from the hose! 5) DISCONNECT SWAY BAR LINK 17mm wrench and socket. It helps to take the stress off the connection by jacking the trailing arm up to the proper height. 6) DISCONNECT AXLE FROM WHEEL HUB remove the bolt on the axis of the wheel, then use a deep socket and a dead blow hammer to bop the spline of the axle out of the hub, then move it out of the way. 7) REMOVE SPRING Easy if you have a spring compressor, which luckily I did. If you can't obtain one, Whiskeydan was able to do this job without one, but his method required dropping the whole subframe, diff and all. If your springs are original and you have over 250K miles, odds are they're shot and this is a good time to replace them. I put in a set of H&R sport springs JohnHef found for me in the junkyard, and I couldn't be happier with them. If you like a stiffer ride they're awesome, I have so much less body roll than I used to. I did the fronts as well while I was at it, with 3 nub shims on all corners. 8) DISCONNECT FLEX DISC, MOVE DRIVESHAFT TO THE SIDE This is required because otherwise there isn't enough space to pull out the inner 24mm bolt holding each trailing arm to the subframe. Throw the car in neutral so you can rotate the driveshaft with your hand, and then disconnect the three bolts that connect the flex disc to the diff, rotating it each time so you always have access on the bottom. Then you need a pry bar to pop the driveshaft off the diff. This takes a decent amount of force, you need to push it back by 2cm or so because of the centering sleeve. 9) DROP ONE SIDE OF THE SUBFRAME Now we're ready to attack the outer (closer to the wheel) 24mm bolt that connects the trailing arm to the subframe. This can be a bit tricky, because unless you're supporting the car in the right place, the jack stand can get in the way of where you want to put the wrench, or even obstruct the subframe from dropping to where you want it to. Remove the two 17mm bolts on the retaining plate for the rear subframe bushing. Then, while supporting the subframe with a jack, remove the large 24mm bolt on the axis of the subframe bushing of the side you're working on. Now, when you release the jack that side of the subframe should drop. THen you want to pull the subframe down far enough that you can wedge a 2x4 between the subframe and chassis, that will guarantee that when you're attacking the trailing arm bolt your force goes to the bolt, not moving the chassis. 10) BREAK THE SECOND TRAILING ARM BOLT Now that the frame is down, you should have access to the outer trailing arm bolt. I wasn't able to get to it with the socket wrench, I ended up using a long handle combo wrench from a Harbor freight set. 11) REMOVE TRAILING ARM BOLTS, ARM COMPLETELY Now take the bolts out the rest of the way. You'll need to hold the nut on the back still with another wrench or socket, but this should be noproblem. Then the arm should pull right out! It's still tethered to the car by the emergency brake cable, but that's fine for the bushing R&R. Also be aware that the rear rotor is loose and can fall off without the caliper holding it in place. 12) REPLACE TRAILING ARM BUSHINGS, REINSTALL ARM Now the moment of truth, time to replace the trailing arm bushings! I made a bushing press specifically for the task that both removed and installed the new ones. However, i'm sure you could make do with some standard bushing press kit or improvise with a bolt and some big washers. Make sure you use some silicone-based lubricant so it slides in there more easily. On my car, the outer bushings were in much worse shape, the inner metal piece had completely separated from the rubber. I think they were original, I guess that's what 375K miles will do. 13) REINSTALL TRAILING ARM, TORQUE BOLTS I missed a detail when I was doing this part, and didn't realize it until I was reading the FSM procedure a little while later. After you put the arm back in and get the trailing arm bolts finger tight, you need to move the trailing arm to the approximate position where it is when the suspension is at rest. Only THEN do you torque the bolts. I think this is because once you torque the bolts, the inner metal sleeve on the bushing is pinched in the subframe and cannot move. In addition, the rubber is pretty tight in the arm, so whenever the trailing arm goes up and down all that moves is the rubber in between the two metal sleeves, and you want that rubber to be stressed for the smallest fraction of the time possible. I didn't do this, and I can only hope the metal on the subframe or the rubber on the trailing arm settled, since I sure don't want to go in there again just to break and re-torque those bolts. Time will tell... 14) REPLACE SUBFRAME BUSHING I made this one easy on myself by machining imitations of mercedes special tools #126 589 00 33 00 and #126 589 01 33 00. Using these the replacement took about 5 minutes, I just popped the old one out by preloading the bushing with the puller, then working the edges out with a pry bar, then preloading some more. When installing, it's important to put the force on the edges of the bushing so you don't collapse the middle in the process of installation. Again, silicone lube is your friend. My old ones were quite collapsed, this was overdue. 15) PUT EVERYTHING BACK TOGETHER Now go backwards through steps 9 thru 3 to put that side of the car back together (leaving the flex disc disconnected though), then start again at step 3 for the other side of the car. Now you're done, congrats!
__________________
-Brian 1984 300SD, 375XXX miles, Light Ivory w/ Palomino TEX 
|
|
#2
11-20-2010, 09:52 PM
|
||||
|
||||
|
Again, link for the higher resolution pics with captions-
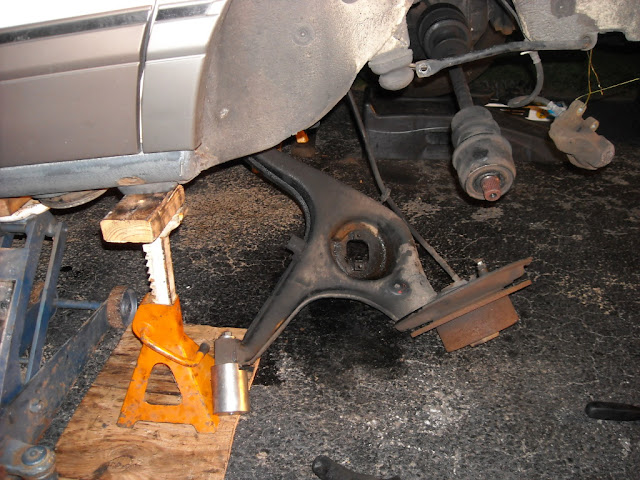
http://picasaweb.google.com/layerbd/20101023RearSuspensionRebuild# 800x600 pics saved on the forums-  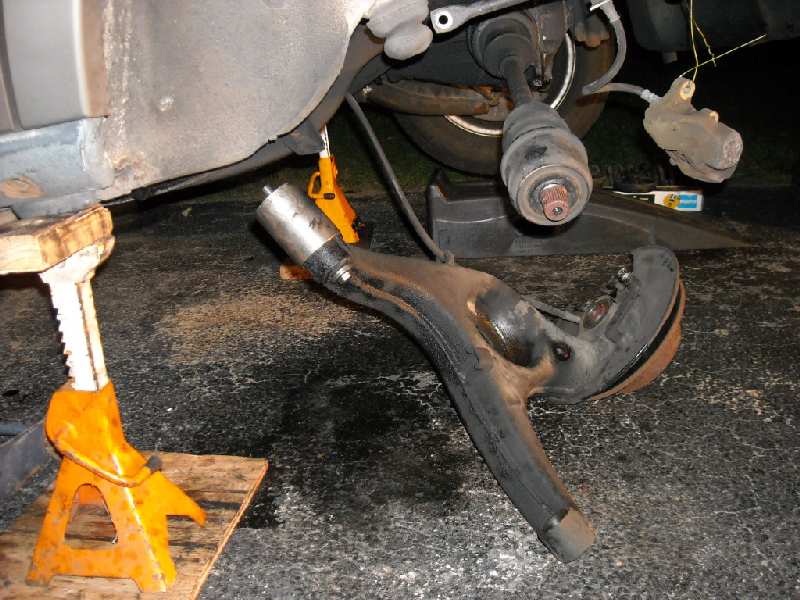  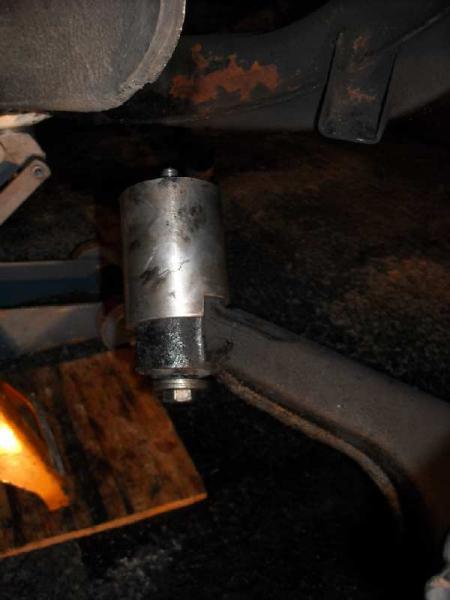 Pics 1-4 show the trailing arm after being detached from the car. It's only tethered by the emergency brake cable. The trailing arm bushing press I made is in place, makes R&R of the bushing a snap. The only thing I needed to be careful about was to NOT overtighten the press while reinstalling; I used a washer because I was too lazy to make a cup that pressed the bushing in along its edge as I should have.  Pic 5 shows the subframe bushing remover on the ground. It consists of three pieces. there are two aluminum pieces that I machined and steel bolt with the last 1/2 inch skinned. The first piece is threaded and makes contact with the subframe, and the second is a cup that forms an interface between the bolt and subframe bushing.  pic 6 shows the puller as it rests in a subframe bushing.  pic 7 shows the subframe braced away from the chassis, with the subframe bushing nice and exposed, ready to be removed.  pic 8 shows the puller installed, ready to do it's job. The best way to get it in there is to put the two aluminum pieces in, then put the bolt in. There's just barely enough clearance to get them in, I made the aluminum as thick as I could for strength. 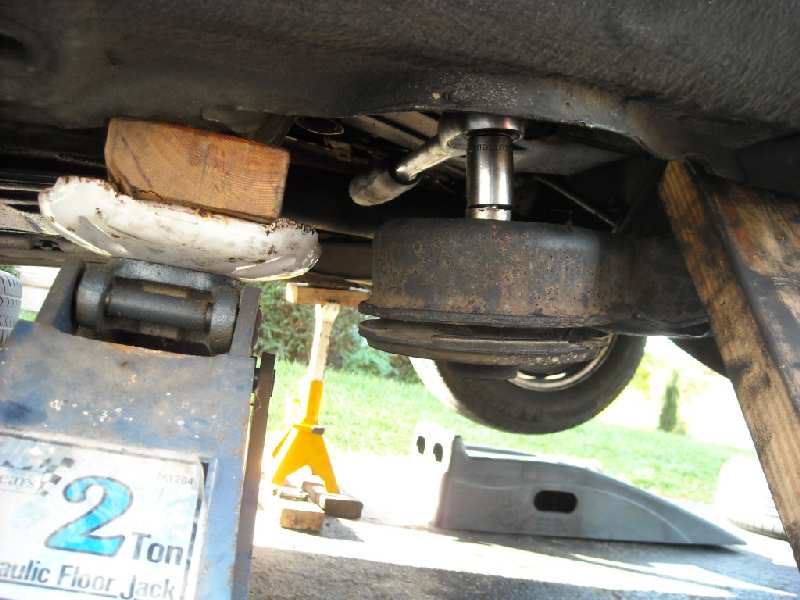 pic 9 shows the bushing partially removed. Tightening the bolt on the puller DOES NOT push the bushing out on its own. It merely preloads the rubber, which then makes it extremely easy to move the bushing with the tip of a pry bar. Preload, pry, repat.    pics 10 thru 12 provide an illustration of how collapsed the old bushing was. 375K miles is too many for one of these things! Note the shadows on pic 11, they're both on level ground, they should be the same! The rubber is cracked around the outside and inside of the old one, I don't think it was doing anything anymore. Also note the semicircular mark from 10 o'clock to 3 o'clock around the edge on the old one, it was where the retaining plate was making contact with the collapsed bushing. The new one has a nice healthy gap. pic 12 shows just how misshapen the profile of the old one is. Also I like how the 24mm bolt that holds it in looks like a gleaming golden rocketship in the background  . . pic 13 shows the underside of the new and old bushings, they don't really look too different.  pic 14 shows the installer I made. It only makes contact around the edge, so it isn't collapsing the rubber as the bushing is installed. The piece to the right is the washer for centering the bolt on the other side, I made a step with the same diameter as the hole in the subframe.  pic 15 shows how perfectly the bushing fits in the installer  pic 16 shows a side view of the bushing seated in the installer. I can't really overtighten it because the aluminum lip will make contact with the subframe once it's in all the way.  pic 17 is a detail of the washer about to be seated on top of the subframe.  pic 18, everything ready for action.  pic 19, subframe bushing all lubed up with silicone and partially installed.  pic 20, all done! Now to reassemble the rear of the car...
__________________
-Brian 1984 300SD, 375XXX miles, Light Ivory w/ Palomino TEX Last edited by brainlair; 11-23-2010 at 12:02 PM.
|
|
#3
11-20-2010, 10:08 PM
|
||||
|
||||
|
putting the pics into the thread is simple with picassa, but it'd be better to actually upload the pics to the forum so they will not be dead links if google changes servers or url's in the future.
__________________
John HAUL AWAY, OR CRUSHED CARS!!! HELP ME keep the cars out of the crusher! A/C Thread "as I ride with my a/c on... I have fond memories of sweaty oily saturdays and spewing R12 into the air. THANKS for all you do! My drivers: 1987 190D 2.5Turbo 1987 190D 2.5Turbo 1987 190D 2.5-5SPEED!!!  1987 300TD 1987 300TD 1994GMC 2500 6.5Turbo truck... I had to put the ladder somewhere!
|
|
#4
11-20-2010, 10:11 PM
|
||||
|
||||
 to link to your pics... or use the manage attachments in the edit form to upload each pic into the server... like so. shoot. your pics are too large to upload... could you go in and change the size reduce them a tad so they fit into the server?
__________________
John HAUL AWAY, OR CRUSHED CARS!!! HELP ME keep the cars out of the crusher! A/C Thread "as I ride with my a/c on... I have fond memories of sweaty oily saturdays and spewing R12 into the air. THANKS for all you do! My drivers: 1987 190D 2.5Turbo 1987 190D 2.5Turbo 1987 190D 2.5-5SPEED!!! 1987 300TD 1987 300TD 1994GMC 2500 6.5Turbo truck... I had to put the ladder somewhere! Last edited by vstech; 11-20-2010 at 10:22 PM.
|
|
#5
11-20-2010, 10:20 PM
|
||||
|
||||
|
How does one make the pics appear in the thread like that? I assume you start with a link to the picture, then put some html before and after...?
I'll make and upload some compressed versions. How much space do we each have for uploading such pictures?
__________________
-Brian 1984 300SD, 375XXX miles, Light Ivory w/ Palomino TEX
|
|
#6
11-20-2010, 10:22 PM
|
||||
|
||||
|
When composing a post, click this:
 Then paste the image URL (address starting with http://) in the box that comes up. When attached, they are not inserted within the text on most forums. Here would seem the same. Then paste the image URL (address starting with http://) in the box that comes up. When attached, they are not inserted within the text on most forums. Here would seem the same.
__________________
1991 560 SEL / 185k miles 1992 750il / 17k miles - project car
|
|
#8
11-20-2010, 10:25 PM
|
||||
|
||||
|
Quote:
two, if your account closes or if google changes servers or url's for the page where your pics are in the future, this forum loses the pics and all your hard work is lost to us. it's best to edit each pic in your album, and resize each to 800x600 then right click on each and save the image location, then upload them to the forum with the manage attachment link I took your pic, and put it in my album, and clicked the edit button, changed the size to 800x600 and saved it, then hit the manage uploads, and uploaded from url, right clicked on the image in picassa, and chose save image location and pasted it into the upload from url link here on the forum advanced or edit page.
__________________
John HAUL AWAY, OR CRUSHED CARS!!! HELP ME keep the cars out of the crusher! A/C Thread "as I ride with my a/c on... I have fond memories of sweaty oily saturdays and spewing R12 into the air. THANKS for all you do! My drivers: 1987 190D 2.5Turbo 1987 190D 2.5Turbo 1987 190D 2.5-5SPEED!!! 1987 300TD 1987 300TD 1994GMC 2500 6.5Turbo truck... I had to put the ladder somewhere!
|
|
#9
11-22-2010, 11:13 AM
|
||||
|
||||
|
Anyone know where I can get the tool for the rear subframe mounts and its appx cost? I checked above to no avail.
__________________
I'm not a doctor, but I'll have a look.  '85 300SD 245k '87 300SDL 251k '90 300SEL 326k Six others from BMW, GM, and Ford. Liberty will not descend to a people; a people must raise themselves to liberty.[/IMG]
|
|
#10
11-22-2010, 11:59 AM
|
||||
|
||||
|
I have no idea where one would buy them. I guess I didn't really make it clear in my post, but I made imitations of mercedes tools #116 589 13 43 00, 126 589 00 33 00 and 126 589 01 33 00 myself. I used the drawings on the .pdf's and the replacement bushings to get my design and measurements, then machined them myself out of 6061 aluminum. They're definitely not as tough as the mercedes tools probably are, but i'd wager they'll hold up pretty well. The two tools for the subframe bushing turned out perfectly- everything fit exactly as i'd hoped. The trailing arm bushing press turned out OK. It's perfect for removal, but I got lazy and didn't make an installation cup, so it's possible to crush the bushing upon installation if you're not careful. I'd say it took me about 20 hours of shop time and 10 hours of reading/design time total for all three.
The rear suspension job isn't anything I see myself doing again in the near future, so I'd be happy to add them to the tool rental thread if there's interest.
__________________
-Brian 1984 300SD, 375XXX miles, Light Ivory w/ Palomino TEX
|
|
#11
11-22-2010, 12:20 PM
|
||||
|
||||
|
Can you make them out of some steel?
__________________
I'm not a doctor, but I'll have a look. '85 300SD 245k '87 300SDL 251k '90 300SEL 326k Six others from BMW, GM, and Ford. Liberty will not descend to a people; a people must raise themselves to liberty.[/IMG]
|
|
#12
11-22-2010, 01:15 PM
|
||||
|
||||
|
Haha, I *could* make them out of steel, but I definitely don't have the time for that right now. Making something out of steel instead of aluminum is double or triple the time and hassle. You need to take smaller cuts, it dulls the bit more quickly, and while aluminum chips are friendly little snowflakes, steel chips are terrifying razors.
And frankly, for this application I think aluminum is fine, something like a spring compressor where life and death is at stake is another story. Granted, if they lived in a dealership and got used monthly or weekly or something, the puller would probably eventually become deformed, but if you only use it to preload the rubber like I did I think it would last more or less indefinitely. I didn't need to tighten the bolt too much for it to do it's job, it just made the work of the pry bar that much easier. And of course aluminum threads are more susceptible to cross-threading. I'll put all the drawings for these tools up on the thread soon, maybe you can find an affordable local machine shop or more enterprising forum member .
__________________
-Brian 1984 300SD, 375XXX miles, Light Ivory w/ Palomino TEX
|
|
#13
11-22-2010, 01:26 PM
|
||||
|
||||
|
Quote:
__________________
1992 W201 190E 1.8 171,000 km - Daily driver 1981 W123 300D ~ 100,000 miles / 160,000 km - project car stripped to the bone 1965 Land Rover Series 2a Station Wagon CIS recovery therapy! 1961 Volvo PV544 Bare metal rat rod-ish thing I'm here to chat about cars and to help others - I'm not here "to always be right" like an internet warrior  Don't leave that there - I'll take it to bits!
|
|
#14
11-23-2010, 12:18 AM
|
||||
|
||||
|
For posterity!
Pics 1-5, trailing arm bushing press and subframe bushing remover Pics 1-4 show the trailing arm after being detached from the car. It's only tethered by the emergency brake cable. The trailing arm bushing press I made is in place, makes R&R of the bushing a snap. The only thing I needed to be careful about was to NOT overtighten the press while reinstalling; I used a washer because I was too lazy to make a cup that pressed the bushing in along its edge as I should have. Pic 5 shows the subframe bushing remover on the ground. It consists of three pieces. there are two aluminum pieces that I machined and steel bolt with the last 1/2 inch skinned. The first piece is threaded and makes contact with the subframe, and the second is a cup that forms an interface between the bolt and subframe bushing.
__________________
-Brian 1984 300SD, 375XXX miles, Light Ivory w/ Palomino TEX Last edited by brainlair; 11-23-2010 at 12:40 AM.
|
|
#15
11-23-2010, 12:19 AM
|
||||
|
||||
|
pics 6-10, puller detail and new/old subframe bushing comparison
pic 6 shows the puller as it rests in a subframe bushing. pic 7 shows the subframe braced away from the chassis, with the subframe bushing nice and exposed, ready to be removed. pic 8 shows the puller installed, ready to do it's job. The best way to get it in there is to put the two aluminum pieces in, then put the bolt in. There's just barely enough clearance to get them in, I made the aluminum as thick as I could for strength. pic 9 shows the bushing partially removed. Tightening the bolt on the puller DOES NOT push the bushing out on its own. It merely preloads the rubber, which then makes it extremely easy to move the bushing with the tip of a pry bar. Preload, pry, repat. pic 10 shows the old (375K!) and new bushings side by side.
__________________
-Brian 1984 300SD, 375XXX miles, Light Ivory w/ Palomino TEX Last edited by brainlair; 11-23-2010 at 12:51 AM.
|
 |
| Bookmarks |
|
|


 Linear Mode


