

|
|
|
|
|
|
#46
 07-22-2011, 11:01 AM
|
||||
|
||||
|
Quote:
__________________
http://superturbodiesel.com/images/sig.04.10.jpg 1995 E420 Schwarz 1995 E300 Weiss #1987 300D Sturmmachine #1991 300D Nearly Perfect #1994 E320 Cabriolet #1995 E320 Touring #1985 300D Sedan OBK #42 
|
|
#47
07-22-2011, 12:49 PM
|
||||
|
||||
|
Quote:
__________________
84 300D, 82 Volvo 244Gl Diesel
|
|
#48
07-22-2011, 01:23 PM
|
|||
|
|||
|
Quote:
like hundreds of dollars and hours of labor difference!!!!!
__________________
1980 240d , chain elongation, cam marks reference: http://www.peachparts.com/shopforum/diesel-discussion/10414-help-i-need-check-stretch.html http://www.peachparts.com/shopforum/diesel-discussion/305365-9-degrees-chain-stretch.html evap fin cleaning: http://www.peachparts.com/shopforum/diesel-discussion/156207-photo-step-step-post-showing-w123-evaporator-removal-1983-240d-1982-300td.html?highlight=evaporator A/C thread http://www.peachparts.com/shopforum/diesel-discussion/297462-c-recommendations-mb-vehicles.html
|
|
#49
07-22-2011, 01:30 PM
|
||||
|
||||
|
Quote:
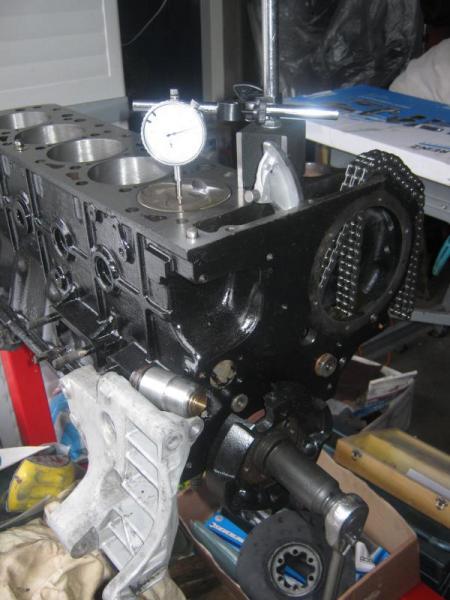
Set the engine with the markings to TDC for number one cylinder. Remove the front group of rocker arms and remove the valve nuts and valve spring on one of the valves on #1 cylinder. Carefully lower the valve onto the top of the piston crown. If the piston is indeed at TDC the valve will drop by a few millimeters say 6mm. If the valve stem starts to disappear - quickly pull it back up before it drops into the cylinder... otherwise will need to remove the head to retrieve the valve. FYI - this is part of the procedure in the FSM for setting up the position of the tachometer sensor on the front of the engine.
__________________
1992 W201 190E 1.8 171,000 km - Daily driver 1981 W123 300D ~ 100,000 miles / 160,000 km - project car stripped to the bone 1965 Land Rover Series 2a Station Wagon CIS recovery therapy! 1961 Volvo PV544 Bare metal rat rod-ish thing I'm here to chat about cars and to help others - I'm not here "to always be right" like an internet warrior  Don't leave that there - I'll take it to bits!
|
|
#50
07-22-2011, 01:35 PM
|
|||
|
|||
|
WHOA THERE ARMY !!!!
That is not good procedure either.... first because you can find TDC by taking out just the precombustion chamber.. AND your method is not the standard and more accurate way of finding TDC... which involves choosing a distance of piston movement before AND after TDC.... having marked those on the crank pulley....you split the difference... THAT is accurate TDC.... because at the top of the stroke.. the actual movement of the piston is non existant for several degrees... thus can not be measured any closer than that that way..
__________________
1980 240d , chain elongation, cam marks reference: http://www.peachparts.com/shopforum/showthread.php?threadid=10414 http://www.peachparts.com/shopforum/diesel-discussion/305365-9-degrees-chain-stretch.html evap fin cleaning: http://www.peachparts.com/shopforum/diesel-discussion/156207-photo-step-step-post-showing-w123-evaporator-removal-1983-240d-1982-300td.html?highlight=evaporator A/C thread http://www.peachparts.com/shopforum/diesel-discussion/297462-c-recommendations-mb-vehicles.html
|
|
#51
07-22-2011, 01:41 PM
|
||||
|
||||
|
Quote:
Also for the purpose of the possibility of the timing marks on the end of the crankshaft being 180 degrees out - I'd say it was a very good way of doing it. This valve will either rest on the piston crown or fall into the cylinder (not what you want - so catch it before it falls). I think this is particularly appropriate for the average home mechanic who is quite unlikely to have the necessary tools to remove the pre-chamber.
__________________
1992 W201 190E 1.8 171,000 km - Daily driver 1981 W123 300D ~ 100,000 miles / 160,000 km - project car stripped to the bone 1965 Land Rover Series 2a Station Wagon CIS recovery therapy! 1961 Volvo PV544 Bare metal rat rod-ish thing I'm here to chat about cars and to help others - I'm not here "to always be right" like an internet warrior Don't leave that there - I'll take it to bits!
|
|
#52
07-22-2011, 01:49 PM
|
|||
|
|||
|
Think about the physics of the situation I have mentioned....The method I describe as been used for all sorts of engines for decades... you will be SEVERAL degrees off using your method... I don't have to look at the FSM for this one... I have 40 years of messing with engines and the physics is proven...
and taking the front group of rocker arms off... fraught with danger... As compared to pulling the PCC to put that clock directly on the piston top..
__________________
1980 240d , chain elongation, cam marks reference: http://www.peachparts.com/shopforum/showthread.php?threadid=10414 http://www.peachparts.com/shopforum/diesel-discussion/305365-9-degrees-chain-stretch.html evap fin cleaning: http://www.peachparts.com/shopforum/diesel-discussion/156207-photo-step-step-post-showing-w123-evaporator-removal-1983-240d-1982-300td.html?highlight=evaporator A/C thread http://www.peachparts.com/shopforum/diesel-discussion/297462-c-recommendations-mb-vehicles.html
|
|
#53
07-22-2011, 01:54 PM
|
||||
|
||||
|
Quote:
__________________
1992 W201 190E 1.8 171,000 km - Daily driver 1981 W123 300D ~ 100,000 miles / 160,000 km - project car stripped to the bone 1965 Land Rover Series 2a Station Wagon CIS recovery therapy! 1961 Volvo PV544 Bare metal rat rod-ish thing I'm here to chat about cars and to help others - I'm not here "to always be right" like an internet warrior Don't leave that there - I'll take it to bits!
|
|
#54
07-22-2011, 01:55 PM
|
||||
|
||||
|
Quote:

__________________
 1985 Euro 240D 5 spd 140K 1979 240D 5 spd, 40K on engine rebuild 1994 Dodge/Cummins, 5 spd, 121K 1964 Allice Chalmers D15 tractor 2014 Kubota L3800 tractor 1964 VW bug "Lifes too short to drive a boring car"
|
|
#55
07-22-2011, 01:56 PM
|
|||
|
|||
|
You are suggesting that pulling the entire head... meaning having to put the chain and everything back together correctly.... is better than having access to the top of the piston ( which is what you are suggesting pulling the head for ) by pulling and reinserting the precombustion chamber ? Think about that first...as your reputation is on the line...
__________________
1980 240d , chain elongation, cam marks reference: http://www.peachparts.com/shopforum/showthread.php?threadid=10414 http://www.peachparts.com/shopforum/diesel-discussion/305365-9-degrees-chain-stretch.html evap fin cleaning: http://www.peachparts.com/shopforum/diesel-discussion/156207-photo-step-step-post-showing-w123-evaporator-removal-1983-240d-1982-300td.html?highlight=evaporator A/C thread http://www.peachparts.com/shopforum/diesel-discussion/297462-c-recommendations-mb-vehicles.html
|
|
#56
07-22-2011, 01:58 PM
|
|||
|
|||
|
Quote:
Measuring from a distance before... to the same distance after it starts back down and marking the spot half way in between is the standard ACCURATE way to measure it...
__________________
1980 240d , chain elongation, cam marks reference: http://www.peachparts.com/shopforum/showthread.php?threadid=10414 http://www.peachparts.com/shopforum/diesel-discussion/305365-9-degrees-chain-stretch.html evap fin cleaning: http://www.peachparts.com/shopforum/diesel-discussion/156207-photo-step-step-post-showing-w123-evaporator-removal-1983-240d-1982-300td.html?highlight=evaporator A/C thread http://www.peachparts.com/shopforum/diesel-discussion/297462-c-recommendations-mb-vehicles.html
|
|
#57
07-22-2011, 02:02 PM
|
||||
|
||||
|
Quote:
I'd do this before doing all the extra work. It isn't quite as good as actually physically checking for the presence of the piston at TDC but it would give you a good idea. Remove the valve cover and a glow plug on #1 cylinder. Rotate the crank by hand and watch for the position of the timing marks and the position of the valves over #1 cylinder. As you rotate the engine you should hear air escaping from the cylinder through the glow plug hole on the compression stroke. The valves should be closed and the timing marks should be more or less in the correct position when the air stops coming out.
__________________
1992 W201 190E 1.8 171,000 km - Daily driver 1981 W123 300D ~ 100,000 miles / 160,000 km - project car stripped to the bone 1965 Land Rover Series 2a Station Wagon CIS recovery therapy! 1961 Volvo PV544 Bare metal rat rod-ish thing I'm here to chat about cars and to help others - I'm not here "to always be right" like an internet warrior Don't leave that there - I'll take it to bits!
|
|
#58
07-22-2011, 02:12 PM
|
||||
|
||||
|
Quote:
OM617 (non turbo) cam profile specs, piston height specs etc When I was measuring the piston height with a DTI I didn't see the dial not moving for several degrees. If I remember correctly it was quite a sudden change as the piston came up the bore, reached TDC and then returned back down. It just goes to show doesn't it? You can never measure too much eh? Now do I need to dig the engine out the back of my garage and prove it to you?
__________________
1992 W201 190E 1.8 171,000 km - Daily driver 1981 W123 300D ~ 100,000 miles / 160,000 km - project car stripped to the bone 1965 Land Rover Series 2a Station Wagon CIS recovery therapy! 1961 Volvo PV544 Bare metal rat rod-ish thing I'm here to chat about cars and to help others - I'm not here "to always be right" like an internet warrior Don't leave that there - I'll take it to bits!
|
|
#59
07-22-2011, 02:14 PM
|
|||
|
|||
|
No one in their right mind would take the head off one of these engines just to find the top of the piston with the precombustion chamber available.....
Army, Here is one example.. in this case due to angle he used a method to hard stop the piston and then turned the engine backwards. something our engines do not want to have happen to them due to the long timing chain design... but the phsics are the same...as noted in the second post.. I am not making this stuff up...and it is not a matter of opinion... http://www.mossmotors.com/forum/forums/thread/5744.aspx ""Finding TDC shouldn't be too hard. First you'll need a degree wheel and some type of pointer. This might be a problem if the engine is in the car, if so then you'll have to be a little less precise but you should still be able to get close. Remove the plugs and make up a piston stop from an old spark plug. I've done this by breaking out the ceramic insulator and drilling and taping the plug body for an appropriate sized bolt. Raise the piston on the number one cylinder to nearly the top, install the piston stop and adjust the bolt until it hits the piston, then lock it in position. Mark the front pully or damper at this point and then carefully turn the engine backwards until the piston hits the stop again. Mark this point. One half way between these two points is TDC. If you're using a degree wheel, then remove the piston stop, rotate the crank to where the calculated TDC lines up with the pointer and mark your damper. If you don't have the degree wheel, then measure between the two marks and mark the center. You should be close enough to be able to set the timing and tune that Prefect."" ""In theory it might work. I'm afraid though that with the piston right at the bottom, a movement of several degrees on the crank would make an all but imperceptible vertical movement of the piston. That's probably pretty much like Bill suggested at the top. Just a very small error in finding the exact top or bottom could lead to a several degree error at the crankshaft."""
__________________
1980 240d , chain elongation, cam marks reference: http://www.peachparts.com/shopforum/showthread.php?threadid=10414 http://www.peachparts.com/shopforum/diesel-discussion/305365-9-degrees-chain-stretch.html evap fin cleaning: http://www.peachparts.com/shopforum/diesel-discussion/156207-photo-step-step-post-showing-w123-evaporator-removal-1983-240d-1982-300td.html?highlight=evaporator A/C thread http://www.peachparts.com/shopforum/diesel-discussion/297462-c-recommendations-mb-vehicles.html
|
|
#60
07-22-2011, 02:29 PM
|
||||
|
||||
|
Quote:
I've actually done the head on and head off measurements before. I've already posted a link to the thread for the head on measurements. And here are the head off measurements in this thread Timing marks gone from my OM617 engine Here's what I wrote in post #8 many moons ago... Quote:
__________________
1992 W201 190E 1.8 171,000 km - Daily driver 1981 W123 300D ~ 100,000 miles / 160,000 km - project car stripped to the bone 1965 Land Rover Series 2a Station Wagon CIS recovery therapy! 1961 Volvo PV544 Bare metal rat rod-ish thing I'm here to chat about cars and to help others - I'm not here "to always be right" like an internet warrior Don't leave that there - I'll take it to bits!
|
 |
| Bookmarks |
|
|


 Linear Mode


