

|
|
|
|
|
|
|||||||
 |
|
|
LinkBack | Thread Tools | Display Modes |
|
#16
 08-11-2011, 04:24 AM
|
||||
|
||||
|
Putting it back together (3)
Once the input shaft cap is reassembled you can slide the steering worm end of this shaft into the working piston. Push the steering worm through to the first hole (that it meets) on the steering nut. Introduce 17 ball bearings into this hole whilst slowly turning the input shaft to the right.
 Make sure that the ball bearings go the right way around the steering worm. From the perspective in the photograph above they go down and under the steering worm. When you get to ball 15, 16, or 17 you are likely to see the ball bearings appearing at the second hole in the steering nut (the hole on the right hand side in the picture above). If you have turned the steering worm to quickly / not added the ball bearings fast enough you might see the balls arriving too early in which case it might be prudent to start again. The final 7 ball bearings need to be set in grease in the detachable bearing races that you will shortly be re-attaching to the steering nut.  Torque the holding bolts for the detachable bearing races to 12 16 Nm.  Once assembled the whole steering worm / working piston friction needs to be measured again (just like when you took it to bits). Like last time the torque required to move the input shaft should be in the range of 5 50Ncm If this isn't achieved you are back to considering whether you want to buy a replacement steering box or not (see previous post).
__________________
1992 W201 190E 1.8 171,000 km - Daily driver 1981 W123 300D ~ 100,000 miles / 160,000 km - project car stripped to the bone 1965 Land Rover Series 2a Station Wagon CIS recovery therapy! 1961 Volvo PV544 Bare metal rat rod-ish thing I'm here to chat about cars and to help others - I'm not here "to always be right" like an internet warrior  Don't leave that there - I'll take it to bits! Last edited by Stretch; 08-11-2011 at 05:59 AM. 
|
|
#17
08-11-2011, 04:24 AM
|
||||
|
||||
|
Putting it back together (4)
You can now put the input shaft / steering worm + working piston assembly into the main casing. The teeth on the back of the working piston need to be aligned with the output shaft so you need to position these so they are visible via the hole in the casing for the output shaft.
When you fit the input shaft cap make sure that the small hole for the oil supply is aligned with the small hole in the casing and that the 'O' rings are positioned correctly. Tighten the four bolts that hold the cap in place to 70 75 Nm. Next, fit the control valve back into the main casing. Make sure you don't forget to add in the little springs that go on either side of this shuttle valve. 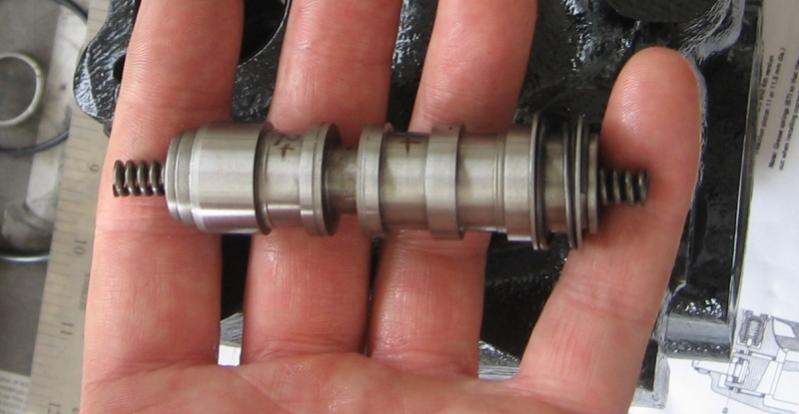 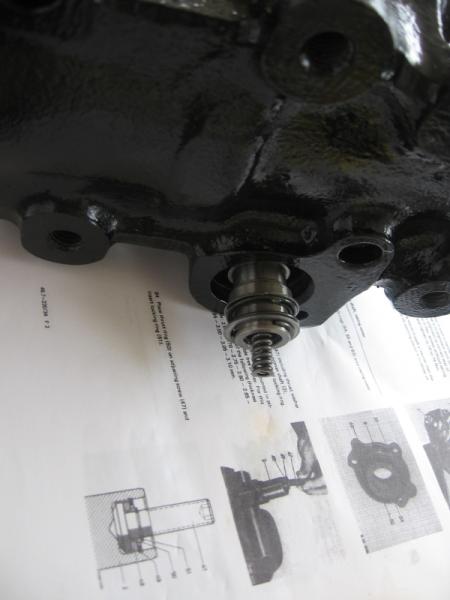 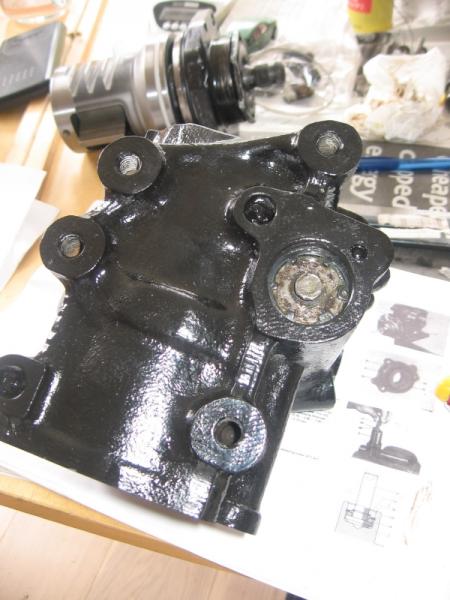 Please note if you are replacing the Pitman shaft / output shaft you really need to read the FSM to make sure it is compatible with the working piston. The adjusting screw assembly now needs to be fixed in place on the end of the output shaft (Pitman shaft). When fitted this adjustment screw needs to have as small clearance as possible. No clearance is not good too much clearance is also not good. The FSM states that there are several different thrust washer thicknesss available to adjust this.  Once you've reassembled the adjusting screw on the end of the output shaft you can insert the shaft into the main body making sure that the teeth on the Pitman shaft / output shaft mesh with the teeth in the working piston. The working nut the little foot that sticks out of the working piston needs to engage in the middle gap in the control valve. Wind the adjusting screw on the output shaft in an anti-clockwise direction (when facing the adjusting screw) to draw the output shaft into position. Keep turning the adjusting screw until it is hard to turn it. Don't over cook this bit if you are strong don't start jumping up and down on it a noticeable change in stiffness is all that is required.  Next fit the seals on the output shaft cap. The FSM says to fill the gap between the large seal beneath the circlip with grease.  Fit the output shaft cap as before make sure that the oil ways line up correctly and tighten the bolts to 30 35 N. The FSM says to replace these screws with new plastic coated screws. I used normal 8.8 strength bolts with Loctite. Please note this is my personal choice and not officially recommended.
__________________
1992 W201 190E 1.8 171,000 km - Daily driver 1981 W123 300D ~ 100,000 miles / 160,000 km - project car stripped to the bone 1965 Land Rover Series 2a Station Wagon CIS recovery therapy! 1961 Volvo PV544 Bare metal rat rod-ish thing I'm here to chat about cars and to help others - I'm not here "to always be right" like an internet warrior Don't leave that there - I'll take it to bits! Last edited by Stretch; 08-12-2011 at 12:41 PM. Reason: I forgot to mention
|
|
#18
08-11-2011, 04:25 AM
|
||||
|
||||
|
The final adjustment
Now that the assembly is complete you are left to do the final adjustment.
Slacken the adjusting screw (turn clockwise when facing it) so that the output shaft can be easily rotated. I recommend that you now take the time to wind the input shaft from stop to stop and make sure that the gearing feels smooth and that it does not bind (as the FSM puts it). You should be able to feel a slight change in stiffness in the centre of the travel of the output shaft. To keep track of the travel of the output shaft I made some marks on a piece of masking tape showing the furthest points of travel and the centre position.  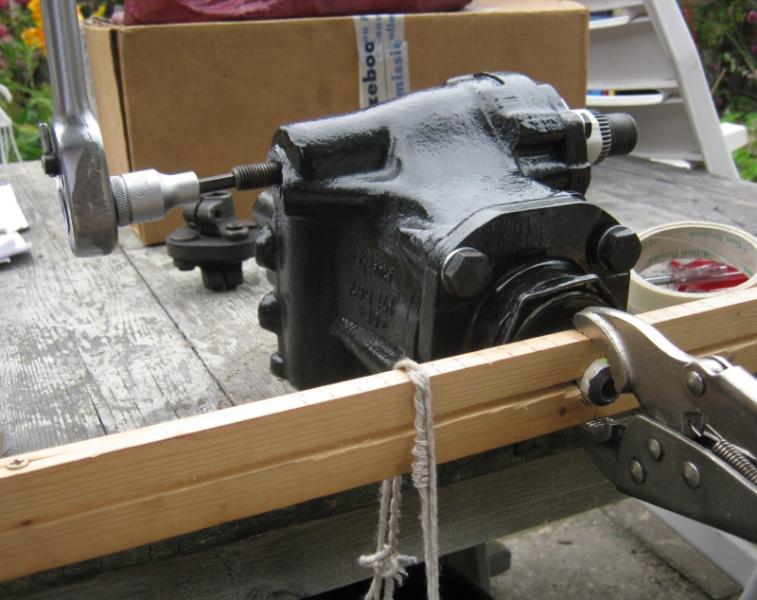 The FSM says to now measure the friction of the steering box. Place your balancing device back on the input shaft and measure the friction required to turn the output shaft (and thus the input shaft) beyond the centre position. You are now meant to turn the adjusting screw in an anti-clockwise direction (when facing the screw) until the friction is increased by 40 60Ncm. According to the FSM, in real terms this means that the amount of torque applied to the input shaft in order to move the output shaft beyond the centre position should be in the range of 110 160Ncm. Warning don't forget about the difference between Newton metres and Newton centimetres! If you tighten the adjusting screw too far do not be tempted to just back it off a bit. That little amount of clearance at the end of the Pitman shaft / output shaft and the adjusting screw helps you to loose your place. I thought I could get away with doing this but I found that I couldn't. After working the steering from stop to stop I found that the friction changed slightly from the amount that I had previously set. For this reason I recommend that you start all over again tighten the adjusting screw until it is stiff to move and then repeat the adjustment process as detailed above. I don't know this for sure but I think this might be the reason why some people have had trouble adjusting steering boxes by just nipping up the adjustment screw. If you decide to do this quick adjustment to your car I recommend that you only turn that pesky adjusting screw in an anti-clockwise direction!
__________________
1992 W201 190E 1.8 171,000 km - Daily driver 1981 W123 300D ~ 100,000 miles / 160,000 km - project car stripped to the bone 1965 Land Rover Series 2a Station Wagon CIS recovery therapy! 1961 Volvo PV544 Bare metal rat rod-ish thing I'm here to chat about cars and to help others - I'm not here "to always be right" like an internet warrior Don't leave that there - I'll take it to bits! Last edited by Stretch; 08-11-2011 at 06:05 AM.
|
|
#19
08-11-2011, 04:29 AM
|
||||
|
||||
|
Final comments
This is a nice little science project for rainy days when you can't get anything else done. It isn't really the sort of thing I'd like to do in a rush. If you decide to do this please take your time and make sure you do it properly so read the FSM.
I'd like to hear from anyone who has done this job before. If I have made any errors in the long and winding text above please let me know. Oh and in case you want to know I painted the steering casing with POR15 engine enamel to match the engine block I hope it sticks!
__________________
1992 W201 190E 1.8 171,000 km - Daily driver 1981 W123 300D ~ 100,000 miles / 160,000 km - project car stripped to the bone 1965 Land Rover Series 2a Station Wagon CIS recovery therapy! 1961 Volvo PV544 Bare metal rat rod-ish thing I'm here to chat about cars and to help others - I'm not here "to always be right" like an internet warrior Don't leave that there - I'll take it to bits!
|
|
#20
08-11-2011, 06:28 AM
|
|||
|
|||
|
Wow! I am impressed. Thanks for this. Too bad you are on the other side of the pond. You could probably do quite a business in rebuilding these from forum members.
__________________
80 300SD (129k mi) 82 240D stick (193k mi)77 240D auto - stick to be (153k mi) 85 380SL (145k mi) 89 BMW 535i 82 Diesel Rabbit Pickup (374k mi) 91 Jetta IDI Diesel (155k mi) 81 VW Rabbit Convertible Diesel 70 Triumph Spitfire Mk III (63kmi)66 Triumph TR4a IRS (90k mi)67 Ford F-100 (??)
|
|
#21
08-11-2011, 07:27 AM
|
||||
|
||||
|
Quote:
__________________
1992 W201 190E 1.8 171,000 km - Daily driver 1981 W123 300D ~ 100,000 miles / 160,000 km - project car stripped to the bone 1965 Land Rover Series 2a Station Wagon CIS recovery therapy! 1961 Volvo PV544 Bare metal rat rod-ish thing I'm here to chat about cars and to help others - I'm not here "to always be right" like an internet warrior Don't leave that there - I'll take it to bits!
|
|
#22
08-11-2011, 09:17 AM
|
||||
|
||||
|
The question is Army;
When will you have it all back together & road test? Sorry if i sound like the grief you are probably getting at home !! 
__________________
Grumpy Old Diesel Owners Club group I no longer question authority, I annoy authority. More effect, less effort....  1967 230-6 auto parts car. rust bucket. 1980 300D now parts car 800k miles 1984 300D 500k miles  1987 250td 160k miles English import  2001 jeep turbo diesel 130k miles  1998 jeep tdi ~ followed me home. Needs a turbo. 1968 Ford F750 truck. 6-354 diesel conversion. Other toys ~J.D.,Cat & GM ~ mainly earth moving
|
|
#23
08-11-2011, 09:30 AM
|
||||
|
||||
|
Quote:
I'm half way through my paint job. I'm stuck painting outside which is less than ideal in a summer with more rain than we had in the winter. I'm getting to the stage where I'll be off to the technical college just round the corner to see if I can hire a spray booth. As for the transmission - that's back together so in principle I could fit that and the engine and get it running. Virtually everything else has been done. I have a bit of rust to repair on the floor pan - that's what I'm doing today between the showers from the heavens. And whilst I've got the interior out I guess I should check the condition of the heater matrix... ...you see even for an idiot like myself who insists on taking everything to bits a car is eventually a finite thing. There won't be anything else left to "fix" soon.
__________________
1992 W201 190E 1.8 171,000 km - Daily driver 1981 W123 300D ~ 100,000 miles / 160,000 km - project car stripped to the bone 1965 Land Rover Series 2a Station Wagon CIS recovery therapy! 1961 Volvo PV544 Bare metal rat rod-ish thing I'm here to chat about cars and to help others - I'm not here "to always be right" like an internet warrior Don't leave that there - I'll take it to bits!
|
|
#24
08-11-2011, 10:48 AM
|
|||
|
|||
|
Quote:
When the first thing you did was years ago, its time to re-fix it.
__________________
80 300SD (129k mi) 82 240D stick (193k mi)77 240D auto - stick to be (153k mi) 85 380SL (145k mi) 89 BMW 535i 82 Diesel Rabbit Pickup (374k mi) 91 Jetta IDI Diesel (155k mi) 81 VW Rabbit Convertible Diesel 70 Triumph Spitfire Mk III (63kmi)66 Triumph TR4a IRS (90k mi)67 Ford F-100 (??)
|
|
#25
08-11-2011, 10:56 AM
|
||||
|
||||
|
Fantastic writeup. Thanks.
__________________
Proud owner of .... 1971 280SE W108 1979 300SD W116 1983 300D W123 1975 Ironhead Sportster chopper 1987 GMC 3/4 ton 4X4 Diesel 1989 Honda Civic (Heavily modified) --------------------- Section 609 MVAC Certified --------------------- "He who fights with monsters might take care lest he thereby become a monster. And if you gaze for long into an abyss, the abyss gazes also into you." - Friedrich Nietzsche
|
|
#26
08-11-2011, 12:59 PM
|
||||
|
||||
|
Amazing writeup Army. Thanks for walking us through this.
I dont know if I'll have time to do such a task, but its interesting to see how it's done. I am dying to know how it works compared to before! I have no idea what a 'new' steering box felt like. Supposedly they did have a center 'dead' spot even when new.
__________________
------------------------------- '85 300D, 'Lance',250k, ... winter beater (100k on franken-Frybrid 3 Valve Kit) '82 300D, 'Tex', 228k body / 170k engine ... summer car '83 300TD Cali Wagon 210k, wife's car
|
|
#27
08-11-2011, 01:05 PM
|
||||
|
||||
|
Thanks guys - I too will be very interested to see if it is worth the effort. When I get it all done it will be almost a new car. I want to finish this project soon I'm itching to start the next one.
If I could see some hope of some good weather I'd challenge you to a race dieseldan - you and your engine swap and me and my boxes of bits!
__________________
1992 W201 190E 1.8 171,000 km - Daily driver 1981 W123 300D ~ 100,000 miles / 160,000 km - project car stripped to the bone 1965 Land Rover Series 2a Station Wagon CIS recovery therapy! 1961 Volvo PV544 Bare metal rat rod-ish thing I'm here to chat about cars and to help others - I'm not here "to always be right" like an internet warrior Don't leave that there - I'll take it to bits!
|
|
#28
08-11-2011, 01:11 PM
|
|||
|
|||
|
I am pre-congratulating you on a wonderful instructable. Well Done.
...However, it is conditional, and I maintain that you are a truly disturbed individual and that I may never need this DIY. But in the even that I do, you have done a terrific job.
|
|
#29
08-11-2011, 02:14 PM
|
||||
|
||||
|
Nice work Tristan! Love the step-by-step write up.
Definitely one for the archives to help many, many others.
__________________
http://farm8.staticflickr.com/7271/7...144c3fc1dc.jpg
|
|
#30
08-11-2011, 02:26 PM
|
||||
|
||||
|
I'm echoing the thanks. And for the Nth time, reiterating how much the knowledge base here puts anything else I have seen, in the shade....
__________________
 Mac 2002 e320 4matic estate│1985 300d│1980 300td Previous: 1979 & 1982 & 1983 300sd │ 1982 240d Let's take a drive into the middle of nowhere with a packet of Marlboro lights and talk about our lives. ― Joseph Heller, Catch-22
|
|
| Bookmarks |
|
|


 Linear Mode


