

|
|
|
|
|
|
#1
 12-20-2011, 04:31 PM
|
|||
|
|||
|
W123 Axle Seal removal
Has anyone got any tips for removing the seals from the 3rd member to the rear axles? The FSM says use a screw driver but I have seen several posts lamenting on how useless that is.

|
|
#2
12-20-2011, 05:28 PM
|
||||
|
||||
|
i used a 20" long pry bar, pressing on it with my foot.
did it work? yes. was it easy? no.
|
|
#3
12-20-2011, 10:24 PM
|
||||
|
||||
|
Do a Google search for Seal Remover and you will find a lot of hook shaped ones (sold at you local Auto Parts Store) that look like a miniature medieval weapon.
There are also one that attach to Slide Hammers. What will work depends on what is behind the Seal. If there is flat metal behind the seal something like a Screwdriver Blade may be needed to get behind it.
__________________
84 300D, 82 Volvo 244Gl Diesel
|
|
#4
12-20-2011, 10:39 PM
|
||||
|
||||
|
__________________
1983 123.133 California - GreaseCar Veg System 
|
|
#5
06-11-2012, 06:16 PM
|
|||
|
|||
|
diff seal puller
My most effective tool was to find a 14mm size bolt with a lip, of the kind that are strewn all over the ground at wrecking yards.
Drill a hole for the bolt into the side of one end of a heavy block of wood that is about a metre long. Screw it in leaving about 15mm of the bolt protruding, enough room for the lip to grab on the inside edge of the seal while the block rests against the diff. Apply the bolt lip to the seal and give the other end of the block a good kick and your seal will fly out. You'll spend about a minute giggling.
|
|
#6
06-11-2012, 06:34 PM
|
|||
|
|||
|
If you use the seal puller A.K.A. "miniature medieval weapon" be careful what you pry on as I did this last weekend and there was some damage to what lies behind the seal.
Another thing I had problems with is the differential mount bottom bolt. It wanted to cross thread. Use a pry bar to position the differential it to where it needs to be. If the bolt don't go in with hand pressure don't force it. It will cross thread. Been there done that.
|
|
#7
06-11-2012, 07:18 PM
|
||||
|
||||
|
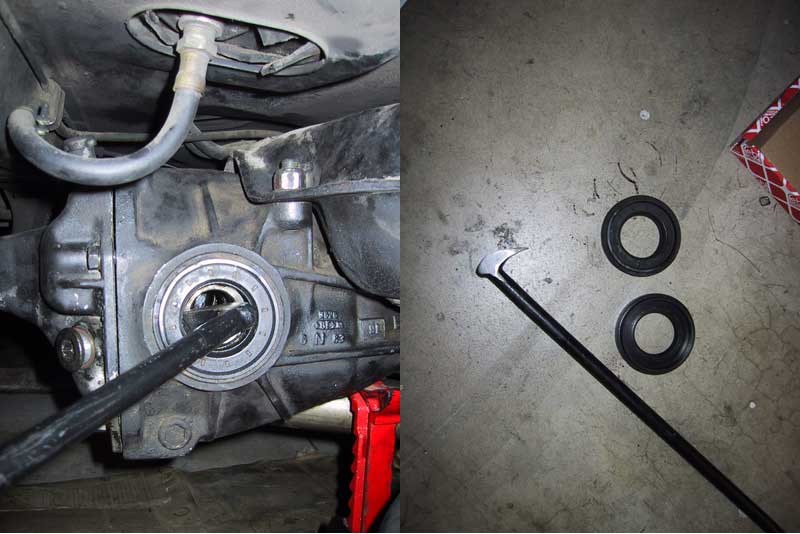
I used the tool used in Deliveryvalves post but I was removing Seal that has not been in long. I was removing it becauethe Seal Spring had popped of when I installed it. See Pics.
When I removed the Old Seals I when to the highest point/12:00 on the Seal (the highest point if the differential was installed) and tapped a small Scewdriver between the bore and the Seal edge and pried the Seal out. You need to be careful with that because it marks up the bore the Seal goes into a little. However, I took a small Jewlers File and dressed off the high spots and used Permatex Copper Kote Sealent around the seal to seal up any grooves that might have been left by the Screwdriver. It is not going to leake when you do that because the Differential Fluid is thick and it is not under any pressure (there is a vent in the Differential Housing). I did not use the Prybar the to remove the Old Seals because I was not willing to spend the hour or so to find where I had put them. When I was faced with remvoving the new Seal undamged I had to take the time to look for the Pry Bars. After putting the Spring Back on the Seal I shoved a Socket into the center to keep tension on the Lip and Seal Spring to keep it from popping off again; as suggested by one of our Members.
__________________
84 300D, 82 Volvo 244Gl Diesel
|
|
#8
06-12-2012, 03:34 AM
|
||||
|
||||
|
Quote:
Are you not going to post up a nice picture of your tool then? (Teasing is also good!)
__________________
1992 W201 190E 1.8 171,000 km - Daily driver 1981 W123 300D ~ 100,000 miles / 160,000 km - project car stripped to the bone 1965 Land Rover Series 2a Station Wagon CIS recovery therapy! 1961 Volvo PV544 Bare metal rat rod-ish thing I'm here to chat about cars and to help others - I'm not here "to always be right" like an internet warrior  Don't leave that there - I'll take it to bits!
|
|
#9
06-12-2012, 11:16 AM
|
|||
|
|||
|
I didn't have a big socket to install the new seals when I did axles on my 123 last year. I went to Home Depot and found some large pvc fittings that fit perfectly. Probably cost me $4.
__________________
2009 E320 Bluetec 117,000 1995 E300D 306,000 Sold 1996 Ford Taurus LX 130,000 Sold 1985 300TD Still 225,000 Sold 2016 Ford Fusion 24,900
|
|
#10
06-12-2012, 09:01 PM
|
||||
|
||||
|
Quote:
I guess I had been lucky for some thing like 44 years; until that Seal came along I have never had the Spring pop out.
__________________
84 300D, 82 Volvo 244Gl Diesel Last edited by Diesel911; 06-13-2012 at 02:20 PM.
|
|
#11
06-13-2012, 12:20 AM
|
||||
|
||||
|
FYI
Last edited by whunter; 06-13-2012 at 09:48 PM.
|
|
#12
06-13-2012, 05:48 AM
|
|||
|
|||
|
I ended up using a prybar but that tool Roy posted looks like it would have been easier.
|
|
#13
06-13-2012, 11:41 AM
|
|||
|
|||
|
I have the HF tool, but couldn`t get the seals to budge. think I used a screwdriver and hammer, punched a hole or deformed the metal a bit, then it came out. that tool isn`t super strong, someone posted a picture of his that broke where the 2 pieces are rivited together.
I workd really good for installing the muffler do-nuts. Charlie
__________________
there were three HP ratings on the OM616... 1) Not much power 2) Even less power 3) Not nearly enough power!! 240D w/auto Anyone that thinks a 240D is slow drives too fast. 80 240D Naturally Exasperated, 4-Spd 388k DD 150mph spedo 3:58 Diff We are advised to NOT judge ALL Muslims by the actions of a few lunatics, but we are encouraged to judge ALL gun owners by the actions of a few lunatics. Funny how that works
|
|
#14
06-13-2012, 09:52 PM
|
||||
|
||||
|
More tools
Carbon Steel Seal Puller w/Side Handle
Professional grade tools: YA105, Seal Puller, 12 5/8" long SP56 SEAL PULLER | Matco Tools Buy.com - PULLER SEAL SRT1, Tool, Seal Removal, Heavy Duty Truck Wheel Some people get creative: Project Lilia Uber ("BUILD THREAD") : SR20DET Forum (rear-drive) - Page 3  .
|
|
#15
07-11-2023, 06:21 PM
|
|||
|
|||
|
Quote:
Last edited by HughO; 07-11-2023 at 07:13 PM.
|
 |
| Bookmarks |
|
|


 Linear Mode


