

|
|
|
|
|
|
#16
 02-18-2012, 01:18 AM
|
|||
|
|||
|
I have to amend my post. The problem I had turned out to be a too small vent line from valve cover to air filter assembly. I really don't know what was causing the smoke when I came to a stop, but I do know the back-pressure from the vent line caused all sorts of strange things to happen. For example: if I pulled my dipstick large amounts of oil would flow from the hole. So I have to conclude that I could have had oil flowing up the air filter return line back into the engine intake causing large amounts of smoke. One thing I would check is crankcase pressure, you can have none or very little. If you pull your valve cover cap or vent line you should have NO back pressure or hiss when the seal is broken. I chased my tail all over the place until I found a post that led me to the case pressure problem. I unplugged the system and all the wierd stuff went away. I did re-seal my turbo and the fact it had tons of carbon build up made me think it was a good thing to do even if it was not the cause.

|
|
#17
04-22-2012, 07:30 PM
|
|||
|
|||
|
Hello, again. I have finally scraped together most of the parts (thanks scottmcphee) I thought may be necessary to do the head-gasket job....and have already taken the valve cover and air filter assemblies off... I have loosened the turbo supply line going to the oil filter tower at the oil filter tower...(I think the rest will come out as a unit together with the turbo and manifolds. Taken the rear hose off for the cooling system and ripped it.
I have cleaned the area under the valve cover and the holes for the head bolt tool. I loosened all the fuel lines to the injectors...I have marked the timing chain and gear and cam.with paint marker. I also decided to zip tie the chain to the cam sproket. I am a little worried about the timing going out. Is there a specific position the timing needs to be at? or can it just be marked where it is and put back to the same spot after reassembly?? Thanks Last edited by macdoe; 04-23-2012 at 01:05 AM.
|
|
#18
04-22-2012, 09:08 PM
|
|||
|
|||
|
Almost forgot to mention that the car sat for a few months and I got a sample of oil from the pan before moving it to the shop and it looks like no antifreeze in the oil. Also checked the trans fluid and it seems fine. So we will go ahead with the head-gasket replacement.
Last edited by macdoe; 04-23-2012 at 12:55 AM.
|
|
#19
04-22-2012, 09:27 PM
|
|||
|
|||
|
Here are some pics of a cheap set of s2 tool steel triple square bits that just slide into a 1/2 inch socket. I paid $7.99 for them at princess auto. I will have to modify them abit by grinding down the excess material which gets in the way of the tool fitting into the head-bolt in a couple of spots. I believe this tool is 3 inches long and gets shorter once inserted into the 1/2 inch socket. I am not sure why the special expensive socket needs to be so long.....this will work once I do some grinding and was way cheaper than $50 bucks for the Mercedes Hazet socket. I believe the size is M12 Triple square.
|
|
#21
04-22-2012, 11:53 PM
|
||||
|
||||
|
Quote:
__________________
95 E300 Diesel 200K
|
|
#22
04-23-2012, 12:25 AM
|
||||
|
||||
|
TDC on the compression stroke (#1 valves closed). There is a mark on the cam tower that lines up with the mark on the back side of the gear. You will need to remove the guide rail and pin with a rail pin puller. Don't forget to put a rag down in the cavity between the chain, so it will catch any parts you drop (washer behind timing gear, allen bolts inside the cavity). I would have the head rebuilt while it is out if I were doing the job.
__________________
 All Diesel Fleet 1985 R107 300SLD TURBODIESEL 2005 E320 CDI (daily) LOTS of parts for sale! EGR block kit http://www.peachparts.com/shopforum/diesel-discussion/355250-sale-egr-delete-block-off-plate-kit.html 1985 CA emissions 617 owners- You Need This! Sanden style A/C Compressor Mounting Kit for your 616/ 617 For Sale + Install Inst. Sanden Instalation Guide (post 11): http://www.peachparts.com/shopforum/diesel-discussion/367883-sanden-retrofit-installation-guide.html
|
|
#24
04-23-2012, 12:52 AM
|
|||
|
|||
|
nevermind about the guide rail...I can see why it has to come out. I see a small notch protruding from the cam tower on the drivers side but do not see a mark on the timing gear itself...just a Mercedes emblem and some numbers cast into the gear? Maybe I'll have a better look in the a.m . Is this mark on the timing gear just a line or something else to indicate? I will cut the zip ties off the timing gear/ chain and move the engine to your guys specified position in the a.m as well... I guess I can zip tie it again....no big deal. Thanks
|
|
#25
04-23-2012, 11:10 AM
|
||||
|
||||
|
The washer between the cam tower and the gear has a notch in it that should line up with the notch on the cam tower. The guide rail and the gear need to be removed to be able to get the head off.
__________________
All Diesel Fleet 1985 R107 300SLD TURBODIESEL 2005 E320 CDI (daily) LOTS of parts for sale! EGR block kit http://www.peachparts.com/shopforum/diesel-discussion/355250-sale-egr-delete-block-off-plate-kit.html 1985 CA emissions 617 owners- You Need This! Sanden style A/C Compressor Mounting Kit for your 616/ 617 For Sale + Install Inst. Sanden Instalation Guide (post 11): http://www.peachparts.com/shopforum/diesel-discussion/367883-sanden-retrofit-installation-guide.html
|
|
#26
04-23-2012, 11:35 AM
|
||||
|
||||
|
__________________
-1985 300TD - 324k mi on chassis. MB "Tauschaggregat" 617 motor + 4-speed conversion Alaska Roadtrip 2009 -2002 E320 Wagon - 197k mi -1998 E320 Wagon - 310k mi - retired
|
|
#27
04-23-2012, 02:46 PM
|
|||
|
|||
|
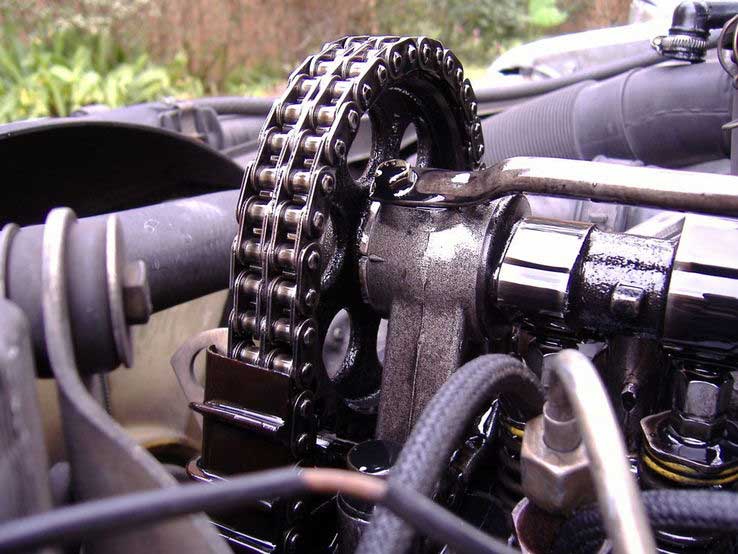
Thanks for the picture. I found the marks and have now lined them up. I will re-mark everything and zip tie it back up. Looks just like the picture as far as where the lobes are...valves should be closed on #1. I think I will be changing the valve seals when the head is off so I will probably end up moving the cam? Is that o.k now? I would love to have the head rebuilt but funds won't allow it right now.
Another question is about the heat shield that covers the starter. It looks like it should be attached to the exhaust manifold so it should come out with the head when lifted? I think I have everything disconnected and am ready to take headbolts out? I have to recharge the camera. I have heard about an injection pump locking tool....is that necessary for this kind of job? Last edited by macdoe; 04-23-2012 at 02:59 PM.
|
|
#28
04-23-2012, 03:04 PM
|
|||
|
|||
|
I read the timing chain stretch guide from the picture by bamba and it looks like the pointer is indicating the timing is at 0 degrees or maybe a pointer width past. (3/16")past 0.... I will take a picture once the camera is charged. This is using the more basic " line up marks on the cam tower and washer method" rather than the dial indicator method.
There is a pin sticking out of the harmonic balancer....what is that for?
|
 |
| Bookmarks |
|
|


 Linear Mode


