

|
|
|
|
|
|
#1
 11-24-2012, 09:03 PM
|
|||
|
|||
|
Turbo Boost Gauge Installation Example
After seeing many of the boost pressure gauge installation pics here on the forum I thought you guys might like to see this.
EDIT: Updated for larger picture, sorry I posted the thumbnail link the first time around. 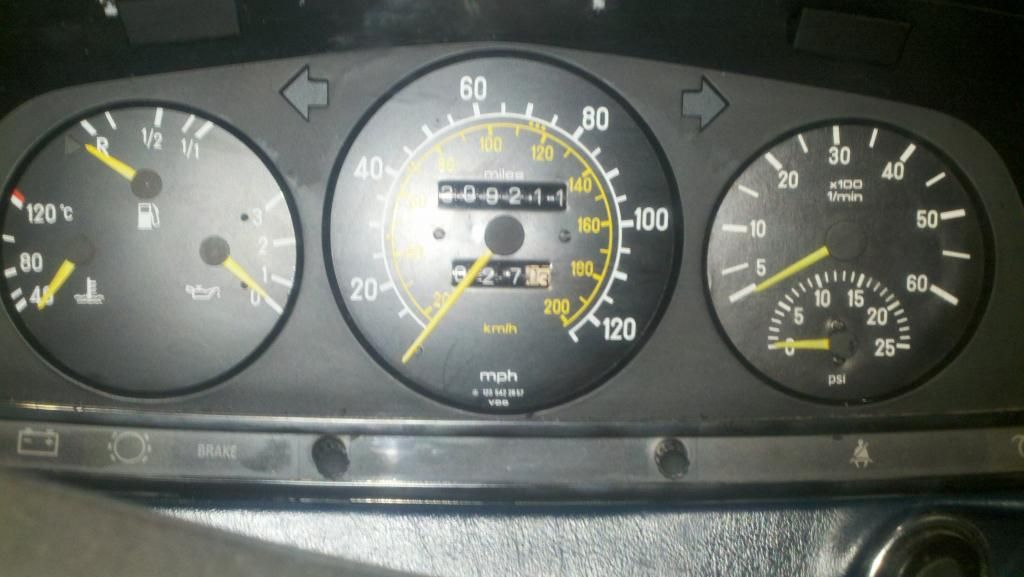 My Procedure: Removed the clock hardware below the tach. Bored a hole into the back of the housing to accept the gauge's fitting for the line and to create a firm mounting (beware if you do this yourself, remove the three outer screws to release the tachometer first, as metal shavings will be attracted to the magnetic raceway of the tachometer). Tee'd into the ALDA-turbo connection to tap the boost reading. Removed the gauge face for the tach/clock portion (be sure to pry with an upward motion so as to not bend the needle's shaft on the tach). Scanned this into the computer. I took an aftermarket boost gauge and took it apart. Scanned in the face into the computer. Used photoshop (actually GIMP) to bring the aftermarket gauge markings onto the area where I wanted it. Rotated and oriented the marking where I wanted them. Cloned the numbers from the tach to the boost area so the font on the numbers would match the OE. Used the closest match of font I could find and marked it simply 'psi' in keeping with the style of the original cluster. Drilled two small holes in the metal gauge face where the new gauge had screw holes. Enameled the screws in black to match other screws in the cluster. Applied spray adhesive to face and applied new facing. I chose to flip the gauge face and use the white side to apply, so as to do minimal damage to the OE in case I ever wanted to remove the boost gauge. Turned out a bit messy as I got into a hurry putting the new face on (has some uneven/raised/bubbly spots) and I got my greasy fingerprints all over the inside of the cluster (should've cleaned it up with rubbing alcohol). But overall, I'm pleased with it. The flash was on the camera in this picture -- the texture/color difference from the original is hardly noticeable in person. It really looks original under all but the most intense white lights. Hope this gives you folks some ideas for your own installations.
__________________
1985 300TD 310k 1985 300D 315k 1984 300D 220k (parts car) Last edited by Jatimo; 11-25-2012 at 12:06 AM. 
|
|
#2
11-24-2012, 09:10 PM
|
|||
|
|||
|
Turbo Boost Gauge Installation Example
After seeing many of the boost pressure gauge installation pics here on the forum I thought you guys might like to see this. Click the thumbnail to see the full size image
 My Procedure: Removed the clock hardware below the tach. Bored a hole into the back of the housing to accept the gauge's fitting for the line and to create a firm mounting (beware if you do this yourself, remove the three outer screws to release the tachometer first, as metal shavings will be attracted to the magnetic raceway of the tachometer). Tee'd into the ALDA-turbo connection to tap the boost reading. Removed the gauge face for the tach/clock portion (be sure to pry with an upward motion so as to not bend the needle's shaft on the tach). Scanned this into the computer. I took an aftermarket boost gauge and took it apart. Scanned in the face into the computer. Used photoshop (actually GIMP) to bring the aftermarket gauge markings onto the area where I wanted it. Rotated and oriented the marking where I wanted them. Cloned the numbers from the tach to the boost area so the font on the numbers would match the OE. Used the closest match of font I could find and marked it simply 'psi' in keeping with the style of the original cluster. Drilled two small holes in the metal gauge face where the new gauge had screw holes. Enameled the screws in black to match other screws in the cluster. Applied spray adhesive to face and applied new facing. I chose to flip the gauge face and use the white side to apply, so as to do minimal damage to the OE in case I ever wanted to remove the boost gauge. Turned out a bit messy as I got into a hurry putting the new face on (has some uneven/raised/bubbly spots) and I got my greasy fingerprints all over the inside of the cluster (should've cleaned it up with rubbing alcohol). But overall, I'm pleased with it. The flash was on the camera in this picture -- the texture/color difference from the original is hardly noticeable in person. It really looks original under all but the most intense white lights. I happen to have a spare instrument cluster from which I pulled the needle. I used one from the left hand side (oil/fuel/temp side). Hope this gives you folks some ideas for your own installations.
__________________
1985 300TD 310k 1985 300D 315k 1984 300D 220k (parts car)
|
|
#3
11-24-2012, 09:16 PM
|
|||
|
|||
|
That is extremely cool!
I'd love to have something like that on my W124.
__________________
68 280SL - 70 280SL - 70 300SEL 3.5 - 72 350SL - 72 280SEL 4.5 - 72 220 - 72 220D - 73 450SL - 84 230GE - 87 200TD - 90 190E 2.0 - 03 G500 Nissan GTR - Nissan Skyline GTS25T - Toyota GTFour - Rover Mini - Toyota Land Cruiser HJ60 - Cadillac Eldorado - BMW E30 - BMW 135i
|
|
#4
11-24-2012, 09:46 PM
|
||||
|
||||
|
Very slick!
What kind of boost are you getting?
__________________
85 Merc 300D - Unwinding 31 years of wear 86 VW TD Mahindra Diesel Iseki Diesel In 2007 I didn't own a diesel.
|
|
#6
11-24-2012, 10:19 PM
|
|||
|
|||
|
would you make your graphic file available to the world?
__________________
1982 300sd from craigslist $800 greased on one tank with NO CONVERSION in the Hot Texas Sun. (currently dead & awaiting engine damage investigation and/or longblock swap) new daily: '03 vw 5speed jetta tdi wagon. bagged&chipped
|
|
#8
11-24-2012, 10:41 PM
|
||||
|
||||
|
Looks cool, hoping for a larger picture please!
|
|
#9
11-24-2012, 11:41 PM
|
||||
|
||||
|
Interesting, Some further instruction on how you used Gimp to make the gauge face would be great. I love having my clock there, I wonder if there is room at the bottom of the left gauge... What boost gauge did you use?
__________________
2004 F150 4.6L -My Daily 2007 Volvo XC70 -Wife's Daily 1998 Ford F150 -Rear ended 1989 J-spec 420SEL -passed onto its new keeper 1982 BMW 733i -fixed and traded for the 420SEL 2003 Volvo V70 5 Speed -scrapped 1997 E290 Turbo Diesel Wagon -traded for above 1992 BMW 525i -traded in 1990 Silver 300TE -hated the M103 1985 Grey 380SE Diesel Conversion, 2.47 rear end, ABS -Sold, really should have kept this one 1979 Silver 300D "The Silver Slug" -Sold
|
|
#10
11-24-2012, 11:44 PM
|
|||
|
|||
|
could we get a merge from a mod?

__________________
1982 300sd from craigslist $800 greased on one tank with NO CONVERSION in the Hot Texas Sun. (currently dead & awaiting engine damage investigation and/or longblock swap) new daily: '03 vw 5speed jetta tdi wagon. bagged&chipped
|
|
#11
11-25-2012, 12:28 AM
|
|||
|
|||
|
In GIMP I started by cutting and pasting the aftermarket gauge face into the area where I wanted it. Then I did an elliptical select of the new gauge marking area. It's easiest if you have your selection start from the center (one of the options when you choose elliptical selection). I then rotated my selection until the "0" was where I wanted it, and anchored that back down to the main layer.
Next you'll do a magic wand selection and adjust the threshold until its clearly grabbing the meter markings and numbering. Then select all the tick marks and numbers by holding shift and magic wand clicking each color region. Don't forget the interiors of 0's and 4's and such. You can also use Ctrl to subtract selection to make things easier. Use the freehand selection (lasso) to correct any misselection automatically done by the magic wand. Again, Ctrl and Shift to subtract or add to selection. Once you have all the white regions selected, I suggest airbrush white as your scanner will probably have imparted a not-so-white tint to them. You should still have just these regions selected, so you can freely airbrush all over the gauge face and only be airbrushing the white portions, much like masking tape with spray paint. When you're done touching up the white, inverse your selection. This now gives you the black background area. Again, make sure you have the interior colors of numbers selected as well. I chose to use the cloning brush to copy from a region of the black background to the area of the new gauge face where the color was different and the branding and labeling was. I may try doing it again airbrushing straight black to see if the color is a better match. For the numbers I did a simple copy and paste operation. The font I used for the lettering was a Sans bold variant. I feel the letters are not as wide as the font MB/VDO used on the OE cluster. If anyone can find a closer font, I'd love to have it. I used a Sunpro vac/boost pressure gauge that can be had at your typical auto parts store or some big box stores. IIRC it was around $30-40. I simply didn't use the vacuum section of the markings. It was a tad bit big, and I ended up bending the copper tube in the back of the gauge to get it to fit without hitting the tach's PCB thus affecting the reading. I'd recommend getting a slightly smaller gauge if anyone can find one. Next time I have the cluster out I'll take measurements so we can determine what the biggest size is that will readily clear the tach hardware. I imagine it will be sometime this week. I want to touch up a screw head that I chipped during reassembly, and I'll probably reprint my mask and apply it again with a plastic spreader knife in order to get bubbles and wrinkles out, as well as clean the fingerprints and grease off with alcohol. If anyone happens to use that same gauge, this same mask below ought to work for you. simply place your needle on the shaft such that it's pointing directly at 0. The white spots will tell you where to cut the paper with your razor knife for the tach needle shaft, boost needle shaft, and screw holes. The top screw will be partially going into the hole for the clock needle shaft, but it will do the job fine of keeping the gauge straight and calibrated if you use the back housing to actually do the heavy lifting as far as the mounting goes. 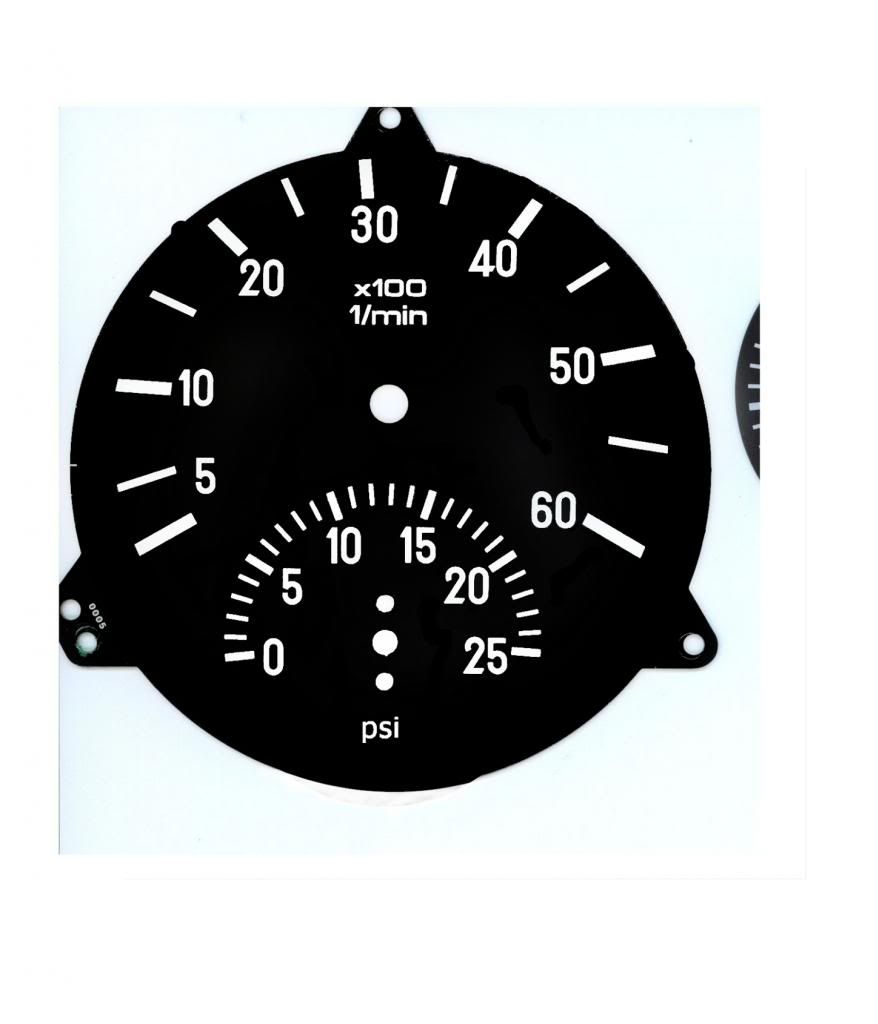 merge with a mod? do you mean start a thread in the mods section and merge this in? I'd be glad if you'd point me in the right direction, I haven't used this forum software much 
__________________
1985 300TD 310k 1985 300D 315k 1984 300D 220k (parts car)
|
|
#12
11-25-2012, 12:36 AM
|
|||
|
|||
|
Oh, and I almost forgot to speak on the prospect of placing the gauge on the left side of the cluster. I didn't have any luck finding a gauge locally that would fit in the free space that in the left side. The finished side of the section of the cluster looks as so there'd be a big open free space behind that face, but in reality it's pretty cramped.
Perhaps if we took some measurements of the area and any folks with smallish boost gauges could post the dimensions of those, we could determine what gauges could be made to fit in that area. Personally I decided to have it near the tach because I never use the clock (I have the smartphone mounted above the cluster with clock and GPS speedo, radio system integration, etc). Also the tach and turbo are closely related, and I find it interesting to watch the relationship between the two. It's interesting how a 100rpm difference, along with load and current trans gear can affect available boost pressure. Hopefully I don't get into an accident staring at my cluster instead of the road.
__________________
1985 300TD 310k 1985 300D 315k 1984 300D 220k (parts car)
|
|
#13
11-25-2012, 01:27 AM
|
||||
|
||||
|
There should be some matte plastic material that would be compatible with ink jet printers that would provide a more substantial substrate for mounting on the gauge face. I think that's what the guys that do the white face gauge retrofit kits use... just don't know the source.
When I replaced the tach module in my 107 with one from a 123 I trimmed the tabs and epoxied the entire tach face on top of the existing one.
__________________
Current Stable
|
|
#14
11-25-2012, 09:16 AM
|
||||
|
||||
|
Well done!
__________________
83 SD 84 CD
|
 |
| Bookmarks |
|
|


 ,72 350SL, 98 E320, Outback 2.5


 Linear Mode


