

|
|
|
|
|
|
#16
 12-22-2012, 02:40 PM
|
|||
|
|||
|
let me clarify that concern:
i think i understand where everything is going based on this diagram: http://www.peachparts.com/shopforum/attachments/mercedes-used-parts-sale-wanted/65936d1238561155-wtb-om617-plastic-fan-small-coolant-pump-pulley-picture-2.jpg the thing that concerns me is that i don't know how i'll get the belts around the coolant pump pulley as they are attached to a fan. do i just need to remove the fan assembly, put on the belt, then replace that assembly? it seems that way, but i thought i should check before i move forward later today. i've attached a picture of the fan i'm talking about for clarity's sake. you can see the grooves for the belts and if you look closely you can see the grooves on the alternator pulley. for obvious reasons, you cannot see the crank pulley in this picture. as always, any advice / confirmation of information is very much appreciated! 
|
|
#17
12-22-2012, 03:01 PM
|
|||
|
|||
|
Quote:
|
|
#18
12-22-2012, 04:10 PM
|
|||
|
|||
|
argh! i cannot get good access to that bolt due to the fan / radiator being in the way (no way to get my drill positioned correctly).
i don't think i'll be able to move forward without getting the radiator out of the way. how difficult will it be to remove it and put it back when i'm done?
|
|
#19
12-22-2012, 04:15 PM
|
|||
|
|||
|
Quote:
|
|
#21
12-22-2012, 04:41 PM
|
|||
|
|||
|
The drain plug is accessed from underneath the radiator support on the driver side. The plug is usually blue with large slots for a screwdriver or coin.
Then you have 4 radiator hoses attached with hose clamps. And two transmission cooler hoses at bottom radiator tank, with threaded connections. The fan shroud is secured to the radiator with two clips. Then the radiator attaches to the upper support with two padded clips. With those items disconnected, the radiator should lift straight up and out.
|
|
#22
12-22-2012, 07:14 PM
|
|||
|
|||
|
the good news is i was able to get the radiator removed (though not without some trouble - one of the hoses would not come off and i had to cut it).
the bad news is i'm still stuck with that bolt. at this point its dark and i'm tired, so i'll hit it again in the morning. how deep do these bolts go? do they just go into the harmonic balancer? if so, i may be able to pull it out and see if i have any luck that way (drilling from the other side or even just getting better angles and views with it off the engine). that, or i may just be able to replace the balancer.
|
|
#24
12-22-2012, 08:01 PM
|
|||
|
|||
|
yeah, i found an interesting thread on the subject after i made that post and it looks like that would not be too fun.
well...here's hoping in can get the rest of that bolt out tomorrow. also, one of the other holes has some bolt bits or some unknown thing in it, so that one needs clearing as well.
|
|
#25
12-22-2012, 09:59 PM
|
|||
|
|||
|
quick question while i'm thinking of it:
is there a way to manually turn the crank? changing the position can be really helpful to me at this point to see the problematic bolt from different angles and to get better access. i've turned on / off the engine a couple times to spin it, but that's just roulette that is clearly not a reliable method for getting things positioned optimally.
|
|
#27
12-23-2012, 04:14 AM
|
||||
|
||||
|
You might find some radiator removal information here that will be of use
How I took out my 1981 W123 300D (euro) non-turbo engine It is about my non-turbo OM617 which doesn't have the expansion tank or any air conditioning but anyway there's some pictures. If you are considering (an often controversial upgrade) have a look at the space you have with out a fan! 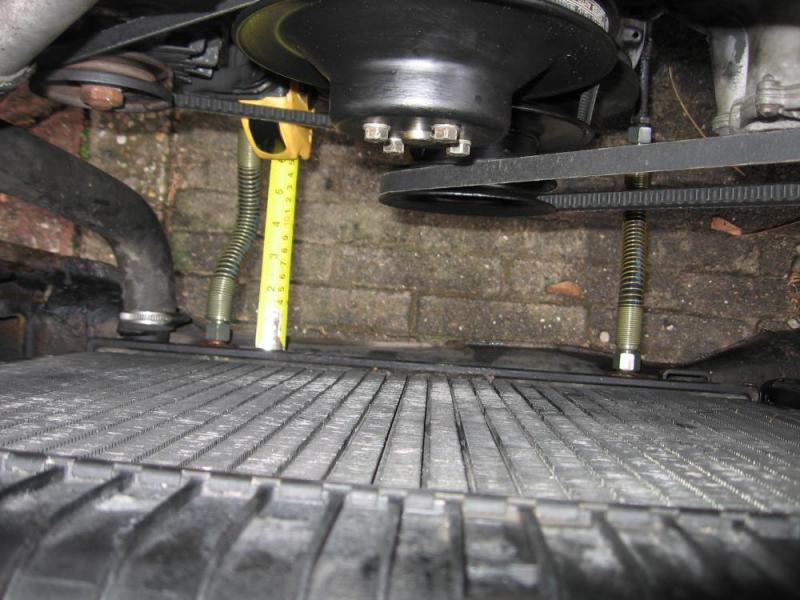 Will I get vibration problems if I remove my cooling fan?
__________________
1992 W201 190E 1.8 171,000 km - Daily driver 1981 W123 300D ~ 100,000 miles / 160,000 km - project car stripped to the bone 1965 Land Rover Series 2a Station Wagon CIS recovery therapy! 1961 Volvo PV544 Bare metal rat rod-ish thing I'm here to chat about cars and to help others - I'm not here "to always be right" like an internet warrior  Don't leave that there - I'll take it to bits!
|
|
#28
12-23-2012, 08:53 AM
|
||||
|
||||
|
I would think that is a clutch fan and can be rotated without turning the engine.
I've been able to work the belts around the fan. The shroud may need removal or loosening.
__________________
83 SD 84 CD
|
|
#29
12-23-2012, 10:24 AM
|
||||
|
||||
|
Quote:
__________________
John HAUL AWAY, OR CRUSHED CARS!!! HELP ME keep the cars out of the crusher! A/C Thread "as I ride with my a/c on... I have fond memories of sweaty oily saturdays and spewing R12 into the air. THANKS for all you do! My drivers: 1987 190D 2.5Turbo 1987 190D 2.5Turbo 1987 190D 2.5-5SPEED!!!  1987 300TD 1987 300TD 1994GMC 2500 6.5Turbo truck... I had to put the ladder somewhere!
|
|
#30
12-23-2012, 01:34 PM
|
|||
|
|||
|
i think i finally have all the bolt shrapnel cleared out, but unfortunately the threads (at least at the beginning) are pretty toasted. i'm not sure if this is a result of my drilling, previous damage, or both.
in a different thread i saw mention of using helicoils for stripped threads. i'm not at all familiar with such things, so i'm wondering if anyone has any experience with this process and if it may work for my situation.
|
 |
| Bookmarks |
|
|


 Linear Mode


