

|
|
|
|
|
|
#1
 02-10-2013, 12:10 AM
|
||||
|
||||
|
1980 W116 300SD OM617 Front Crank Seal Replacement
This is a write-up on replacing the front crankshaft oil seal on an OM617 5 cylinder turbo diesel engine in a 1980 W116 300SD with over 315,000 miles. The procedure should be nearly the same for the W123 and W126 chassis with this engine. Many of the principles can be applied to nearly any of the older Mercedes models.
I cannot stand oil leaks! My front crank seal leak has been gradually getting worse, now leaving a spot of oil in the garage.  Since I have free time and the parts are cheap, I decided to try replacing it myself. First, the alternator bolts are loosened so the belts can be removed (17mm for mounting bolts, 13mm for tension nut).  Then remove the 10mm fan bolts and remove the fan and pulley. There is a high risk of rounding them. It is best to use a box wrench with the outer edge ground down so it will slip over them. I did not have one and yes, I rounded them. One was so bad I had to use clamping pliers to remove it.  The 8mm bolts on top of the fan shroud come out next.  Then the fan shroud comes out. Yes, it will come out, but you have to turn it on its side as pictured. 
__________________
Stop paying for animal enslavement, cruelty, and slaughter. Save your health and the planet. Go vegan! I did 18 years ago. https://challenge22.com/ DON'T MESS WITH MY MERCEDES!  1967 W110 Universal Wagon, Euro, Turbo Diesel, Tail Fins, 4 Speed Manual Column Shift, A/C 1980 W116 300SD Turbo Diesel, DB479 Walnut Brown, Sunroof, Highly Optioned, 350,000+ Miles 
|
|
#2
02-10-2013, 12:11 AM
|
||||
|
||||
|
Now the power steering pump is loosened (all 13mm nuts and bolts) and the belt removed.
 Despite what others have told me, I did not believe it was necessary to remove the radiator. I would also have had to remove the condenser and oil cooler with it. I found that I was right; there was plenty enough free space and having it out wouldn't have done one bit of good. I didn't even come close to damaging it.  As a safety precaution, I flattened out a small cardboard box to act as a shield. I found it isn't necessary if you are reasonably careful. 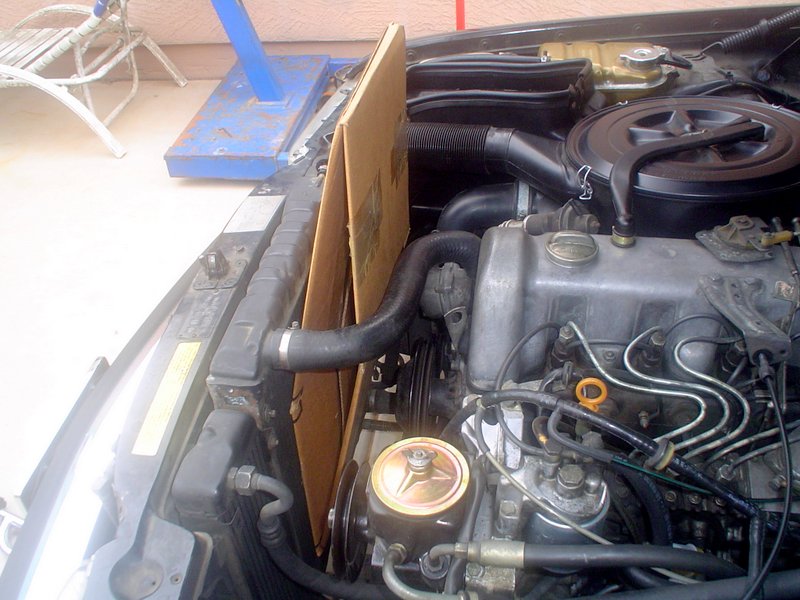 I held onto the crank bolt with a 27mm socket while I loosened the 6mm hex key pulley screws (make sure the heads are clean or the socket won't fit in all the way and it can round them). 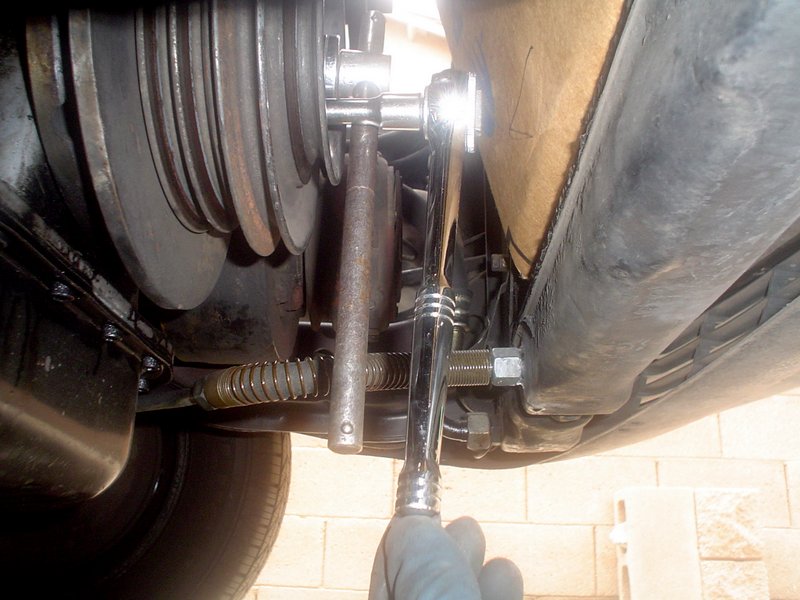 This became awkward, so instead I took a socket extension, wrapped it in a paper towel as a cushion, and wedged it between the cutout on the harmonic balancer and the air conditioning compressor to keep the crank from turning backward. 
__________________
Stop paying for animal enslavement, cruelty, and slaughter. Save your health and the planet. Go vegan! I did 18 years ago. https://challenge22.com/ DON'T MESS WITH MY MERCEDES! 1967 W110 Universal Wagon, Euro, Turbo Diesel, Tail Fins, 4 Speed Manual Column Shift, A/C 1980 W116 300SD Turbo Diesel, DB479 Walnut Brown, Sunroof, Highly Optioned, 350,000+ Miles
|
|
#3
02-10-2013, 12:12 AM
|
||||
|
||||
|
Once the six pulley screws are out, the pulley and balancing disc will come off, so it is important to hold them to prevent them from falling and causing damage to anything or themselves. I don't know if it's necessary, but I marked the original position of the pulleys, balancing disc, and harmonic balancer to each other with punch marks. As you can see, once the pulleys are off, there is plenty of space to work around in.
 No need for the extra headache to drain fluids and remove the radiator and oil cooler.  The 27mm crank bolt is torqued to at least 270nm (200 ft-lbs), so breaking it free after many years is very difficult. I did it the easy way--make sure nothing is blocking the crank from turning (remember the socket extension that was wedged in to keep it from turning?--remove it). Then I positioned a breaker bar wrapped in cloth against the frame rail and bumped the starter. Make sure the socket is fully seated on the bolt. This breaks the bolt loose with minimal effort. The breaker bar did fall back and rest on top of one of the transmission cooler hoses, but it didn't cause any damage. 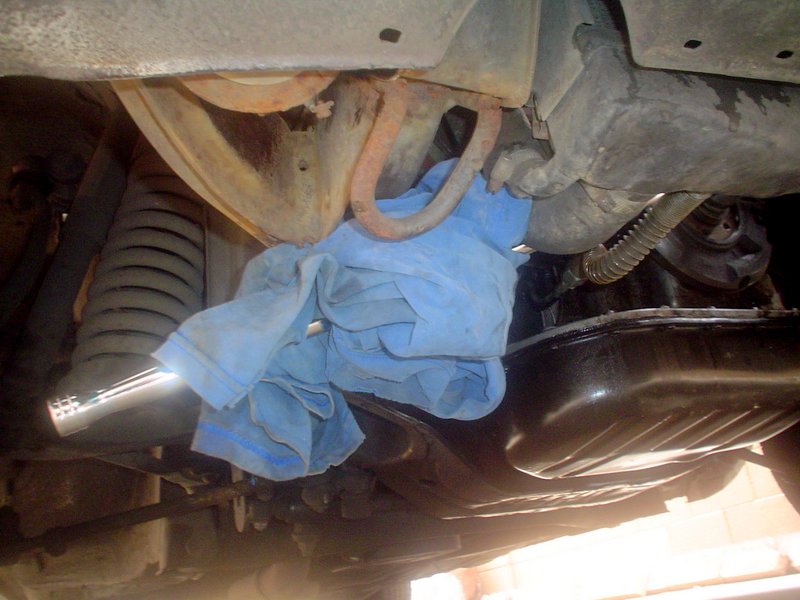 Here is what the harmonic balancer looks like with the fixing pins. Make sure to mark the position of the balancer on the crank with punch marks on each. If it is installed 180 degrees off, the engine will be out of balance. If the old balancer is damaged, the replacement must be match balanced to the old one.  I didn't have a harmonic balancer puller, so I rented one for free from my local auto parts store. I used a generic one and it worked great. There was plenty of room to use it. The balancer came off slowly but smoothly. Make sure it doesn't fall to the ground. 
__________________
Stop paying for animal enslavement, cruelty, and slaughter. Save your health and the planet. Go vegan! I did 18 years ago. https://challenge22.com/ DON'T MESS WITH MY MERCEDES! 1967 W110 Universal Wagon, Euro, Turbo Diesel, Tail Fins, 4 Speed Manual Column Shift, A/C 1980 W116 300SD Turbo Diesel, DB479 Walnut Brown, Sunroof, Highly Optioned, 350,000+ Miles
|
|
#4
02-10-2013, 12:13 AM
|
||||
|
||||
|
Excuse the blurry photo; I forgot I had my camera under the car when I hosed off the engine! The crank seal is now visible.
 A seal puller is supposed to work well, but I used a screwdriver to pry out the seal--just make sure to not score any machined surfaces.  There is a spacer ring that rides between the crank and seal. It is a replaceable wear item and should be replaced every time the seal is replaced. I have heard that these should come off with your fingers. This did not work. I also tried prying from each side simultaneously with a screwdriver. This also didn't work. I had to resort to drastic measures and remove the upper seal cover. I split the seal ring apart from the sprocket by hammering a screwdriver between them, then rotating the crank and prying around circumference with larger and larger screwdrivers until it came off. It was a struggle the entire way. 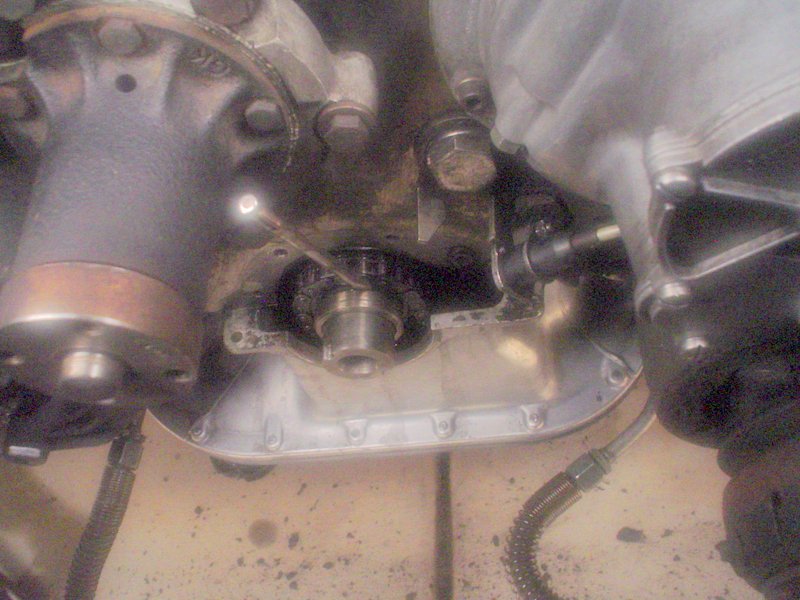 My spacer ring had a deep groove cut into it from the crank seal. It wouldn't have sealed well even with a brand new seal in place; too much material was missing. 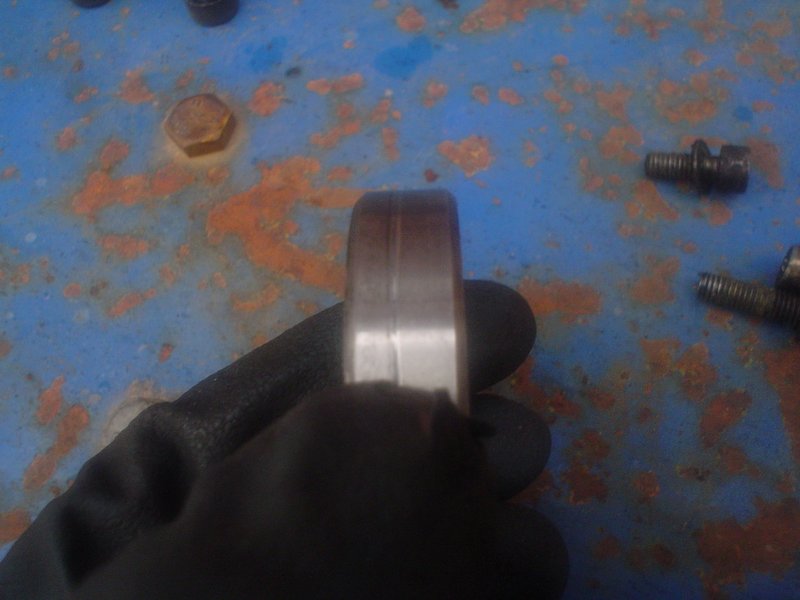 I protected the inside of the engine from debris by placing a plastic bag in the opening as I cleaned the mounting surface. Changing the oil is not necessary if you are very careful, but planning this right before a scheduled oil change is a good idea. 
__________________
Stop paying for animal enslavement, cruelty, and slaughter. Save your health and the planet. Go vegan! I did 18 years ago. https://challenge22.com/ DON'T MESS WITH MY MERCEDES! 1967 W110 Universal Wagon, Euro, Turbo Diesel, Tail Fins, 4 Speed Manual Column Shift, A/C 1980 W116 300SD Turbo Diesel, DB479 Walnut Brown, Sunroof, Highly Optioned, 350,000+ Miles
|
|
#5
02-10-2013, 12:13 AM
|
||||
|
||||
|
As I was looking at the aluminum seal top cover, I noticed that one of the threaded holes was stripped out and the threads were stuck on one of the upper oil pan screws, both of which were too short! I went to the wrecking yard and removed one from a 1983 W126 300SD, having to remove the pulleys and harmonic balancer on it in order to access the part--there is just as much room to remove the parts on a W126 without removing the radiator.
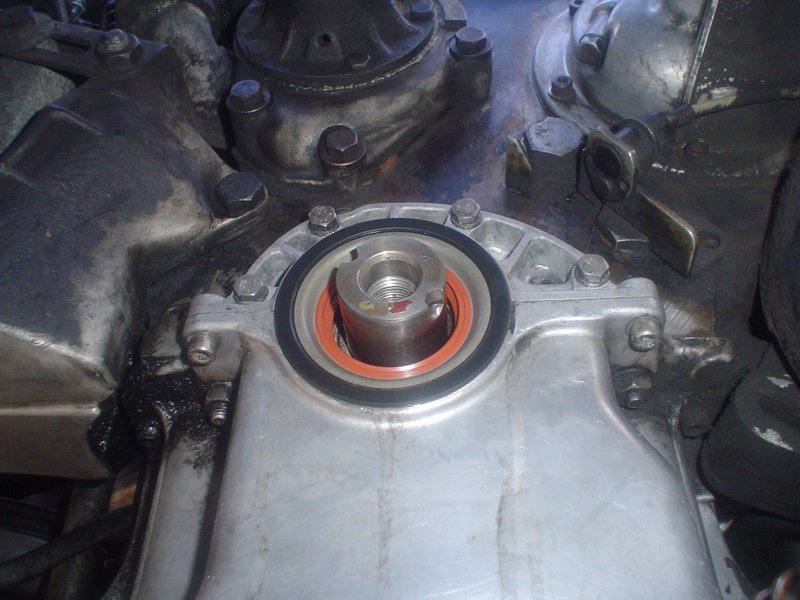
When I got the part home, I noticed that it was a different part number (617 014 05 33) than the one from my car (617 014 03 33)! Apparently, this part supersedes the old one.  One of the differences can be seen on the backside.  I made sure to get the proper length screws for mounting it to the upper oil pan (size difference of one from my car vs. proper length on lower left). I am glad that I also got the block mounting screws as they were longer in length, due to the replacement part being thicker than mine!  I cleaned the mounting surfaces of the block and cover by carefully scraping away the old sealant and then using 800 grit sandpaper with brake cleaner as a lubricant. Then I did a light parallel directional scuffing with 220 grit sandpaper to give a bit of a bite and help keep oil from seeping across a too-smooth surface. I was extra careful to chip away old sealant from around the pin on the block and cleaned the mounting surfaces with brake cleaner applied with a rag. With the surfaces clean, I applied Reinzosil Anthracite 300+C Silicone Sealing Compound (003 989 98 20 10) to the block and exposed portion of the upper oil pan. I quickly placed the cover onto the block and installed the two lower screws slightly snug, put some sealant on the bolts on the smooth portion near the heads, then inserted them into the block. The centering tool is nice, but not necessary. I just made sure to feel that the top cover was centered perfectly over the upper oil pan as I was torquing the bolts to 10nm (lower ones get torqued first as they have to fight the upper bolts). I found a 1 1/4" PVC union from the plumbing section of a hardware store makes a great installation tool for the crank seal and spacer ring.  I added a small amount of Reinzosil just around the forwardmost lip of the new crank seal where it wouldn't fall into the crankcase and pressed the seal in a ways by hand. Then I used part of the PVC union and tapped the seal in some more. For further seating I used the crank bolt with a washer and another part of the union inside, and tightened it just enough until it was fully seated, but not too far. If you left the spacer ring on the crank, you'll have to make a sleeve out of a plastic drink cup, lubricate it, slide it over the spacer ring, then insert the seal and slide the sleeve out. Otherwise the seal will flip inside out when it is pushed against the spacer ring. 
__________________
Stop paying for animal enslavement, cruelty, and slaughter. Save your health and the planet. Go vegan! I did 18 years ago. https://challenge22.com/ DON'T MESS WITH MY MERCEDES! 1967 W110 Universal Wagon, Euro, Turbo Diesel, Tail Fins, 4 Speed Manual Column Shift, A/C 1980 W116 300SD Turbo Diesel, DB479 Walnut Brown, Sunroof, Highly Optioned, 350,000+ Miles
|
|
#6
02-10-2013, 12:14 AM
|
||||
|
||||
|
I made sure the seal was fully seated and square with the crank.
 After the seal was on, I lightly greased the crank and tapped on a new spacer ring using part of the PVC union. I put a good amount of grease on the outside diameter of the spacer to help it slide into the seal without tearing it. This type of hammer without the claw at the other end is the way to go; you get more swinging room and if you need to pull nails, that's what a crowbar is for. I stopped tapping on the spacer when the PVC tool touched the seal as I didn't want to damage the seal lip. From there I tapped it in the rest of the way with a flatblade screwdriver.  The harmonic balancer gets placed back on the crank (I used a very faint amount of grease, but any large amount and it could possibly cause the balancer to rotate on the crank during operation). Position it with the punch marks matching and the bores for the pins as closely aligned as possible. The crank bolt can be used to press it into place. Remove one or two of the cupped washers if necessary to get enough threads to start the bolt. It is a good idea for the bolt to be as clean as possible and with a light amount of grease on the threads. Use a socket extension wedged between the balancer and the upper oil pan to keep the crank from turning. I have read of people heating the balancers in the oven at 250 degrees Fahrenheit to get them to slide onto the crank, but this seems overkill. Tighten the balancer onto the crank until the bores for the pins are a good ways into each other. Chances are they will not be perfectly aligned with each other, so using an extension or block of wood, tap on one of the cutouts in the balancer (without the extension wedged and the crank free to turn) to get it to rotate on the crank so that the pin bores line up. It may take sharp blows to move it a good distance. When the bores look perfectly aligned, go back to pressing on the balancer some more and recheck. You want the bores to be perfectly aligned when the balancer is tightened fully on the crank. The slightest misalignment will cause the pins to not go into place without shaving off too much metal. 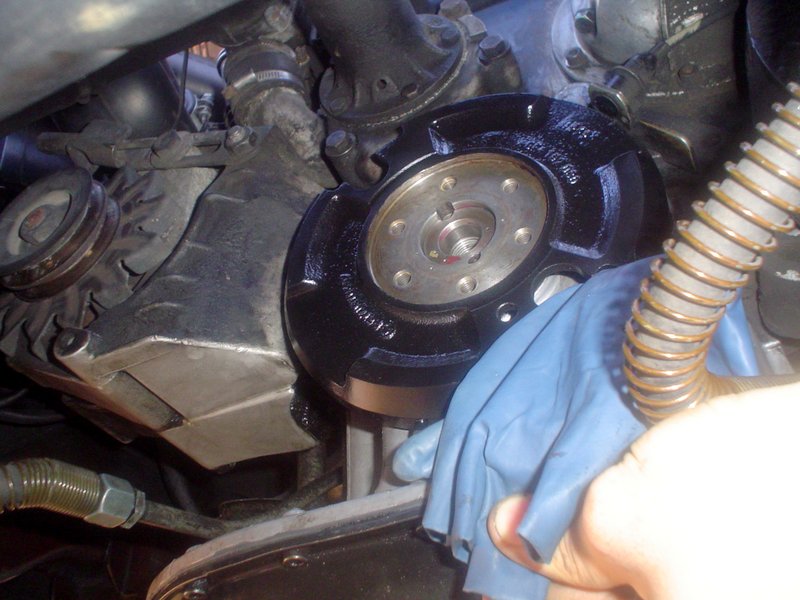 Once you are absolutely sure that the bores are perfectly lined up on both sides, carefully tap NEW pins into the bores. Take your time and make sure they go in straight. These are an interference fit and there will probably be small metal shavings that come out. Once they are fully tapped into place, they will set about 1mm above the balancer face.  Using a rotary tool, carefully grind the excess material off of the pins until they are flush with the balancer face. Be careful as you could realistically grind too much material off of the balancer very fast. Alternatively, you could shorten the pins before driving them in, but you would have to be careful to not mushroom the heads by hitting on them too hard. 
__________________
Stop paying for animal enslavement, cruelty, and slaughter. Save your health and the planet. Go vegan! I did 18 years ago. https://challenge22.com/ DON'T MESS WITH MY MERCEDES! 1967 W110 Universal Wagon, Euro, Turbo Diesel, Tail Fins, 4 Speed Manual Column Shift, A/C 1980 W116 300SD Turbo Diesel, DB479 Walnut Brown, Sunroof, Highly Optioned, 350,000+ Miles
|
|
#7
02-10-2013, 12:15 AM
|
||||
|
||||
|
A new crank bolt (grade 10.9 pictured) and cupped washers should be used because of the high amount of torque to which these are tightened, and the potential for breakage due to vibration. These are to be installed with the threads lightly greased and tightened up to 270nm or 200 ft-lbs. I do not have a torque wrench that goes this high, so I rented one for free from my local auto parts store. You'll need to use an extension wedged in the balancer to tighten it up this much. I placed a rag around the extension so it wouldn't dent the upper oil pan. 270nm is a lot of force (sometimes it looks like you are lifting the engine out of the car). It's best to pull the wrench toward you as you tighten, making sure to not let the socket on the crank bolt slip.
 I used 80 grit sandpaper on the belt surface of all of the pulleys while they were off, making perpendicular lines to discourage belt slippage.  Crank pulley screws should be used only once. I ordered new ones. The originals were grade 8.8. The replacements are grade 10.9. Supposedly the early engines used grade 10.9 and a bulletin was put out to replace them with 8.8 because they had a tendency to shear off. Now I see Mercedes went back to grade 10.9. I would not recommend using grade 12.9 found at the hardware stores because even though it is a higher tensile strength, it is more brittle than a grade 10.9 or 8.8. I would recommend using grade 8.8 if available. I ordered new spring washers, but since January 1979 they were no longer installed on OM617 engines. I used blue thread lock compound on them and tightened them to 30nm (25nm is spec for grade 8.8, I went a touch higher due to higher grade screws plus 25nm didn't seem tight at all).  I had a nice-looking spare fan clutch, so installed it.  I put the radiator shroud, fan, and belts back into place. After things were tightened up, I started the car and let it run for a while. So far, no leaks! It seems my repair was a success. It's one that I had been dreading and I think it went rather well. It only cost me about $50 and several hours of time. I'm sure this would be an expensive job to have a shop do. Let's hope my rear crank seal and upper oil pan hold up for a while! 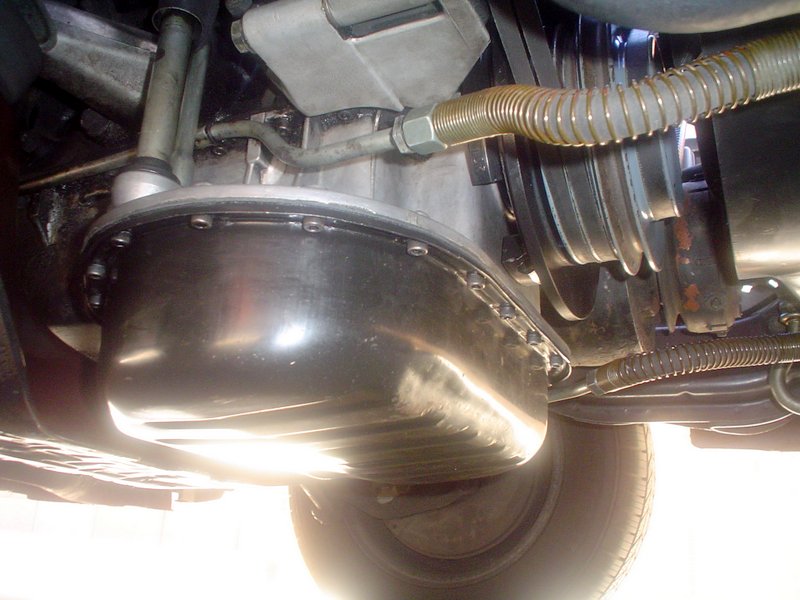
__________________
Stop paying for animal enslavement, cruelty, and slaughter. Save your health and the planet. Go vegan! I did 18 years ago. https://challenge22.com/ DON'T MESS WITH MY MERCEDES! 1967 W110 Universal Wagon, Euro, Turbo Diesel, Tail Fins, 4 Speed Manual Column Shift, A/C 1980 W116 300SD Turbo Diesel, DB479 Walnut Brown, Sunroof, Highly Optioned, 350,000+ Miles
|
|
#8
02-10-2013, 05:21 AM
|
||||
|
||||
|
Great write up - thanks for doing it.
I particularly like the plumbing parts trick for centering the seal. The alternator bolts are a potential problem area - if you are removing the cooling fan then I've found that the water pump pulley is the best pulley to remove to get the belts out of the way. This gives you some time to spray the alternator bolts with penetrating oil and still continue with the job... ...removing the hex head bolts on the crankshaft pulley can be a total nightmare. Lots of muck and junk can end up inside the crank pulley - the hex head bolts rust - and then you'll probably have to drill out the heads. That's what happened to me. I can't see that it would be easy to do this job without removing the radiator. I think you were lucky! I think the biggest problem with removing the radiator is the oil cooler unions - if you are not careful you'll kill your oil cooler. As for trimming the dowels when fitted I reckon you are better off cutting them to size first - that way you are sure that you've got the entire length fitted in place - and there's less chance that you'll damage parts close to that scary dremmel cutter. The trickiest part of this job - in my opinion - is stopping the crank from turning when you undo the bolt on the end of the balancer or when you do it back up. This is the moment when you can potentially cause the most damage; both at the time you are doing the job and later on in the engine's life. There is a special tool that locks the flywheel but so far I've not come up with a better plan for the DIYer - I'm not a fan of wedging parts to apply that monster torque.
__________________
1992 W201 190E 1.8 171,000 km - Daily driver 1981 W123 300D ~ 100,000 miles / 160,000 km - project car stripped to the bone 1965 Land Rover Series 2a Station Wagon CIS recovery therapy! 1961 Volvo PV544 Bare metal rat rod-ish thing I'm here to chat about cars and to help others - I'm not here "to always be right" like an internet warrior  Don't leave that there - I'll take it to bits! Last edited by Stretch; 02-10-2013 at 05:33 AM. Reason: changed a bit
|
|
#9
02-10-2013, 10:28 AM
|
|||
|
|||
|
This is a fantastic and very detailed write up.
Since you live in Phoenix, Az. and I know it can hit 115Deg in the summer. this would have been a good time to replace the Fan and Water Pump pully with the 9 blade and smaller pully found on the 85 300SD. How did you get this all posted between 5:10pm and 5:15pm? took me more time than that to read through this. ") This should be posted in the DIY Articles section. Charlie
__________________
there were three HP ratings on the OM616... 1) Not much power 2) Even less power 3) Not nearly enough power!! 240D w/auto Anyone that thinks a 240D is slow drives too fast. 80 240D Naturally Exasperated, 4-Spd 388k DD 150mph spedo 3:58 Diff We are advised to NOT judge ALL Muslims by the actions of a few lunatics, but we are encouraged to judge ALL gun owners by the actions of a few lunatics. Funny how that works
|
|
#10
02-10-2013, 12:19 PM
|
||||
|
||||
|
I don't mind if a moderator wants to move the thread to the DIY section. I copied and pasted it from my 300SD's thread: My Custom 1980 W116 300SD Project
I made sure the hex head bolts on the pulley were clean by poking at them with an small pointed punch. A couple of them did round a slight bit, which helped me decide to not reuse them. I did the same when pulling the balancer off of the W126 at the wrecking yard. One of the bolts broke off in the balancer and some of the other bolts looked stretched. If the heads round out, then you are in trouble indeed, and may well have to remove the radiator. Cutting the dowels to size first would prevent potential damage to the balancer from grinding off too much material. I knew that the replacements were 2mm longer than the originals, and ended up with 1mm too long on both sides. It was 115 degrees Fahrenheit last summer and neither my or my roommate's car has working air conditioning. Fortunately, my 300SD's engine stayed cool. The 300SD I pulled the upper seal cover from has a 9 blade fan and the pulley seemed smaller than mine. I was thinking of getting the fan, but didn't really have the $30 or whatever to spend on it.
__________________
Stop paying for animal enslavement, cruelty, and slaughter. Save your health and the planet. Go vegan! I did 18 years ago. https://challenge22.com/ DON'T MESS WITH MY MERCEDES! 1967 W110 Universal Wagon, Euro, Turbo Diesel, Tail Fins, 4 Speed Manual Column Shift, A/C 1980 W116 300SD Turbo Diesel, DB479 Walnut Brown, Sunroof, Highly Optioned, 350,000+ Miles
|
|
#12
09-28-2013, 04:29 PM
|
||||
|
||||
|
Quote:
__________________
1992 W201 190E 1.8 171,000 km - Daily driver 1981 W123 300D ~ 100,000 miles / 160,000 km - project car stripped to the bone 1965 Land Rover Series 2a Station Wagon CIS recovery therapy! 1961 Volvo PV544 Bare metal rat rod-ish thing I'm here to chat about cars and to help others - I'm not here "to always be right" like an internet warrior Don't leave that there - I'll take it to bits!
|
|
#13
10-09-2013, 08:16 AM
|
|||
|
|||
|
"...and for 5 beautiful seconds, it ran smoother than he'd ever seen it. Then...it sputtered and died. He tried it again, it turned, ran for 2 seconds, and the same thing happened."
That's what played over in my head last night around midnight after I finished the job. Looking for help on diagnosing it. Could be pretty easy, but I don't have a tremendous knowledge of these vehicles (or any, for that matter, really), though I've been working on this one and reading the forums for the last 6 mos. I was able to get started w/o removing the radiator. I wish I would have tapped the hex key in with a hammer to make sure it was all the way into the hex bolt, because that's when I rounded one out and then had to remove the radiator. Feeling crunched for time, I rushed getting the a/c unit out, and ended up cutting the main hose line, figuring I could put a coupler on it when I got it back together (bolt connectors appeared to be frozen together, and I didn't want to break the copper part). I left the oil cooler on while taking the a/c unit off, then, surprise, ended up breaking 2 copper lines while pulling it out (please reserve judgment). Then, with the space now clear, had to drill out the one hex bolt; the rest came off with a "pop." Getting the crank bolt off by bumping the starter was amazing. Balancer came off with the kit I rented, no problems there. Had to go to the local Mercedes shop to get the crank seal; NAPA and Auto Zone both gave me one that was too small, though it showed up in both of their systems and the seal for all Mercedes 1980-1990. :/ It was $25. I ended up taking off the top oil pan cover as well. When putting it back on and tightening the bolts I broke 2 and ended up having to drill one out. One, about a centimeter long, fell into the oil pan. I had already drained the oil. I felt like crying, but figured since it fell straight down to the bottom it'd be ok and below the line for where the oil goes back into the system (please reserve judgment). The guy at the local shop told me I could just flip the spacer ring over if it hadn't been done already. It hadn't, so I did that (but had to use the same methods to get it off/back on). Ended up replacing the water pump (prior to taking the main bolt off), put the top oil pan cover back on w/ a coat of gasket maker, put it right on top of the seal so I knew it was already seated, put on new belts, then put it all back together. Couldn't get the a/c unit back on, decided, hell, it wasn't working anyway, and just left the whole damn thing off, not knowing if it would affect the running of the vehicle, but figuring it wouldn't (no judgment please). The started it up, and...back to the first sentence. Um, help? Please? 
|
|
#14
10-09-2013, 09:52 AM
|
||||
|
||||
|
Quote:
Nice story - I now have a head ache! What's the problem? The engine doesn't run? Oil leaks out? Did you get that bolt out that you dropped?
__________________
1992 W201 190E 1.8 171,000 km - Daily driver 1981 W123 300D ~ 100,000 miles / 160,000 km - project car stripped to the bone 1965 Land Rover Series 2a Station Wagon CIS recovery therapy! 1961 Volvo PV544 Bare metal rat rod-ish thing I'm here to chat about cars and to help others - I'm not here "to always be right" like an internet warrior Don't leave that there - I'll take it to bits!
|
 |
| Bookmarks |
|
|


 Linear Mode


