 |
 |
 |
 |

|


|
|
|
|
|
|
#1
|
|||
|
|||
|
OM617 Head Swap Help
Hello everyone. I rarely post here cause I rarely have anything worthwhile to say. Mostly just lurk. Anyways I have had an 85 300SD for a few years now and have yet to really drive it. I bought it for less than scrap price with a cracked here from no antifreeze in the winter. At least thats what the previous owner said. Motor runs great and cranks easy. Best I can see only the head is cracked but who really knows. I tried to epoxy the cracks but I didn't wanna pull the fuel lines off so it was tough to get under there.
I bought a new head for $30 from a scrap yard and I pulled it myself. Obviously I was fairly wreckless with with everything except the head. Not to mention that was a couple of years ago. So now that I am swapping on my car I need the proper instructions. I remember seeing a very detailed online om617 manual somewhere. Anybody happen to have that link? The car that I got the head from was an 83(I think) 300SD turbo and I noticed that car had hex bit head bolts. My car has triple square 12 point bit head bolts. Is this indicative of a non-compatible head? They looked exactly the same but I wasn't sure if there was a difference. And are the head bolts reusable or do I need to get another set? Also where to best place to get the gaskets for this job? Any guesstimate on hours labor for the head swap? And critical info I NEED to know? Thanks everyone. |
|
#2
|
||||
|
||||
|
Head should be fully compatible, provided its from the 'same' engine--ie, Turbo or N/A. There are only four types anyway.
One for the Wagon, that has the SLS pump fitting--turbo, or N/A, one for the non-wagon Turbo and one for the non-wagon N/A. They did change the head-bolts a couple of times, and its best to renew them on a head-job, especially if your'e not sure of the history of the engine. --Having said that, Ive re-used them in the past with no problems. Shouldn't be any huge issues changing the heads over--Take loads of pics, and mark the FRONT of the cam-sprocket with tippex etc, to identify which way it goes on--It'll fit both ways and if wrong will shed the chain, causing huge issues. Be worth going over the valves and seals on the 'new' head first before fitting, a set of seals for the valves at the very least should be fitted--Not hard. --Dont turn crank while the head is off.... Allow yourself say--4-5 hours or so and take your time, don't rush it...
__________________
http://i190.photobucket.com/albums/z...0TDnoplate.jpg Alastair AKA H.C.II South Wales, U.K. based member W123, 1985 300TD Wagon, 256K, -Most recent M.B. purchase, Cost-a-plenty, Gulps BioDiesel extravagantly, and I love it like an old dog.  W114, 1975 280E Custard Yellow, -Great above decks  needs chassis welding--Really will do it this year.... needs chassis welding--Really will do it this year....
|
|
#3
|
|||
|
|||
|
Turn the head upside down. Make sure the valves you are checking are not being held open at all with the camshaft. Add some thin fluid around the valve seats. You are checking them for being sealed. You can only do so many at a time and will have to rotate the cam if it is installed on the head.
Or have a valve job done on your used head. Not absolutly required if the valves hold the fluid. Fairly expensive as well today it seems. That fluid check eliminates installing a used head with say a really bad valve. |
|
#4
|
||||
|
||||
|
I have used the old head bolts before, but I had a problem getting the proper torque. I will NOT use old head bolts ever again, or suggest anyone else do so either. They are available here (click on the Mercedes tab). The gasket set is also available from P P, and is probably the best value on the 'net. I would also never install a used head without getting it rebuilt before installing it. It is worth the peace of mind and the cost of the parts (head bolts, gaskets etc) to be sure the head is good (no cracks or burnt valves). The prechamber seals and valve stem seals should be replaced as well. The old head is good to have for used parts (prechambers, valves, valve guides etc) if they are bad on the replacement head. I don't believe it is worth the time, effort, cost of parts etc to skimp on a head job on one of these engines. The bottom end is very robust, and should last through several head jobs before needing a rebuild. However, if the head is cracked, the chance that there is a bigger problem with the engine. There could be collapsed rings or other bottom end problems (I replaced the head on a junk yard engine, only to find a dead cylinder from collapsed rings). All the work done on a head installed on a block with a dead cylinder will be wasted (been there, done that).....Rich
__________________
All Diesel Fleet 1985 R107 300SLD TURBODIESEL 2005 E320 CDI (daily) LOTS of parts for sale! EGR block kit http://www.peachparts.com/shopforum/diesel-discussion/355250-sale-egr-delete-block-off-plate-kit.html 1985 CA emissions 617 owners- You Need This! Sanden style A/C Compressor Mounting Kit for your 616/ 617 For Sale + Install Inst. Sanden Instalation Guide (post 11): http://www.peachparts.com/shopforum/diesel-discussion/367883-sanden-retrofit-installation-guide.html |
|
#5
|
||||
|
||||
|
Oh--yes, These heads are HEAVY!
When re-fitting get a friend to help and carefully lower into position so as not to dent out the new gasket...
__________________
http://i190.photobucket.com/albums/z...0TDnoplate.jpg Alastair AKA H.C.II South Wales, U.K. based member W123, 1985 300TD Wagon, 256K, -Most recent M.B. purchase, Cost-a-plenty, Gulps BioDiesel extravagantly, and I love it like an old dog.  W114, 1975 280E Custard Yellow, -Great above decks  needs chassis welding--Really will do it this year.... needs chassis welding--Really will do it this year....
|
|
#6
|
|||
|
|||
|
Thanks for all the helpful answers everyone. Yeah, the head was quite heavy I remember. Another question I have is about the supports that hold the cam up. Not sure if I am remembering correctly but I unbolted those. Should I take the head and cam off together or can I leave the cam attached to the chain and sneak the head out from under the supports? If not I just make a few marks on the cam and chain for alignment, don't rotate the crank any, and my timing should be good to go? Or do I have this all wrong? Thanks everyone.
|
|
#7
|
|||
|
|||
|
Before you pull the current head put the timing mark on the crankshaft at zero. If the lobes on the first cylinder of the camshaft are generally pointing upward you are where you want to be.
If the lobes are pointing downward rotate the crank one turn. Then the cam lobes will point generally upward. Before you install the replacement head have the cam sprocket pointing to it's mark. You cannot rotate the camshaft to acomplish this later as the engine is an interferance engine and the valves would hit the pistons. Doing the above keeps the injection pump on the right stroke. I agree that doing a valve job on the head and checking it for cracks is the best. Sometimes though an individual just does not have the funds or wishes to put that much money into the job.. I am not sure why valve jobs are as expensive today as they are. Personally I would not try to manhandle the camshaft while pulling or installing the head. Sounds like a potential nightmare although anything is possible I suppose. Marking the chain and sprocket should be more than adaquate. |
|
#8
|
||||
|
||||
|
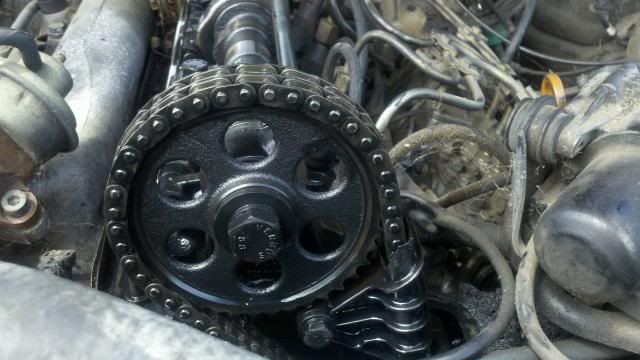
The mark on the camshaft is actually a notch in the thrust washer that is between the cam sprocket and the front cam tower. The tower has a line cast into it that will line up with the notch if it is in the correct spot. As said, line the mark up with the notch and you can remove the gear from the cam, the cam and towers from the head, and then the rocker arm assemblies. The head is now ready to unbolt and remove. Don't forget the two socket head cap screws (allen) inside the chain cavity. You will also need to remove the chain guide pin. I use a simple tool made using a bolt (6mm?) that has threads all the way, and a nut with a thick sleeve (R4 compressor mounting washers) that fit over the pin. Thread the bolt into the pin with the nut tightening against the sleeve. The pin will pull out of the head in the hole of the sleeve. Whatever you decide to do with the head (rebuild or just install a used one), I would at least use a stone and lubricant (I use WD40) to dress the block deck. This will clean off any gasket material and anything else that should not be there. Don't forget to completely remove the chain tensioner piston and spring. It only goes one way (toward the guide rail), and can't be removed without removing the tensioner body. After installing the head, gear and chain, you can then install the tensioner body, and then the tensioner piston and spring.
Any other questions, please don't hesitate to ask them here. There are many experienced folks here willing to help you...Rich
__________________
All Diesel Fleet 1985 R107 300SLD TURBODIESEL 2005 E320 CDI (daily) LOTS of parts for sale! EGR block kit http://www.peachparts.com/shopforum/diesel-discussion/355250-sale-egr-delete-block-off-plate-kit.html 1985 CA emissions 617 owners- You Need This! Sanden style A/C Compressor Mounting Kit for your 616/ 617 For Sale + Install Inst. Sanden Instalation Guide (post 11): http://www.peachparts.com/shopforum/diesel-discussion/367883-sanden-retrofit-installation-guide.html |
|
#9
|
|||
|
|||
|
Thanks everyone. Dreading gettin started on this but the car has sat way too long. I will take pics all through out the process so you guys can give me better guidance. Thanks everyone.
|
|
#10
|
|||
|
|||
|
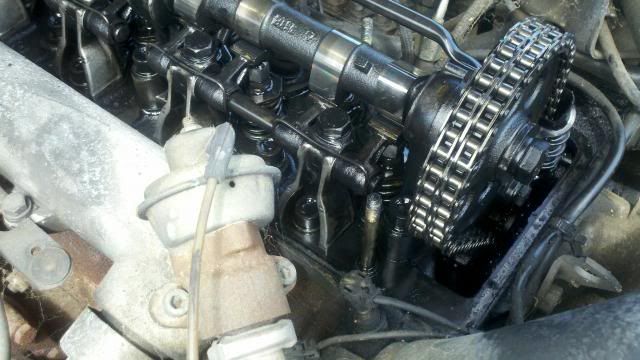
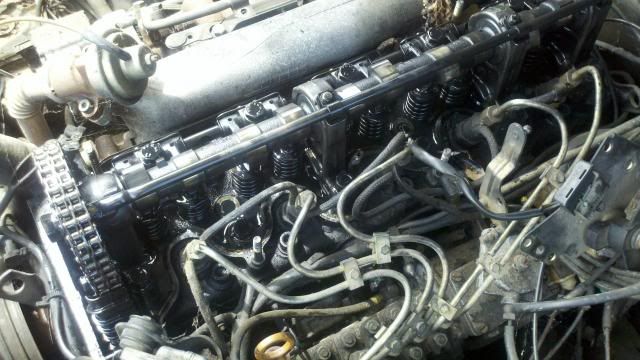
Ok, I finally decided to start on this thing. So far I only got the valve cover off. It was surprisingly more difficult than I thought because apparently the motor need a million linkages and levers to run. That and I was fighting wasps the entire time. Anyway, I have a few questions. Can I bump the motor over with the starter to get it to TDC or wherever it needs to be? Or can I turn the motor over by turning the cam bolt? I really don't wanna get under the car to turn the crank bolt cause its down on flats in the grass. Is there a mark on the cam to tell me when I have the crank in the proper position to proceed with disassembly?
Also, what do you guys recommend to get rust off the surface of the "new" head? It was sitting in the car for a couple of years and didn't get rusty anywhere except where I didn't want it rusty. A flap disk? Sand paper? What type, what grit etc? Here are some pics of the the tear down in progress. If you could use these to give me references or point out things I would appreciate it. What should my next step be? I bookmarked this manual for assistance. http://handbook.w116.org/Engine/617/01-415.pdf. Thanks everyone.   
|
|
#11
|
||||
|
||||
|
You can use a wrench on the PS pulley bolt to turn the engine. You need to put the crank on TDC of the compression stroke (cam lobes of #1 facing up), and the pointer lining up with the mark on the crank pulley. It has a 0, line, and a T, line the pointer up with the line between the 0 and T. You should also see the notch in the washer next to the cam drive gear line up with the line cast into the front cam tower. You can now remove the cam and head.
__________________
All Diesel Fleet 1985 R107 300SLD TURBODIESEL 2005 E320 CDI (daily) LOTS of parts for sale! EGR block kit http://www.peachparts.com/shopforum/diesel-discussion/355250-sale-egr-delete-block-off-plate-kit.html 1985 CA emissions 617 owners- You Need This! Sanden style A/C Compressor Mounting Kit for your 616/ 617 For Sale + Install Inst. Sanden Instalation Guide (post 11): http://www.peachparts.com/shopforum/diesel-discussion/367883-sanden-retrofit-installation-guide.html |
 |
| Bookmarks |
|
|