

|
|
|
|
|
|
#31
 11-17-2013, 09:53 PM
|
|||
|
|||
|
Here is the Google translation of that German site.
Google Translate http://translate.google.com/translate?sl=auto&tl=en&js=n&prev=_t&hl=en&ie=UTF-8&u=http%3A%2F%2Fw123-forum.net%2Ffaq%2Findex.php%3Faction%3Dartikel%26cat%3D4%26id%3D344%26artlang%3Dde Charlie
__________________
there were three HP ratings on the OM616... 1) Not much power 2) Even less power 3) Not nearly enough power!! 240D w/auto Anyone that thinks a 240D is slow drives too fast. 80 240D Naturally Exasperated, 4-Spd 388k DD 150mph spedo 3:58 Diff We are advised to NOT judge ALL Muslims by the actions of a few lunatics, but we are encouraged to judge ALL gun owners by the actions of a few lunatics. Funny how that works 
|
|
#32
11-17-2013, 09:55 PM
|
|||
|
|||
|
Door Check Strap W123
I had this problem on my 1983 W126 several years ago. The metal around the spot welds failed on the A pillar (driver's door). My mechanic tried to re-weld from the outside --- that worked for a few weeks and the A pillar metal failed again. I took the car back to the mechanic and asked him to repair it again. He told me to take the car to a welding shop. The welding shop welded the portion of the bracket that extends through the A pillar to the A pillar with filet type weld beads. They extended the weld metal out onto the surface of the A pillar metal for about 1/2" all around to spread the load from the door strap. This repair has worked well for several years.
I gave this car to one of our sons last spring when I bought a 2008 E320 Bluetec.
|
|
#33
11-18-2013, 10:50 AM
|
||||
|
||||
|
Quote:
Reason being, I use Chrome for foreign sites and it translates them automatically (if you so choose) for many different languages.
__________________
Graham 85 300D  ,72 350SL, 98 E320, Outback 2.5 ,72 350SL, 98 E320, Outback 2.5
|
|
#34
11-18-2013, 11:15 AM
|
||||
|
||||
|
Quote:
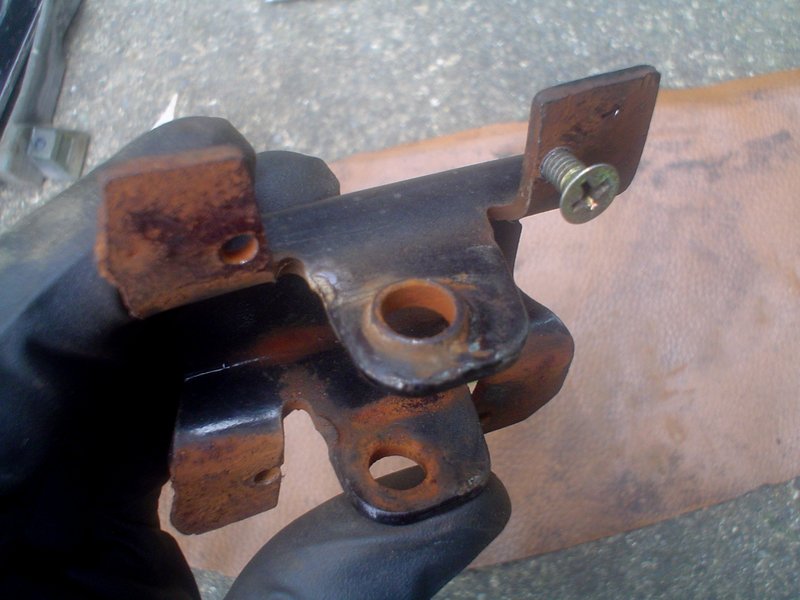
In my case, with nothing yet broken, but paint cracked around two spot welds I think I can drill and tap through those original spot weld holes. The picture really helped in determining just how much metal there is to tap into. Another option would be to use pop-rivets. 3/16" or 1/4". I will probably use washers or perhaps make an external cover plate so that the A=pillar is sandwiched and doesn't take full load.
__________________
Graham 85 300D ,72 350SL, 98 E320, Outback 2.5
|
|
#35
06-12-2016, 02:42 PM
|
||||
|
||||
|
Quote:
 ) )After hooking up door stop again and testing it, the hinge prongs still move in their openings. How could that be - the tabs on the interior bracket have been pulled tight against the door frame. I drilled out one rivet. Then tapped inner bracket and put in a 1/4" machine screw. Pulled it up tight. Made no difference! It must be that the inner bracket is either flexible enough to allow the movement or it could be partly broken. Or, perhaps there is supposed to be some movement so as to not damage the door frame?? Looking at this picture from a German site, it seems the brackets on 123 are different from the one above - small weld dimples seem to still be there, but there also seems to be metal behind the three holes they drilled. Boy, I wish I had a picture of the 123 bracket to compare with that first bracket.  Maybe if I put in a couple or three rivets or bolts in locations they used it will stiffen the bracket. Here we go....
__________________
Graham 85 300D ,72 350SL, 98 E320, Outback 2.5
|
|
#36
06-12-2016, 04:13 PM
|
||||
|
||||
|
Ok I am done.
Firstly, where the bottom holes is on the German pic, there is no part of bracket on other side. I drilled a small hole to find that out! I drilled a hole dead center, about where the German one is drilled. That would work on other bracket too. Lots of metal on other side there. But no clearance on outside for a bolt head. So I put in another S/S rivet. 3/4" rivet was barely long enough but pulled up tight. With 5 fasteners installed, the hinge is much better. Just slight movement. But it would have been nice to know ahead of time what was on other side First rivet after installation (Have heavy duty rivet gun - helps when using S/S rivets) 
__________________
Graham 85 300D ,72 350SL, 98 E320, Outback 2.5
Last edited by Graham; 06-12-2016 at 04:28 PM.
|
|
#37
07-01-2018, 05:42 AM
|
|||
|
|||
|
Hi All,
I to attempted the feat of re-inserting the ball bearings back into the tube and channels. I ended up using a set of multigrips to squash the balls and spring enough to slip them back into the channel. It actually was quite easy once i worked out the technique. Cheers jason.
|
 |
| Bookmarks |
|
|


 Linear Mode


