

|
|
|
|
|
|
#1
 10-02-2013, 11:05 PM
|
||||
|
||||
|
1987 300D The fun starts...
Got my 87 back to the house today. After 2 years. Boy it's needing some love.
First things first. When the mech put the head on removed and reinstalled the new head, he never removed the pump or moved it. Fine. BUT he was messing around with the timing chain itself. First he told me he had it at 15 ATDC which should have been correct, but the car was smoking so bad he changed it to 15 BTDC (car cleared up (I think more due to 2 year old fuel in the fuel filter finally clearing out) But he says he changed it back to 15 ATDC because of the stuff I showed him here saying that was the correct spot... I saw how he was doing this and it looking like he was just removing the top sprocket and adjusting that way... Bottom line, I have no idea where the timing is actually set now. Anyone have the manual to check myself or instructions to look? The car drove home, But I can tell it's underpowered. I know about the tool I'll need to buy for the pump and can go ahead and order that, And I was given the WSM on setting the pump timing... http://www.startekinfo.com/StarTek/outside/12264/Program/Engine/602_603/07.1-8240.pdf Figured I better get this correct before moving on to all the other stuff, and there is a pile of it... Hear are a few pictures from today after getting it back home, plus a little video I shot with it starting and running. 87 300d Back home - YouTube 
|
|
#2
10-03-2013, 01:26 PM
|
||||
|
||||
|
What top sprocket was he removing? The cam sprocket?
Pull the valve cover and align the cam sprocket flange notch with the notch in the #1 cam tower - 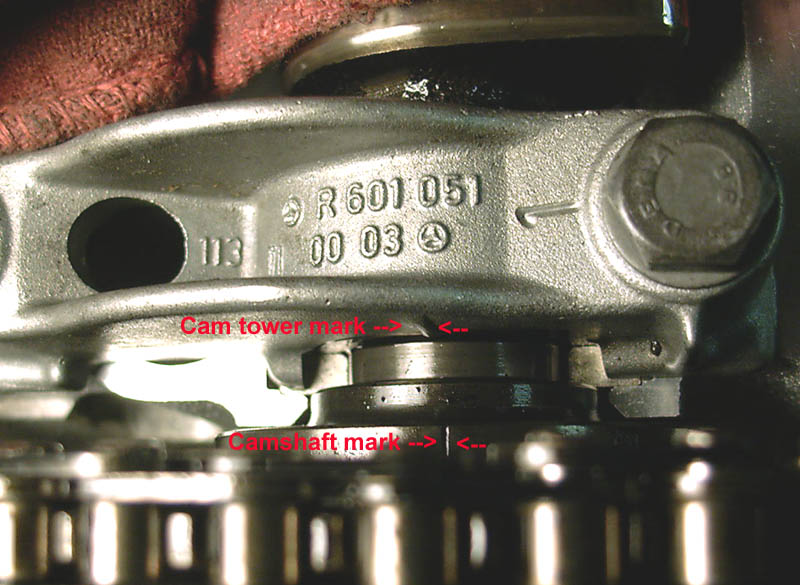 Rather than inspect from above as in this picture, I sight the cam sprocket flange notch down a hole in the cam sprocket to align with the cam tower. Read the position of the crank pulley 0|T mark against the pointer at the 10-11 o'clock position of the front cover. Hopefully it's spot on or within a couple of degrees. More than that and the chain might be elongated beyond spec. Use the IP locking tool or simply a mirror as you advance the crank until the IP's RIV tang is centered the inspection hole. I grossly simplified the locking pin method. I'd get the tang at the top of the inspection hole by eye before fitting the locking tool. Hopefully the front cover pointer is by the 14-15 ATDC mark on the crank pulley, or within the range of adjustment of the IP. Sixto 87 300D
|
|
#4
10-06-2013, 04:28 PM
|
||||
|
||||
|
Some work started today. I got the hoods and headlights swapped around. I have to say, I like the original blinkers better than the half clear half yellow. I was going to swap some of the trim around (bumpers) but I'm kind of liking the original there also. I like the more subdued look of the 87 as it sits. Next step will to get the timing sorted out then off to the paint shop.
One thing, I can seem to adjust the hood low enough on the pass side. This is not an issue with the original hood, The drivers side is flush, and not an issue on the other car with either hood. Any hints? Also note, I did not have to switch the fenders, the originals fit just fine. Which is good, because there was surface rust on the 94's that would have cost me $$ to fix. Should I keep the plastic sides inside the truck or switch over to the carpeted version thats in the 94... tough call.
|
|
#5
10-17-2013, 07:47 PM
|
||||
|
||||
|
Post: #20RE: My 87 300D Build Plus...
Working away on the car. Dropping it off saturday so finishing the total stripping of it. Have tested and found that the body molding from the 94 fits correctly and even the holes line up, so going to go ahead and use them. It's amazing the amount of dirt/mud that was behind the lower body molding, I better I removed 5-6 cups worth from the 94... major rust area I would think. Still don't care for the chrome on the bumpers so will retain the originals there. Found something new to me, Bottom drivers side front, behind fender is a hidden oil cooler... never noticed that before. Not sure it's story, but it was held in with zip ties... sigh. Looks pretty corroded. Will take a closer look and get some pictures tomorrow. This is the look I'm kind of going for...   Of course, mine will not be quite this nice... It's a 400 paint job I'm getting... plus I'm using the rims from the 94... but still.... The idea is the same with the deleted/painted chrome on the body molding, the rear badges gone etc... Will be interesting to see how close I get.
|
|
#8
10-27-2013, 07:49 AM
|
||||
|
||||
|
Got a little done on the car today, All the rubber seals moved over, the inside trim around the doors also, installed on of the door handles from the 94 along with on of the body panels (both rear pass door) Also installed the grill, which I had painted to match the car. Found two parts they forgot to paint, the molding that goes between the rear roof and body line, so I'll have to have them take car of that.
I'm addressing and repairing things as I go so it's taking time.
|
|
#9
10-27-2013, 11:20 AM
|
||||
|
||||
|
Looking good.
__________________
http://i284.photobucket.com/albums/l...aman/Fleet.jpg Peach Parts W124.128 User Group. 80 280SL 85 300SD 87 300TD 92 300D 2.5 Turbo 92 300TE 4Matic
|
|
#10
10-27-2013, 03:26 PM
|
||||
|
||||
|
Further yet...
Was able to get the back doors done. Man it's going to look good with that 94 Interior. I had asked a question before about using the speakers in the door from the 94 in the 87... well you can. You just have to remove the rivets on a bracket in the 94 and move that bracket to the 87 door... all the holes etc are already stamped into the door! Couple pictures showing the 94 door, and the 87 door with the brace moved over but not riveted back in yet. Also continued on with door handles body molding and such. I'm doing what I can with the used parts first, like reusing the mounting tabs for the molding etc.. of course there is no way to get 100% of them off and they are different types, so I'll end up having to order a few. Next I'll finish up the to front doors, then move the dash...
|
|
#11
10-27-2013, 06:11 PM
|
||||
|
||||
|
Quote:
I guess my issue with this is since he had the sprocket off, how can I trust the marks are correct?
|
|
#13
11-02-2013, 08:55 PM
|
||||
|
||||
|
First off,,, THANKS goes out to winmutt who took time out to come up today and help me take a look at the car.
Also... I got a ride in his white 87... No words. Ok, scratch that... LOTS of words. That car rocks. I literally pushes you back in the seats during acceleration. I have not felt that since my Blown 383 truck!. His car is a rocket and what I aspire too. After I get this damn car back together as I want it, a pump is next on my list. Well, removing my cat is next on my list... but you see where I'm going. Anyways, got quite a bit done today and made 1 huge f-up...Learn from my mistakes... You will learn a lot cause I make a lot of them... I went over to my donor car and took off the trim on the roof and top of the windshield... came off easy. Popped right up and I was like well no big deal... So I used the tabs from the donor, soaked them in some phosphoric acid to treat any rust, then painted them all with black rustolum and riveted them to replace missing ones on my car. so far so good... Then I go to take off the top strip above my windshield and hear a little POP! I broke the frank brand new windshield!!!! Well that's just craptastic. So another new windshield will have to be installed. last one cost me about 250. But at least it will give me the chance to replace a few of the bad, and missing clips along the top, seems that because of there condition last time the installer used Butyl sealer, to hold the trim in place... hence the issue and new broken windshield. I got the speaker into the pass door. Made a template from the donor door and cut out the little bit of metal, Riveted in the new bracket and hit all the cuts etc with black rustolum...(can't be to careful) hahah Also replaced some of the mounting clips for the trim that goes along the bottom the the rear window. Got the interior out of the donor... Need to get it totally striped so I can have full access to the wire harness to move everything over. Will also give me the chance to steam clean the carpets etc. The drivers seat is worn. will need some attention. I'll be getting ahold of fibranew for that and see what the cost is. Oh, and I got the alarm system fully working again, replaced the bad electronics in the from doors with the parts from the donor. Some soldering and was good to go. Winmutt got here and took a look at the car with me. look to only be off maybe a degree. He left me the pump tool to reset it. Car is sitting exactly at 14 right now. Need to find a full set of IP lines. So, if thou have a set let me know.
|
|
#14
11-12-2013, 09:07 PM
|
||||
|
||||
|
Moving on... I start to work out the swap of the seats. The 94 seats are a perfect bolt right in match for the 87, no issue there. Of course, they are wired completely different and the controller door switch is totally different.
I've read about other swapping them in and rewiring them to the existing 87 switch, but mine sucked... So decided to just rip it all out and install the seat switch and wiring from the 94. At the same time I ran the speaker wires for the door speakers and also added the wiring for the 94's electric driver mirror. Used a couple runs of weed waker line to feed the new wire into the doors, and was able to retain the original protective mesh the wires travel in. Everything soldered, heat shrunk then taped up. Should last the life of the car. Mounted the seat for a test and so far everything works except the head rest going up and down. I'll have to figure out what wires control that. Also since the dash is out I replaced the center pods with the ones from the 94, going to go ahead and test/replace the rest. Have not found a working one yet in the 87... I think they are all the originals. Oh, got the rear deal installed, and the main carpet and side posts... starting to look like the inside of a car again. Started to look at the console from the 94... It's it perfect shape, bright, no fading... The 87 has a 140mph speedo and the 94 gasser a 160mph.. may just go ahead and try it out in there. Other than the digital temp being different, which looks like I can simply swap mine in from the 87 (I don't think it works) all the connections on the back are the same. If it works, I can always black out the "unleaded fuel only". Going to go ahead and use the climate control from the 94 also, it looks brand new compared to the old dirty one that was in the 87. Will need to order some mounting clips for the 94's ground effects to finish installing that. There is just no way to remove some of the old ones without breaking them. The 94 also uses different clips than the 87, and the mounding to the sills is totally different. I think it's going to be almost 70 all weekend, so I'm going to tackle the pump timing. Winmutt left me the timing tool when he visited. have a line on new injector line. I took a look at my old video taken the day I took it to the shop to have the head fixed... 1987 300D Head Issue? - YouTube and @ 1:46 you can see the injector lines... I knew he F'd them up! They looked totally fine before. I'm going to head over there armed with this issue and see if he will cover for the replacements I'm going to need. Anyways here's some pics...
|
|
#15
11-16-2013, 05:36 PM
|
||||
|
||||
|
Had a nice day, worked on the car from about 8am till it got too dark...
Dash basically installed, Pass seat installed along with door panel and carpeting. Rear seat back in. Lots of other little things, working on the wiring etc. Have to not only swap in the wiring for some of the stuff I swapped over but also have to figure out the nest of wires left my who knows how many previous owners... fun. Looks more and more like a real car everyday.
|
 |
| Bookmarks |
|
|


 Linear Mode


