

|
|
|
|
|
|
#16
 11-06-2013, 10:52 AM
|
|||
|
|||
|
Sounds like you are on the right track.
__________________
1981 300TD 310k miles 1970 280sel 172k miles 1966 230 Fintail 162k miles "Where are we going? And why am I in this hand basket?" 
|
|
#17
11-09-2013, 01:43 PM
|
|||
|
|||
|
Well Dang !
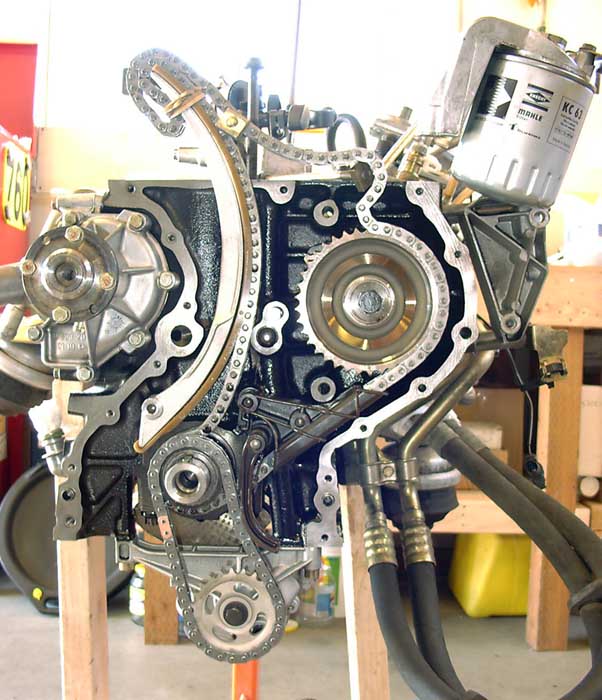
I got my son's friend to hold the crank at 0 degrees, I started to try to turn the IP counter clockwise, but there is NO slack between the crank and the IP sprocket (tried several times - no dice). So, I looked down inside the head (after I removed the upper guide rail) and could see that the timing chain was bunched up on it's self down on the crank sprocket! This puzzled me. So, I tried rotating the crank clockwise slowly and I got all my slack back - BUT - when I rotated the crank back to 0 degrees, it took my slack away. I can see the lower guide rail inside of the IP sprocket area, the chain is riding the IP sprocket where I would expect it to, so it does not look like it has come off anything. I wonder, when I lost my slack, I was trying to insert the upper guide rail into place. I must have bumped the IP sprocket enough to make it rotate the vacuum pump cam a little, which then (because of pump spring tension) caused the IP to rotate. Now, I would assume the IP would rotate CW (which would place the chain slack between the crank and IP sprockets), but it appears that it rotated CCW (there are no injector lines connected) - which means the IP would pull the crank around an suck my slack into the left hand side of the crank (as it appears standing in front of the engine). So, what to do now. I can't rotate the engine anymore than I have because the cam is installed (and valves will get in the way) - but I can't get enough slack to put the cam sprocket back on at the proper place. Should I take the cam back off, rotate the engine 360 degrees and hope the slack comes back? I'm running out of ideas and am feeling pretty bummed.
|
|
#19
11-09-2013, 02:06 PM
|
|||
|
|||
|
Hmmmmm - let me look and see.
BTW - I'd love to have my engine looking that clean.
|
|
#20
11-09-2013, 02:18 PM
|
|||
|
|||
|
I just checked - the left hand side guide rail is all the way to the left (the tensioner piston has not been installed.
|
|
#21
11-09-2013, 02:20 PM
|
|||
|
|||
|
Quote:
|
|
#22
11-09-2013, 02:42 PM
|
||||
|
||||
|
You shouldn't have to take the engine further apart beyond removing the cam. It's really difficult to bunch up the chain and gentle wiggling should free it if it gets bunched if you don't force the crank.
You can't remove the oil pan without lifting the engine but the FSM describes removing the front cover with the head and oil pan in place. Sixto 87 300D
|
|
#23
11-09-2013, 04:54 PM
|
|||
|
|||
|
S U C C E S S ! ! !
I was able to get all of my slack back, sp here's how I did it and some tricks I learned along the way that may help others; First - remove the vacuum pump so it doesn't get in the way later like it did for me. Also - the upper guide rail cannot be installed while the cam sprocket is in place (I couldn't do it, no matter how I tried, it would have broken if I pushed it too hard). 1) I removed the CAM (by removing cam cap's 1, 5 & 6 first, then 2, 3, 4 & 7 slowly together). This placed all of the valves in the closed position. 2) I had my helper hold the timing chain up and out of the way while I rotated the crank a full 360 degrees, stopping on the 0 degree mark when I got there. This got rid of all the slack. 3) I reattached the cam by tightening together 2, 3, 4 & 7 slowly together then attaching 1, 5 & 6 together). I torque’d to 25 foot pounds (couldn't find the spec exactly, but this felt good) - please someone let me know if I was wrong with that value. 4) I made sure to align the hash marks on the cam and first cam tower mark - so it's in sync. 5) Installed the upper guide rail BEFORE I tried to get the sprocket back on. There is a trick here - first I slid the guide rail in (there is a right way and a wrong way, the thinner end goes down) - I used a flashlight and a nail to quickly align the guide rail holes with the pin hole in the front of the head. Once I had it basically in place, I dipped the rail pin in some motor oil and pressed it into place (I threaded in a bolt and tapped on it with the side of my hammer). Once fully seated I knew the rail was secure. The upper pin was a piece of cake and did not need the nail trick. 6) Last thing, I slipped the cam sprocket into place, slowly moving the sprocket one tooth at a time untill it was perfectly aligned with it's indexing pin on the cam. Everything fit like butter Now that this is all together - I can begin closing this engine back up! All of the rest of these parts really just bolt on - the hardest thing left to do is bolting the EGR assembly back on the side of the head (and maybe the lower exhaust pipe bolts will be a drag too). I am so relieved. I have a table full of new parts to go onto this engine. Thank you all for your advice and for the answered prayer's.
|
 |
| Bookmarks |
|
|


 Linear Mode


