

|
|
|
|
|
|
#1
 11-15-2013, 09:10 PM
|
|||
|
|||
|
Stuck Motor Mount Bolts
I'm starting the process of replacing the (very much in need of replacing) motor mounts on my 300td. Unfortunately I've gotten stymied on the very first step - loosening the 8mm allen bolt from the bottom...
The motor mount is so crushed that I think the bolt head might be sitting against the steel of the frame. I've attached a picture of the situation. I read a bunch of other accounts of removing the bolts and it seemed like the process was to clean out the head of the bolt as much as possible, and hit the allen key into the bolt to make sure to get a good fit, and then use a breaker bar to put as much pressure on it as possible. All I ended up with is the head slowly rounding out (I stopped before it got too bad I think). I rented an impact wrench from the local tool lending library, so I'm going to go back at it tomorrow morning, but I guess the question I have is: should I lift the engine enough for the bolt to not sit on top of the frame anymore? 
|
|
#2
11-15-2013, 09:17 PM
|
||||
|
||||
|
I've only done four now, but none of mine were sitting on the frame like that. All 4 were centered in that hole and up.
Wait for an expert to chime in, but I expect they'll say lift it up a bit. Don't use a cheap hex key socket, use a quality tool so you get a good tight fit.
__________________
Eric, CPO, Submarines, retired. Here's a sig line... Mine: '68 Corvette LS1/4L65E, 83 240D, 2000 GMC 4x4, 08 FLSTC Anniv Hers: '72 Corvette 454/4spd, '99 MB SLK, '93 Metro vert, 78 240D, '92 Silverado, '65 Fjord Rustang, '59 Fjord Fairlane, '17 Slingshot.
|
|
#3
11-15-2013, 09:29 PM
|
|||
|
|||
|
Put a 2x4 under the oil pan and then jack the engine up......then undo the bolt, right now you can get it out because all the weight of the engine is on the mount....causing the bolt to sit on the frame......chances are.....you will need a helper to move the engine around while you are underneath attempting to remove the bolt and reinstall the mount......with motor mounts that bad, check your oil cooler hoses for rub through.....your trans mount is also probably trash....
__________________
|
|
#4
11-15-2013, 10:28 PM
|
||||
|
||||
|
you need to get an official NAPA or better brand 8mm hex short socket, in 1/2" drive with an extension on there...
you need STEADY PRESSURE, NOT IMPACT!!! but ONLY with a TOP quality hex socket. TOP QUALITY!
__________________
John HAUL AWAY, OR CRUSHED CARS!!! HELP ME keep the cars out of the crusher! A/C Thread "as I ride with my a/c on... I have fond memories of sweaty oily saturdays and spewing R12 into the air. THANKS for all you do! My drivers: 1987 190D 2.5Turbo 1987 190D 2.5Turbo 1987 190D 2.5-5SPEED!!!  1987 300TD 1987 300TD 1994GMC 2500 6.5Turbo truck... I had to put the ladder somewhere!
|
|
#5
11-15-2013, 10:52 PM
|
|||
|
|||
|
The 8mm bolt just bolts the Aluminum arm to the rubber mount.
There are 2 6mm small bolts one each side of the rubber mounts, these bolt the rubber mount to the frame. Use a 6mm Allen wrench with the short end cut down to fit into each bolt. there is not much room to get into these. Be sure to have the hex holes CLEAN. maybe go to a car wash and blast the area clean of grease and gunk. Some times valve grinding compound works on the 8mm hex bit to grab the hole. if it is rounded out. maybe drive in a 10mm triple square bit. The McParts stores sell these in a 4 bit set. the ridges of the bit might be enough to grip the bolt. I also read of driving a Socket over the head of the bolt, forget the size. and the tight fit will grab it. Drilling off the head of the bolt is another option. If you can`t get the bolt out, remove the 2 6mm bolts on either side of the mount. then remove the 4 17mm nuts on the Aluminum arm and lift it out. then put it in a Vice to work on. might be enough room to wiggle it out. I have an arm with a stuck bolt, I just replaced the arm from one I got at PNP. Back in 97 before I understood how these things go together, I had a bolt that rounded out. NO problem, right? I used a Saws All and cut the arm off.  Then when I got it out I felt kind of stupid looking at what I did. Then when I got it out I felt kind of stupid looking at what I did. Good thing for PNP. Charlie
__________________
there were three HP ratings on the OM616... 1) Not much power 2) Even less power 3) Not nearly enough power!! 240D w/auto Anyone that thinks a 240D is slow drives too fast. 80 240D Naturally Exasperated, 4-Spd 388k DD 150mph spedo 3:58 Diff We are advised to NOT judge ALL Muslims by the actions of a few lunatics, but we are encouraged to judge ALL gun owners by the actions of a few lunatics. Funny how that works Last edited by charmalu; 11-16-2013 at 02:54 AM.
|
|
#7
11-15-2013, 11:50 PM
|
|||
|
|||
|
x2 on - you will need a helper to move the engine around while you are underneath attempting to remove the bolt and reinstall the mount. I recently had the identical situation and that's route I went after attempting it by myself. The motor mount came out in pieces.
|
|
#8
11-16-2013, 06:16 PM
|
|||
|
|||
|
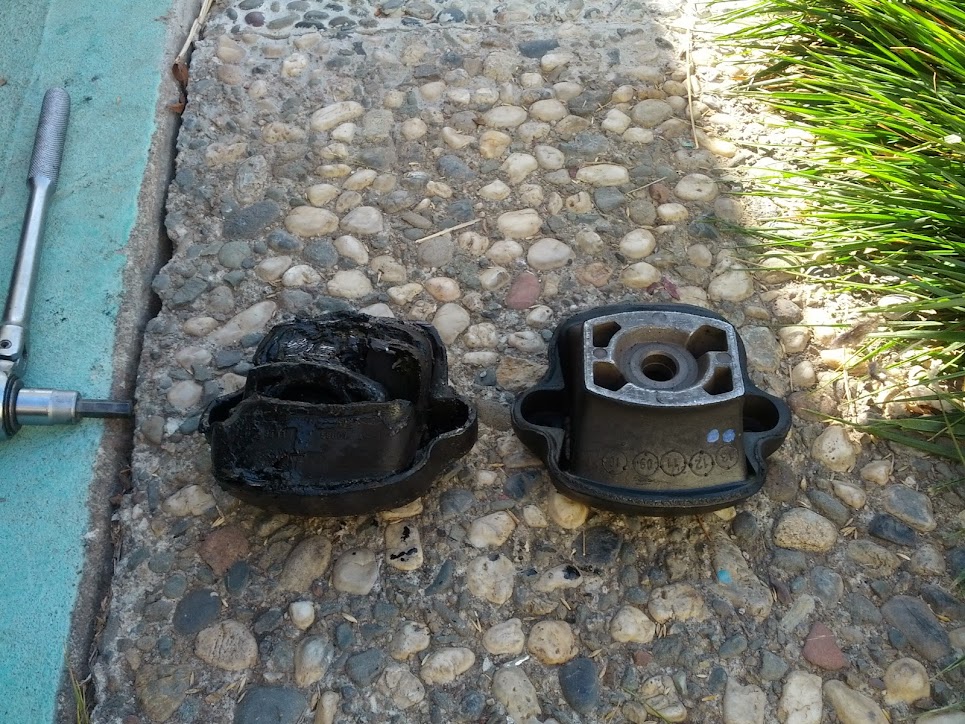
Awesome! I just finished replacing the two motor mounts and shocks. It was probably the dirtiest thing I've ever accomplished actually. I'll post some pictures when I've uploaded them. One of the mounts was so crushed that it ended up mostly in pieces. The other mount was better, but still worthy of replacement.
The 8mm bolts came out with a good bit on an angling ratchet wrench and breaker bar and lots of patience. The 6mm bolts were barely in place (I got kind of lucky there I think). The difference is amazing!! I wish I had taken a before video, but it shook the whole car so badly it hurt. Now it's smooth as can be. Of course, now that it's not shaking anymore, I can hear this pretty awful noise coming from the engine at low rpms, but one thing at a time for now...
|
|
#9
11-16-2013, 06:44 PM
|
||||
|
||||
|
Quote:
__________________
$60 OM617 Blank Exhaust Flanges $110 OM606 Blank Exhaust Flanges No merc at the moment
|
|
#11
11-17-2013, 08:57 AM
|
||||
|
||||
|
Quote:
__________________
Eric, CPO, Submarines, retired. Here's a sig line... Mine: '68 Corvette LS1/4L65E, 83 240D, 2000 GMC 4x4, 08 FLSTC Anniv Hers: '72 Corvette 454/4spd, '99 MB SLK, '93 Metro vert, 78 240D, '92 Silverado, '65 Fjord Rustang, '59 Fjord Fairlane, '17 Slingshot.
|
|
#12
11-17-2013, 10:08 AM
|
||||
|
||||
|
Quote:
__________________
1979 300D 040 Black on Black - 1985 300D Maaco job (sadly sprayed over 199 Black Pearl Metallic) on Palamino http://i.imgur.com/LslW733.jpg The Baja Arizona Oil Burners Send a message if you'd like to join the fun  Left to Right - UberWasser, Iridium, Stuttgart-->Seattle,, mannys9130 Visit the W123 page on iFixit for over 70 helpful DIY guides!
|
|
#13
11-17-2013, 10:50 AM
|
|||
|
|||
|
Some people here have filled the new mount with urethane to make it stiffer, and so it can't collapse. You can find posts w/ excellent photos and instructions. I probably should have done that with my new cheapie mounts (DEA, made in India I recall). Instead of buying liquid cans, maybe use polyurethane caulk, which you can find at home stores.
|
|
#14
11-17-2013, 11:19 AM
|
|||
|
|||
|
Quote:
That`s a nasty looking one for sure. When you spill fuel or oil on them, take the car down to the 25¢ (use to be) car wash and blast them off with hot water and soap. I just scored on a almost new set of mounts at PNP. someone pilled the eng/trans out of a 78 300CD. there were the mounts on the frame. HMMM.. wonder why they didn`t take these? Looked good, so pulled them off, they were just a little dusty, wiped it off and there is the MB part # and the MB STAR.  these were almost brand new......yeah Baby. these were almost brand new......yeah Baby.  Looking up the part#, these are $154 from the Dealer. Charlie
__________________
there were three HP ratings on the OM616... 1) Not much power 2) Even less power 3) Not nearly enough power!! 240D w/auto Anyone that thinks a 240D is slow drives too fast. 80 240D Naturally Exasperated, 4-Spd 388k DD 150mph spedo 3:58 Diff We are advised to NOT judge ALL Muslims by the actions of a few lunatics, but we are encouraged to judge ALL gun owners by the actions of a few lunatics. Funny how that works
|
|
#15
11-17-2013, 01:28 PM
|
|||
|
|||
|
I just got this car, so it was the PO who had been spilling fuel all over them when he was replacing filters. After this job, I'll be very careful about covering them.
Also, just to be clear, the Lemforder mounts are $25 each on peachparts. It looked to me that they had originally had the benz tri-star logo on them, but that the logo had been scuffed off since they were selling them third party. You still got a good deal at the PnP, but I don't think anyone should be paying $150 for mounts.
__________________
1985 CA 300TD Oakland, CA
|
 |
| Bookmarks |
|
|


 Linear Mode


