

|
|
|
|
|
|
#1
 03-26-2014, 05:59 AM
|
|||
|
|||
|
Any special tools needed for W126 rear brake job
I have a 1985 300sd. Got to replace parking brake parts as well as rotors, calipers and pads. hoses too... will I need any special tools? May need a new bearing on the passenger side rear as well...
__________________
1985 300SD 
|
|
#2
03-26-2014, 06:39 AM
|
||||
|
||||
|
The FSM shows a couple of special tools, but maybe a generic shoe tool will work.
As for the calipers etc, just normal hand tools. Be sure and clean the threads of the caliper mounting bolts, then use blue lock-tite.
__________________
83 SD 84 CD
|
|
#3
03-26-2014, 07:01 AM
|
||||
|
||||
|
The parking brake CAN be done without the mb specific drum tools... But it's a snap with them... I'd search eBay for "Mercedes brake tool set" get the two tool set
Item Id: 380602399145
__________________
John HAUL AWAY, OR CRUSHED CARS!!! HELP ME keep the cars out of the crusher! A/C Thread "as I ride with my a/c on... I have fond memories of sweaty oily saturdays and spewing R12 into the air. THANKS for all you do! My drivers: 1987 190D 2.5Turbo 1987 190D 2.5Turbo 1987 190D 2.5-5SPEED!!!  1987 300TD 1987 300TD 1994GMC 2500 6.5Turbo truck... I had to put the ladder somewhere!
|
|
#4
03-26-2014, 07:14 AM
|
||||
|
||||
|
+1 this is one of those cases where the specific tool turns an exercise in futility to a simple job.
__________________
The OM 642/722.9 powered family Still going strong 2014 ML350 Bluetec (wife's DD) 2013 E350 Bluetec (my DD) both my kids cars went to junkyard in 2023 2008 ML320 CDI (Older sons DD) fatal transmission failure, water soaked/fried rear SAM, numerous other issues, just too far gone to save (165k miles) 2008 E320 Bluetec (Younger son's DD) injector failed open and diluted oil with diesel, spun main bearings (240k miles) 1998 E300DT sold to TimFreeh 1987 300TD sold to vstech
|
|
#5
03-26-2014, 12:58 PM
|
||||
|
||||
|
Rear bearing
He mentioned he may need a rear bearing as well.
There is a DIY by dmorrison on this that explains what is required: PeachPartsWiki: Replacing the Rear Wheel Bearings It is for the w123 but it applies to the w126 as well.
__________________
 Mac 2002 e320 4matic estate│1985 300d│1980 300td Previous: 1979 & 1982 & 1983 300sd │ 1982 240d Let's take a drive into the middle of nowhere with a packet of Marlboro lights and talk about our lives. ― Joseph Heller, Catch-22
|
|
#6
03-26-2014, 01:37 PM
|
||||
|
||||
|
Just went through this with vstech on my 124 wagon. I imagine the steps are similar on a 126. Some lessons learned:
Support the car with stands in several locations. Place a floor jack under the LCA to allow the spring to be unloaded. While you still have the brakes intact, unstake the big nut on the end of the axle shaft and break torque. You will need the parking brake and possibly someone standing on the foot brake to hold back against the effort required to loosen this nut. Then remove the caliper and rotor. Hang your rotor up with wire to avoid stress on the hose. Better yet change the hoses while you are there. Then disassemble the parking brake, here is where those tools come in handy. Don't forget to detach the parking brake cable from the backing plate. Also when you remove the actuator mechanism don't lose the little pin that holds the lever to the end of the brake cable. Now you can get the dust shield loose so you can get to the bolts on the ends of the links and the LCA bushing that hold the wheel carrier in place. Carefully unload the spring using the floor jack. Now you have the wheel carrier assembly free to either take to your shop press or to the machine shop for bearing replacement. When pressing be careful of the following (BTDT on all of these): - You will need a healthy shop press (50 ton min.) 12 ton HF special is not going to cut it. - You will need a high quality bearing separator. - Do not distort the dust shield plate, or the parking brake will not go back together properly. - Do not damage the two ears that the caliper attaches to, or the caliper will not be able to be reattached. Bending those ears is cause for scrapping the [edit: wheel carrier], this is due to metal fatigue and the misalignment of the caliper. This happened to us when using a cheap bearing separator. - The wheel bearing is one time press-in only when reinstalling the hub. Removal of the hub will destroy the bearing. So make sure you have everything put back together in the proper orientation before pressing in the hub to the new bearing. - Be sure when pressing that you are applying pressure and backup support to the races in such a way that no force is applied that would pass from one race to the other through the bearing = destroyed bearing. While you have the car this far apart it makes perfect sense to change the LCA bushings in the bottom of the wheel carrier. Of course then you will probably see the split ends of all the links and the rotten subframe bushings. That is how it snowballed on my car. OK... W124 Rear bearings are a BEAR to replace
__________________
The OM 642/722.9 powered family Still going strong 2014 ML350 Bluetec (wife's DD) 2013 E350 Bluetec (my DD) both my kids cars went to junkyard in 2023 2008 ML320 CDI (Older sons DD) fatal transmission failure, water soaked/fried rear SAM, numerous other issues, just too far gone to save (165k miles) 2008 E320 Bluetec (Younger son's DD) injector failed open and diluted oil with diesel, spun main bearings (240k miles) 1998 E300DT sold to TimFreeh 1987 300TD sold to vstech Last edited by jay_bob; 03-26-2014 at 04:59 PM. Reason: changed hub to wheel carrier above
|
|
#7
03-26-2014, 02:39 PM
|
|||
|
|||
|
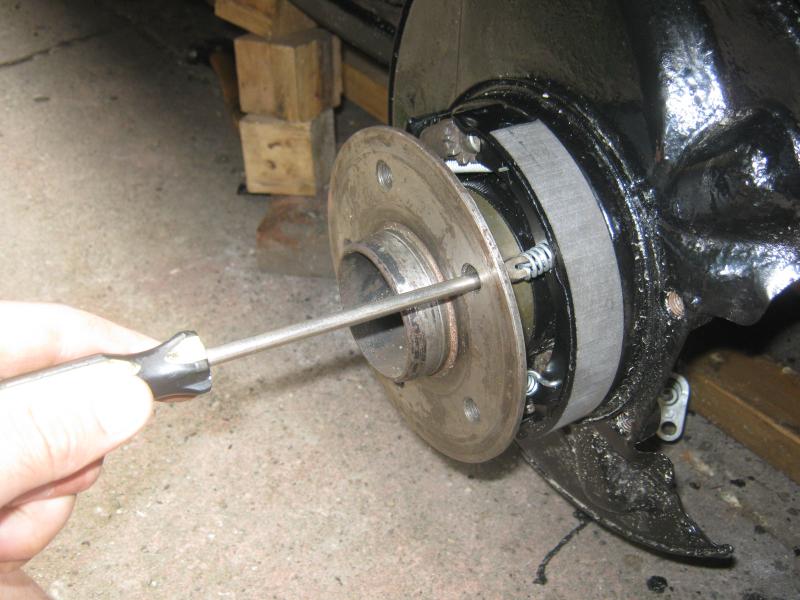
This HF Brake Spring tool is a help.
Search results for: 'brake spring tool'  I had a flat blade Screwdriver I ground down to fit into the Lug Bolt hole to install the Brake Shoe Springs. Pushed it in to rotate the Spring to hook it. Since my last Brake job, the dang thing vaporized.  looked every where for it. looked every where for it.  Charlie
__________________
there were three HP ratings on the OM616... 1) Not much power 2) Even less power 3) Not nearly enough power!! 240D w/auto Anyone that thinks a 240D is slow drives too fast. 80 240D Naturally Exasperated, 4-Spd 388k DD 150mph spedo 3:58 Diff We are advised to NOT judge ALL Muslims by the actions of a few lunatics, but we are encouraged to judge ALL gun owners by the actions of a few lunatics. Funny how that works
|
|
#8
03-26-2014, 03:16 PM
|
||||
|
||||
|
Super duper straight from NASA cost a fortune Y2K compliant =>
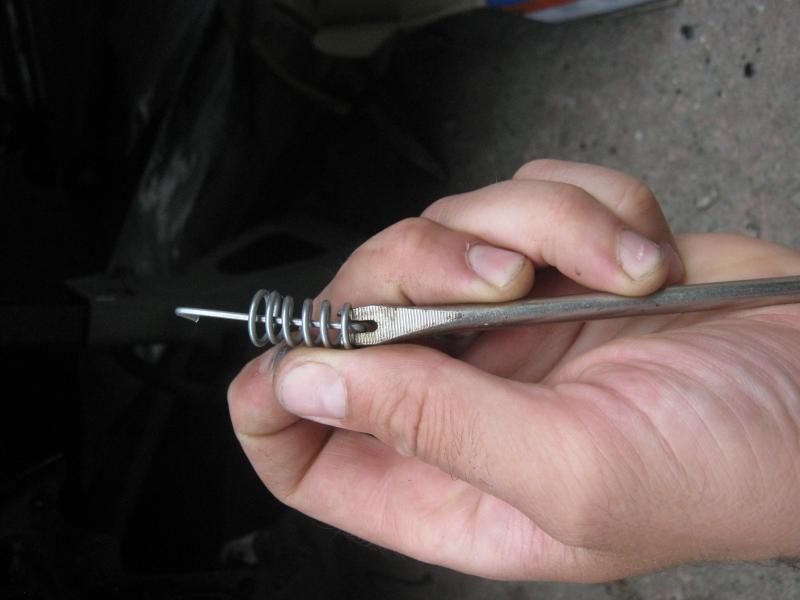  Home Made Special Tools, This is where members can share how they made special tools
__________________
1992 W201 190E 1.8 171,000 km - Daily driver 1981 W123 300D ~ 100,000 miles / 160,000 km - project car stripped to the bone 1965 Land Rover Series 2a Station Wagon CIS recovery therapy! 1961 Volvo PV544 Bare metal rat rod-ish thing I'm here to chat about cars and to help others - I'm not here "to always be right" like an internet warrior  Don't leave that there - I'll take it to bits!
|
|
#9
03-26-2014, 05:35 PM
|
||||
|
||||
|
The petite cargo hook and modified screwdriver are close analogs to the official tools and will probably work fine for brake removal.
__________________
The OM 642/722.9 powered family Still going strong 2014 ML350 Bluetec (wife's DD) 2013 E350 Bluetec (my DD) both my kids cars went to junkyard in 2023 2008 ML320 CDI (Older sons DD) fatal transmission failure, water soaked/fried rear SAM, numerous other issues, just too far gone to save (165k miles) 2008 E320 Bluetec (Younger son's DD) injector failed open and diluted oil with diesel, spun main bearings (240k miles) 1998 E300DT sold to TimFreeh 1987 300TD sold to vstech
|
|
#10
03-26-2014, 07:49 PM
|
||||
|
||||
|
nope, the 126 is identical to the 123, and bears little resemblance to the 124's bearing arangement... aside from properly supporting the car, Jays instructions do not apply to the 126.
just read up on the DIY mentioned above, and realize the massive difficulties involved in changing the rear bearings on your car, then start shopping for a good trailing arm to swap in... unless you really really want to change that bearing, with the one use only tool, and the massive crush preload fun... Quote:
__________________
John HAUL AWAY, OR CRUSHED CARS!!! HELP ME keep the cars out of the crusher! A/C Thread "as I ride with my a/c on... I have fond memories of sweaty oily saturdays and spewing R12 into the air. THANKS for all you do! My drivers: 1987 190D 2.5Turbo 1987 190D 2.5Turbo 1987 190D 2.5-5SPEED!!! 1987 300TD 1987 300TD 1994GMC 2500 6.5Turbo truck... I had to put the ladder somewhere!
|
|
#11
03-26-2014, 09:31 PM
|
||||
|
||||
|
Ok my bad
I thought about that after I posted, and suspected as much.
__________________
The OM 642/722.9 powered family Still going strong 2014 ML350 Bluetec (wife's DD) 2013 E350 Bluetec (my DD) both my kids cars went to junkyard in 2023 2008 ML320 CDI (Older sons DD) fatal transmission failure, water soaked/fried rear SAM, numerous other issues, just too far gone to save (165k miles) 2008 E320 Bluetec (Younger son's DD) injector failed open and diluted oil with diesel, spun main bearings (240k miles) 1998 E300DT sold to TimFreeh 1987 300TD sold to vstech
|
|
#12
03-29-2014, 09:40 PM
|
|||
|
|||
|
well I'm not even sure if my bearings are bad on the rear right. I think that perhaps the caliper is not working properly and I hear a lot of rubbing because it is not releasing.
for now I will replace the hoses , the calipers the rotors and pads and I am not going to deal with the parking brake. so it sounds like I will not need any special tools unless I have a problem with my parking brake and /or bearings... thanks for the advice!
__________________
1985 300SD
|
 |
| Bookmarks |
|
|


 Linear Mode


