Parts Catalog Accessories Catalog How To Articles Tech Forums
Call Pelican Parts at 888-280-7799
Shopping Cart Cart | Project List | Order Status | Help


Go Back   PeachParts Mercedes-Benz Forum > Mercedes-Benz Tech Information and Support > Diesel Discussion

Reply
 
LinkBack Thread Tools Display Modes
  #31  
Old 04-24-2014, 04:42 PM
Stretch's Avatar
...like a shield of steel
 
Join Date: Sep 2009
Location: Somewhere in the Netherlands
Posts: 14,461
Quote:
Originally Posted by Dan Stokes View Post
...And I have to go to Tool Collector's Anonymous regularly (My name's Dan and I'm a Tool Collector.....")

Dan
And it doesn't sound like you've got it as bad as some of us!

I think the thing to remember is that you hear some people saying "just jam a screw driver in there if the valve spins". This is not a smart move - I think this is what caused this to my OM617 =>
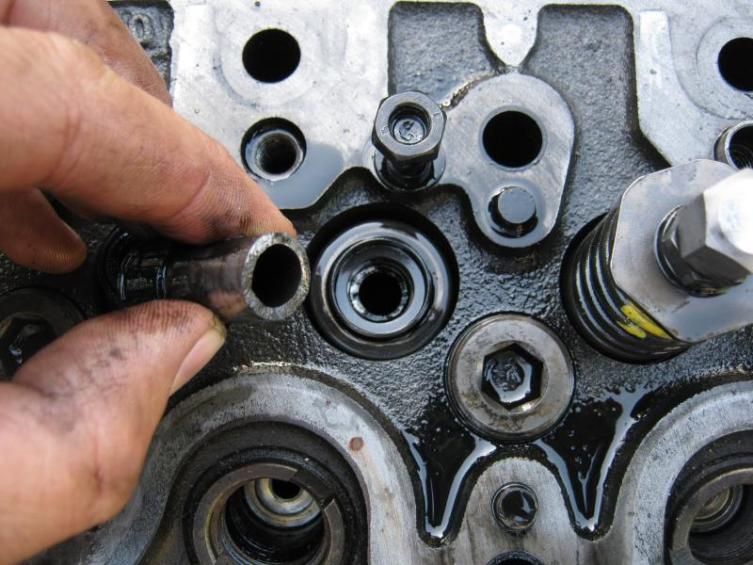


OM617 manifold oil = broken valve guide

These are tough old cars - well engineered - but they are not arse hole proof!

__________________
1992 W201 190E 1.8 171,000 km - Daily driver
1981 W123 300D ~ 100,000 miles / 160,000 km - project car stripped to the bone
1965 Land Rover Series 2a Station Wagon CIS recovery therapy!
1961 Volvo PV544 Bare metal rat rod-ish thing

I'm here to chat about cars and to help others - I'm not here "to always be right" like an internet warrior


Don't leave that there - I'll take it to bits!

Last edited by Stretch; 04-25-2014 at 03:06 AM. Reason: Spelling 0/10
Reply With Quote
  #32  
Old 04-24-2014, 08:09 PM
Save the manuals!
 
Join Date: Jan 2006
Location: .
Posts: 3,477
Quote:
Originally Posted by Diesel911 View Post
I am guessing that you did not remove the Fuel Injection Hard Lines?

I remove the Fuel Injection Hard Lines when I pull the Glow Plugs otherwise I would surly lose some of the little nuts.
But, some Members in the past have said they have no problems leaving the Lines on while the work on the Glow Plugs.
No I left them on. I did take advantage of the extra space one time when I replaced my injectors with some greazzer rebuilds. It was much easier.
Reply With Quote
  #33  
Old 04-24-2014, 09:06 PM
Diesel911's Avatar
Registered User
 
Join Date: Sep 2007
Location: Long Beach,CA
Posts: 51,199
Quote:
Originally Posted by Dan Stokes View Post
The "shortcut" is to hold the adjuster with a 14mm/9/16 and rotate the spring pack (for want of a better term) with the third wrench - or I just used a pair of Channel Locks. If the adjustment is close and you just need to fine tune it, this works great.

I think it's funny that anyone would gripe about using a 9/16 instead of a 14mm. Granted that they are slightly different but either will work just fine. I made my own - just one bent wrench and I worked my Snap-On 14mm in for the other wrench, with fuel lines in place. No issue. When I needed to hold the spring pack I broke out the Channel Locks as noted.

It would be nice to have a spiffy set of the right wrenches but I won't do this all that often so I don't feel the need. And I have to go to Tool Collector's Anonymous regularly (My name's Dan and I'm a Tool Collector.....")

Dan
You are still in denial? Collector and Adict are not the same

Buying Tools is easy finding the specific Tool I need that I have not used for a long time is not.

It used to be you could get a set of Hazet Wrenches on eBay for around $60 somtimes around $40 if lucky. But, I am not seeing that now.
__________________
84 300D, 82 Volvo 244Gl Diesel
Reply With Quote
  #34  
Old 04-24-2014, 09:18 PM
Mölyapina's Avatar
User title not in use
 
Join Date: Oct 2012
Location: Chelmsford, Massachusetts
Posts: 4,373
Quote:
Originally Posted by Stretch View Post
And it doesn't sound like you've got it as bad as some of us!

I think the thing to remember is that you hear some people saying "just jam a screw driver in there is the valve spins". This is not a smart move - I think this is what caused this to my OM617 =>
Guilty as charged . Although I promised not to do it again!
__________________
"Senior Luna, your sense of humor is still loco... but we love it, anyway." -rickymay ____ "Your sense of humor is still loco... " -MBeige ____ "Señor Luna, your sense of humor is quite järjetön" -Delibes

1982 300SD -- 211k, Texas car, tranny issues ____ 1979 240D 4-speed 234k -- turbo and tuned IP, third world taxi hot rod

2 Samuel 12:13: "David said to Nathan, “I have sinned against the Lord.” And Nathan said to David, “The Lord also has put away your sin; you shall not die."
Reply With Quote
  #35  
Old 04-25-2014, 06:58 AM
Willing Participant
 
Join Date: Aug 2005
Location: USA
Posts: 1,394
Quote:
Originally Posted by Dan Stokes View Post
The "shortcut" is to hold the adjuster with a 14mm/9/16 and rotate the spring pack (for want of a better term) with the third wrench - or I just used a pair of Channel Locks. If the adjustment is close and you just need to fine tune it, this works great.
Actually, I did it exactly opposite. I put the third wrench down so that the valve doesn't spin, then moved the nuts just a bit on the threads.

The two nuts will both turn together on the valve stem even though they are "locked" together. To increase clearance, just turn the top nut clockwise and the bottom will go with it. Conversely, if your clearance is too great, turn the bottom nut counterclockwise and it will take the top with it.

Sometimes you will have limited area to work with, so loosening the nuts from each other and doing it the "old fashioned" way is best for that particular valve that time, but it can really cut down on your total time needed for the job and that is good news for an old back and knees.

__________________
1982 300CD Petrol/Black Leather
Reply With Quote
Reply

Bookmarks

Thread Tools
Display Modes

Posting Rules
You may not post new threads
You may not post replies
You may not post attachments
You may not edit your posts

BB code is On
Smilies are On
[IMG] code is On
HTML code is On
Trackbacks are On
Pingbacks are On
Refbacks are On


All times are GMT -4. The time now is 06:37 AM.


Powered by vBulletin® Version 3.8.7
Copyright ©2000 - 2024, vBulletin Solutions, Inc.
Search Engine Optimization by vBSEO 3.6.0
Copyright 2024 Pelican Parts, LLC - Posts may be archived for display on the Peach Parts or Pelican Parts Website -    DMCA Registered Agent Contact Page