

|
|
|
|
|
|
#46
 07-26-2014, 12:10 AM
|
||||
|
||||
|
It appears that there is another beneficial side effect to the new timing chain and that is an increase in fuel mileage. On the most recent tank, with a driving profile that would normally produce right at 30 mpg I got 32.7
Now one tank does not confirm this, but it is definitely a significant indicator. It also appears that there is less smoke (soot) now too. I'm happy.
__________________
Current Stable

|
|
#47
07-26-2014, 10:22 AM
|
||||
|
||||
|
I have this project coming up shortly. Perfectly explained. Thank you.
__________________
1980 300TD, SOLD 1984 300TD, 275K  1999 C230 K Black & Tan 2013 C250 Black 1974 CJ5 Red You might faint from the fight, but you're gonna find it. Every challenge could have paradise behind it. -John Popper-
|
|
#48
07-26-2014, 10:36 AM
|
||||
|
||||
|
Quote:
Someone should contact him so that he can correct the tutorial.
__________________
85 300D turbo pristine w 157k when purchased 161K now 83 300 D turbo 297K runs great. SOLD! 83 240D 4 spd manual- parted out then junked
|
|
#49
07-26-2014, 11:02 AM
|
||||
|
||||
|
Quote:
__________________
 All Diesel Fleet 1985 R107 300SLD TURBODIESEL 2005 E320 CDI (daily) LOTS of parts for sale! EGR block kit http://www.peachparts.com/shopforum/diesel-discussion/355250-sale-egr-delete-block-off-plate-kit.html 1985 CA emissions 617 owners- You Need This! Sanden style A/C Compressor Mounting Kit for your 616/ 617 For Sale + Install Inst. Sanden Instalation Guide (post 11): http://www.peachparts.com/shopforum/diesel-discussion/367883-sanden-retrofit-installation-guide.html
|
|
#50
07-26-2014, 11:39 AM
|
||||
|
||||
|
Quote:
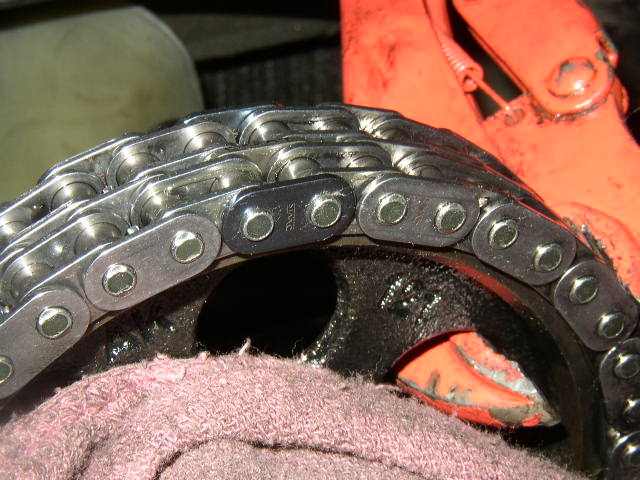
Here's the entire crimping sequence on his site.  And digitally enhancing the first image clearly shows the crimping face of the die not being used.  He might say that this image is pressing on the link in preparation for crimping, but there should definitely be an additional two images showing the crimper being used with the crimping face and the final product with the mushroomed pins. To his credit, he says it but does not show it... which is very misleading.
__________________
Current Stable
|
|
#51
07-28-2014, 08:47 PM
|
||||
|
||||
|
Second tank post chain replacement yielded 34.0 mpg
I think I can call the increase in mileage confirmed. Should have done it a lot sooner I guess...
__________________
Current Stable
|
|
#52
08-13-2014, 12:15 AM
|
|||
|
|||
|
Glad I found this thread, I started this process yesterday and realized I messed up, so now I'll have to press the master link back out and get a new one, despite using the FSM for a W124;the instructions listed nothing like what is listed here. Here's my dilemma:
I couldn't get the master link to go through the middle link or outer link, so I took calipers and measured the ID of the link holes, then measured the OD of the rivets, then took a drill and barely reamed the link plates out to match the OD of the master link rivets, allowing it to press through with no resistance. I used the link press face portion with the magnet to try and swell the heads, but the link rivet heads are barely swelled, with the outer plate loose but barely on. Now, after reading this thread and a couple of others as to how tight the middle and outer links should be, I'm sure I botched this due to the looser tolerances I created, even though I could now crimp the outer plate and finish the job. I don't want to risk destroying my engine.
|
|
#53
09-15-2014, 02:25 AM
|
||||
|
||||
|
Recycled for new members
Education.
.
__________________
ASE Master Mechanic asemastermechanic@juno.com Prototype R&D/testing: Thermal & Aerodynamic System Engineering (TASE) Senior vehicle instrumentation technician. Noise Vibration and Harshness (NVH). Dynamometer. Heat exchanger durability. HV-A/C Climate Control. Vehicle build. Fleet Durability Technical Quality Auditor. Automotive Technical Writer 1985 300SD 1983 300D 1984 190D 2003 Volvo V70 2002 Honda Civic https://www.boldegoist.com/
|
|
#54
09-17-2014, 11:32 AM
|
|||
|
|||
|
Quote:
HOWEVER....this also makes it possible to crimp those ends just fine without the very nice tool... Two 2 lb hammers....one as an anvil behind the pin.... and the other tapping a sharpened drive punch on the center of that pin...... Very little expansion is needed given the situation to hold it in place. There is no rush.... and not much hitting needed.... just be sure the anvil is in place...and TAP... a couple or three firm hits should do the job just fine.
__________________
1980 240d , chain elongation, cam marks reference: http://www.peachparts.com/shopforum/diesel-discussion/10414-help-i-need-check-stretch.html http://www.peachparts.com/shopforum/diesel-discussion/305365-9-degrees-chain-stretch.html evap fin cleaning: http://www.peachparts.com/shopforum/diesel-discussion/156207-photo-step-step-post-showing-w123-evaporator-removal-1983-240d-1982-300td.html?highlight=evaporator A/C thread http://www.peachparts.com/shopforum/diesel-discussion/297462-c-recommendations-mb-vehicles.html
|
 |
| Bookmarks |
|
|


 Linear Mode


