

|
|
|
|
|
|
#1
 02-20-2015, 03:49 PM
|
|||
|
|||
|
Alternator 101 + R&R
(my site has small click-able photos! Can't seem to resize them on here) MODS? Or I can delete them...
Lets see, we are going to cover very basic electrical here! Now I know we have a zillion threads on here on why is my battery not charging? Why do I have electric gremlins? What is there no warning light? And the zillion others. Well here is why you have those issues! This is my Bosch 55amp Part number 0120489526 14v Alternator from my 1978 Mercedes Benz 300D. This is the ORIGINAL alternator!! My issue was that I woke up with a dead battery! I checked and had 11.2 volts at the battery, I had assumed my cheap oreilly battery crooked again. A huge argument with the Manager resulted in my not getting a warranty replace so I threw the battery in my 82 which I know has a good charging system. Thankfully the battery held its charged now it time to figure out why! *A word of advice in Arizona, be prepared to be discriminated against. Every Navajo here treats you as though you just scalped their daughter!! I had no signs of a bad alternator and the VOM showed a 12.5 charge to the battery at idle. Low it is but it should still keep the battery charged. There were also no flashing of the battery light or it not illuminated. I was noticing an issue when the climate control was on, it wasnt operating properly. First thing I decided to do was pull the alternator, as I was sure it was original and it was quite corroded. Even though I didnt see any signs of it being bad, I opted to start there and work towards the fuse box. Here we get to the simple basics of electricity in your car. You see the alternator is grounded to the bracket, which is grounded to the block thus grounded to the body of the car. Thus back to the battery. IF there is any corrosion, oil, etc. on any of these mating surfaces it will cause the parts to not ground. On a battery system that is in your car, in order for the electrical to operate correctly this circle of life needs to be fully operational and this must start with good clean grounds! Without this, you will have tons of electrical bugs going on with the car. This is normal maintenance, as your car is opened to all sorts of elements! It is more an age item, then a wear item due to mileage. This car is approaching 40 years old! And has been sitting for more than half of those years. So it needs to be done! First we will start with the bracket and were it mounts to the block, the first thing I noticed was the nuts were not tight at all! I was expecting a PITA situation trying to get them off. Well after that was removed we see an issue! From the bracket being lose and 40+ years of grime we see fresh oil on the shiny mating surface. This will cause a ground issue.   Now with the bracket off, lets look at all the points where the alternator mates with the bracket .errr corrosion, grease, uneven areas. Again will not make a good grounding surface. We also see all the hardware is corroded and greasy. How is this supposed to ground the alternator to the block?     Now lets look at the alternator itself. Lots of corrosion! Still wears its tag! Explain that!      So how does the alternator charge and feeds the electrical system in the car? The umbilical cord! The mating surfaces of the male and female plugs look like this. Err full of grease, corrosion, oil and who knows what. No wonder I am having strange gremlins and no charging. Also with this being the Positive side of the battery, all this gunk can also cause arcing which can lead to worse nightmares then just a no charging battery from the negative side of the battery.   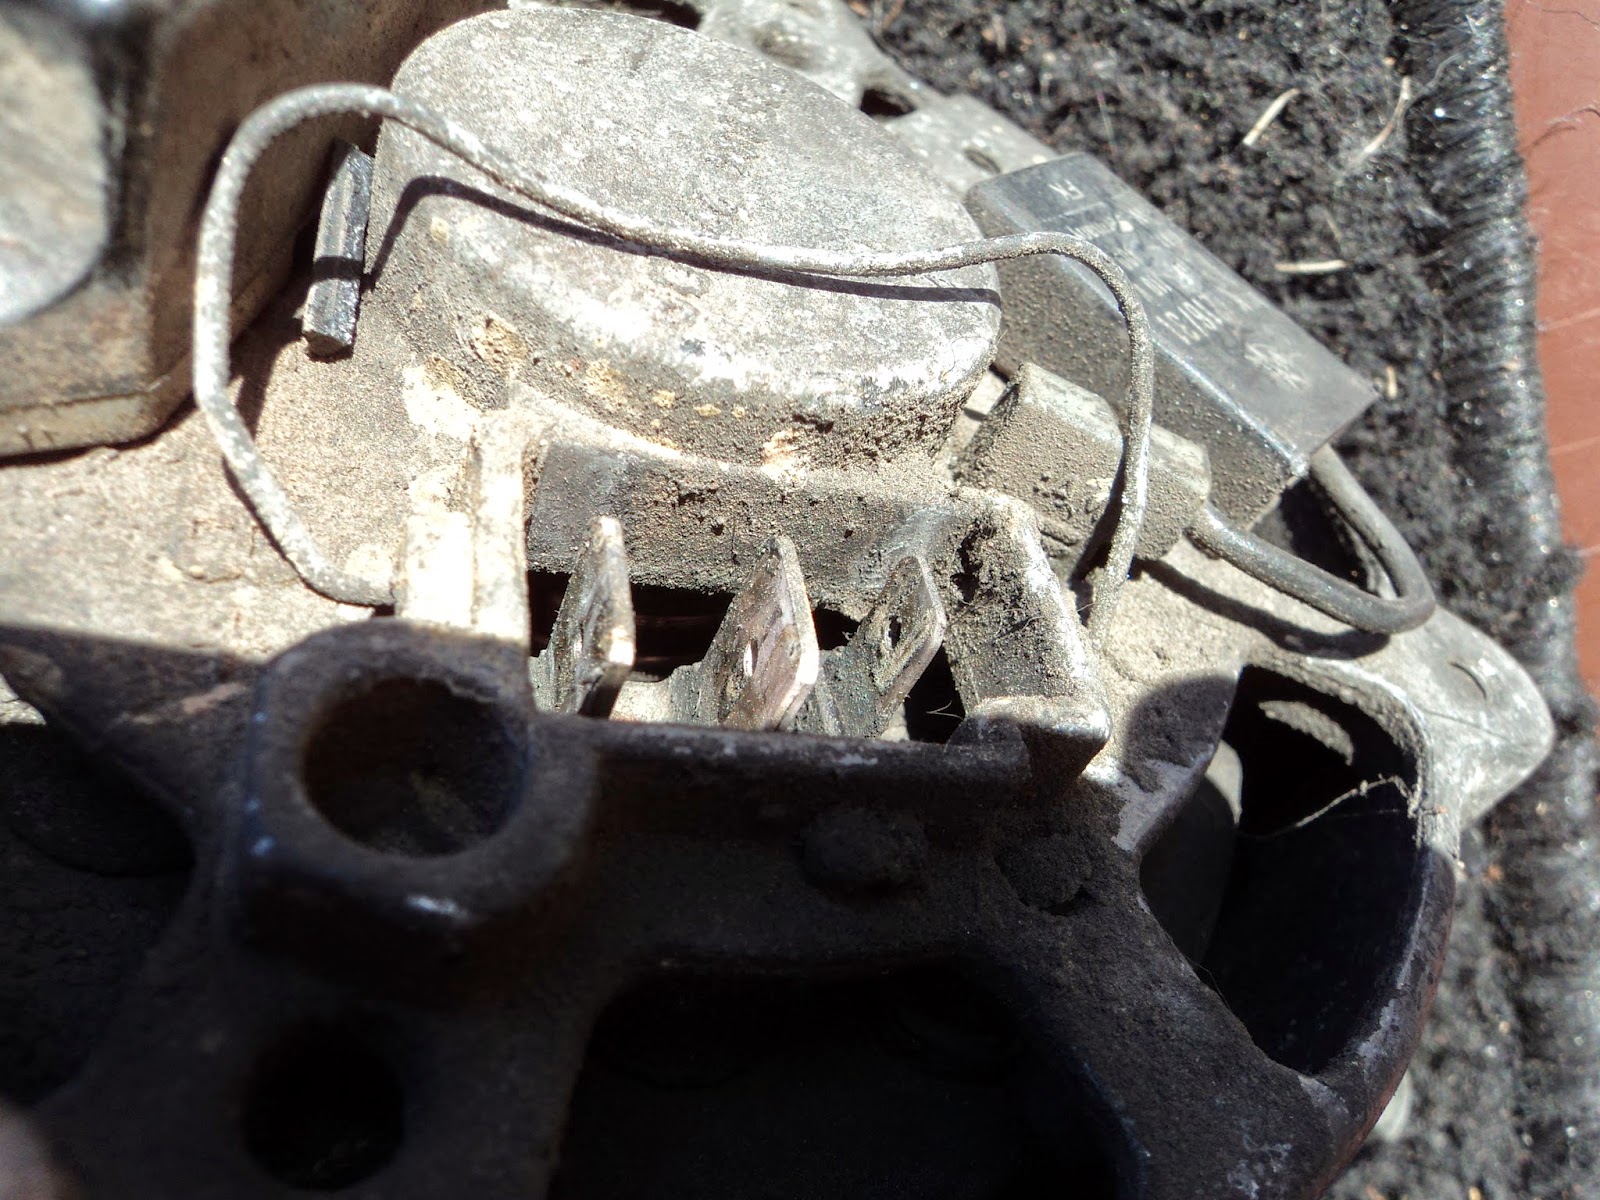 Now lets pull the voltage regulator! Now lets unscrew this! Hmm not too bad, worn yes but not bad but whats this? The ground point of the regulator is corroded. Well that explains the low charge voltage.    Then we look at the alternator itself. Bearings arent making any noise, dry yes but not bad. The commuter where the brushes ride isnt horrible does show its 40 years. 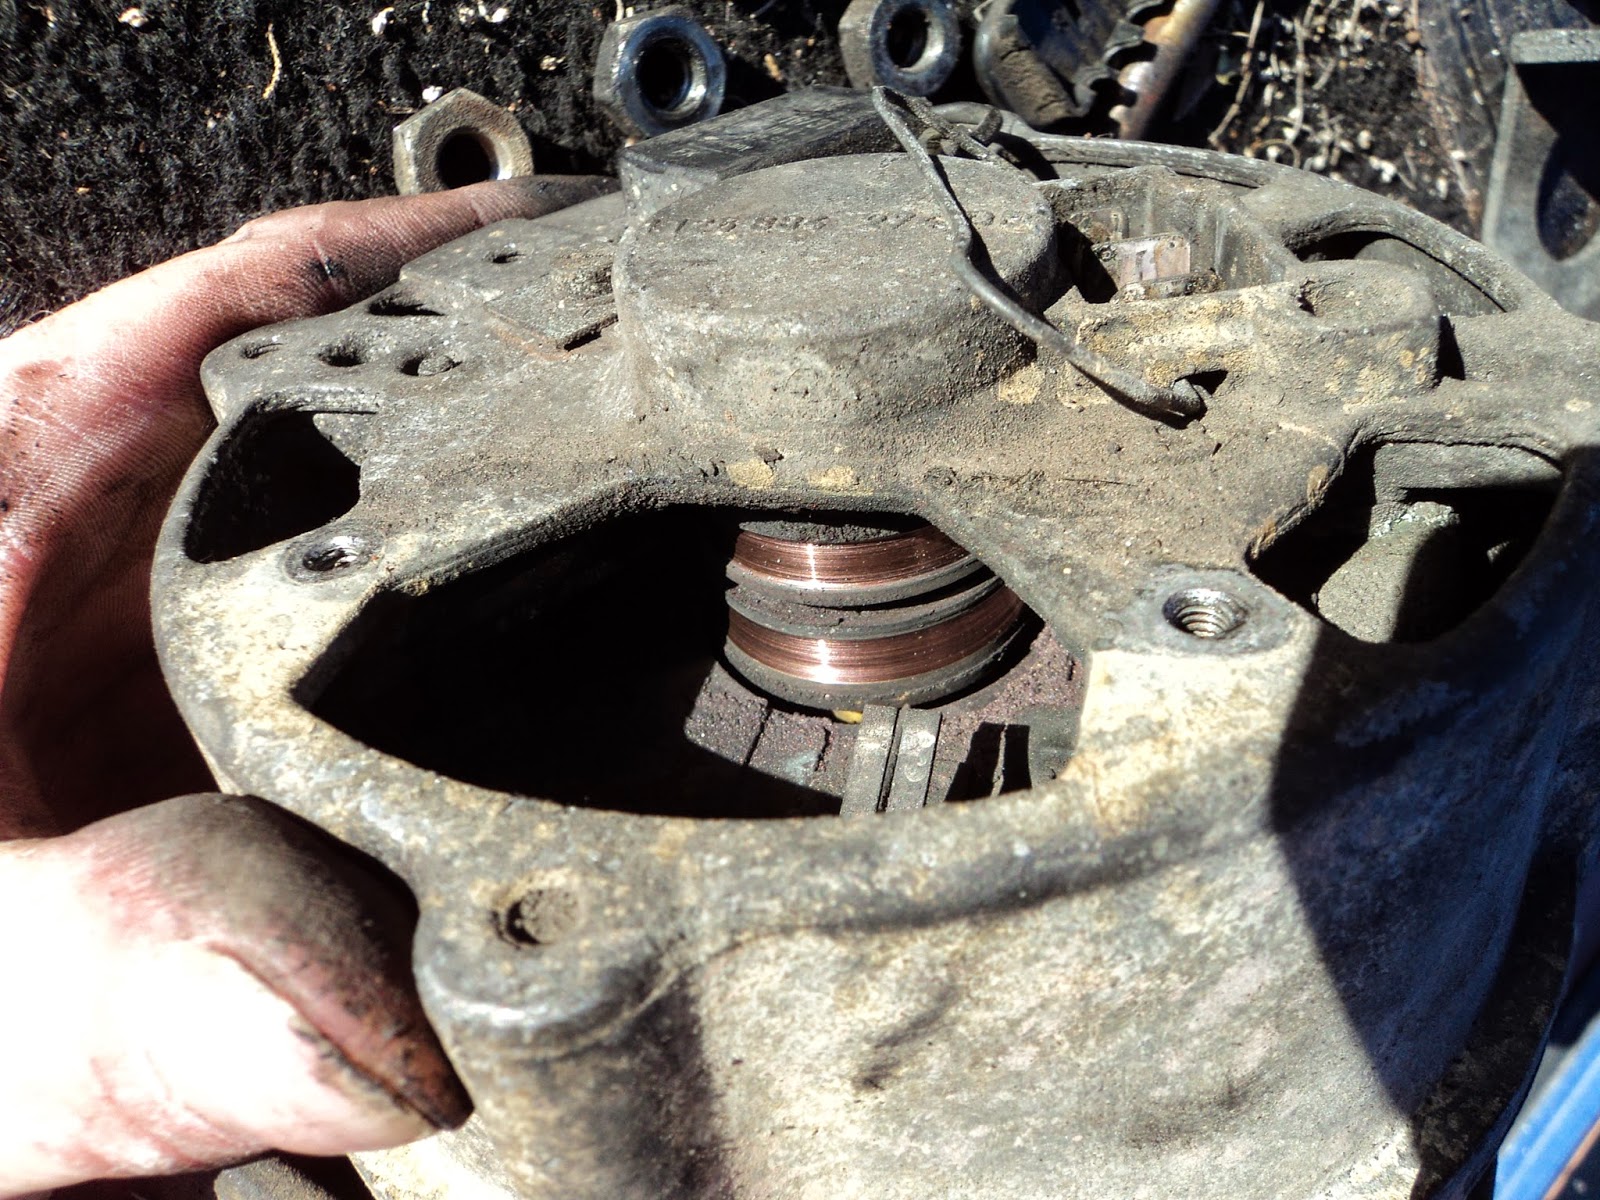 Finally analysis and plans for phase two. The alternator is fine, the only issues are age. Corrosion, grease, dirt, oil etc. The area that are meant to wear such as the brushes and commuter have worn. What will be done, is strictly labor. Plans are to clean all the pieces, sand/file/steel wool all the pieces that are responsible for grounding. Clean all the electrical connections with deoxit and shine them. Go to the hardware store and see if I can find replacement brushes. Then the alternator should give me another 40 years of service plus my expense will be more then like under 20$ if I find brushes or under 45$ if I have to buy a regulator.
__________________

|
|
#2
02-20-2015, 04:07 PM
|
||||
|
||||
|
You are correct, loss of ground will cause this problem.
Army aka Strech "took one of these to bits" so you can see how to disassemble it and refurbish it. Before you do that take it to a auto parts store and have them spin it to make sure it's working. Then I would find a motor shop and have new bearings pressed in, give it a good cleaning, new regulator, bench test, and you ought to be good for another 30 years. Also clean the connection points on the cconnector but do not scrape them. Use Tarn-X on a q-tip only for the alternator terminals. On the plug remove the housing and dip them.
__________________
The OM 642/722.9 powered family Still going strong 2014 ML350 Bluetec (wife's DD) 2013 E350 Bluetec (my DD) both my kids cars went to junkyard in 2023 2008 ML320 CDI (Older sons DD) fatal transmission failure, water soaked/fried rear SAM, numerous other issues, just too far gone to save (165k miles) 2008 E320 Bluetec (Younger son's DD) injector failed open and diluted oil with diesel, spun main bearings (240k miles) 1998 E300DT sold to TimFreeh 1987 300TD sold to vstech
|
|
#3
02-20-2015, 04:22 PM
|
|||
|
|||
|
Correct, you do not want to scrap the terminals but you do want to polish them. For this I use extra fine steal wool.
EEEEPPPP Tarn X. Don't ever use a metal polisher on any electrical surface. They DO live a slight coating which can very well get worse with the elements. Since RadioShack is gone, finding a source for deoxit may be a bit harder but this in my number one choice for anything electrical(I do a lot of restoration of vintage electronics). If the points/mating surface area is really bad I will use a simple electrical cleaner from any autoparts store. This is cheaper then Deoxit and cleans better. Deoxit is both a cleaner, lube and for prevention of corrosion. If a point is exposed to moister I will coat that area after the connection is made with grease to keep water from penetrating the mating surface. DO NOT apply grease before the connection is made and is secure.    For any type of silver polishing or metal polishing I use. For sterling I polish on the stove. 
__________________
|
|
#4
02-20-2015, 04:57 PM
|
|||
|
|||
|
Found stretch's thread. Very information and good pics if I need them BUT
Refreshing the alternator on an OM617 I didn't see him inspect/re grease the bearings. I would AVOID the coating, that was pretty rusty and I think I would have looked for a better core. "Can we all remain friends?" He painted all the mating surfaces. As I said, how can a ground be made IF there is an insulated layer of paint/corrosion where the pieces are suppose to be polished to create a strong mating surface for the ground? Keep an eye on here, and I will show a proper painting of the alternator to allow the alternator to still ground its self. Electricity rather negative, positive, dc or ac can only travel through metal surfaces. Going back to science class, if you are barefoot on a concrete ground electricity will use your body as a ground. If you put rubber shoes on, the electricity will not flow through you to ground its self. Remember the earth is a giant magnet, lightening is DC electricity. It is attracted to the earth because it is a giant molten metal magnet...to say it bluntly  AC electricity is also a man made form of electricity, hints why the earth does not like this. As with the battery in the car, the earth can't recycle the AC electricity. "I prey to all things holly, that this doesn't becoming some battle of the brains in here "
__________________
|
|
#5
02-20-2015, 05:33 PM
|
|||
|
|||
|
Yeh I caved in and bought a regulator, well I made an offer he countered so technically he made me buy it :laugh It looks vintage which is AWESOME set me back 23$. The aftermarket one made in the UK was 25$ but I wanted to have an OEM one to replace this with. I want to keep the car looking 1978 under the hood :grin

__________________
|
|
#6
02-20-2015, 08:33 PM
|
||||
|
||||
|
Great post. I appreciate the detail. I need to know every little thing that goes on, and why it does it. I need to know why we do it this way and not another way, or if we can do it other ways for different reasons. Your pictures are great.
When I did the water pump, realized that the alternator may be on the short list of to do items, so alright I'm alright with this way of teaching. Thanks
__________________
1977 300D - 255,000
|
|
#7
02-20-2015, 09:41 PM
|
||||
|
||||
|
I bet the Bosch factory is temporarily shuttered right now for Carnival !
__________________
1979 300D 220 K miles 1995 C280 109 K miles 1992 Cadillac Eldorado Touring Coupe 57K miles SOLD ******************** 1979 240D 140Kmiles (bought for parents)  *SOLD. *SOLD.SAN FRANCISCO/(*San Diego) 1989 300SE 148 K miles *SOLD
|
|
#8
02-20-2015, 11:45 PM
|
||||
|
||||
|
Tarn - X plus a rubbing alcohol bath afterwards works well.
__________________
1985 300D 198K sold 1982 300D 202K 1989 300E 125K 1992 940T "If you dont have time to do it safely, you dont have time to do it" "The democracy will cease to exist when you take away from those who are willing to work and give to those who would not."
|
|
#9
02-21-2015, 12:53 PM
|
|||
|
|||
|
CARNIVAL!!!!
 Wish America had these great events, but I can just see the after math. I remember what Halloween in the Castro turned out to be like. Can't we all just get along?? YES if you use tranx which personally is expensive last I looked. I tried every polisher on the market to find one that will cut down on the labor involved. Never Dull has been around since the days of the war, was very popular with the army/navy and now its available at local auto zoo's and home depot...so I would grab that before anything else, brasso has changed and that use to be great for polishing bakelite. Also beside an Alcohol bath, gasoline works just as well! I would like to let all these parts soak in gas for a few hours before scrubbing but I only have a diesels and no lawn equipment. So I am not running out and buying a gas can, then gas and then come back. I will stick to gunk, though I am going to first try simply green. I may try to get to cleaning today, as I just took all my drugs so I am hoping in the afternoon things will stop hurting though I did break my toe yesterday. Yeh I think I have excelled aging issues Having a genetic disease that causes arthritis is horrible when you appear 30 to the rest of the world. Also had a couple more teeth fall apart.
__________________
|
|
#10
02-22-2015, 01:56 PM
|
|||
|
|||
|
(Smaller photos on site)
Ok, it was cleaning time yesterday! I dread this! Gunk cleaner works great and I even use it when I rebuild crank phonograph motors. I have rebuilt so far a few Victrolas, Talking Machine, Cheney Phonograph sued by Victor and a Brunswick. Well back to the point, this stuff has some caustic aromas' and I have had more then one share of a sore throat from it. Such as this morning. I suggest anyone who uses it, discard all rags used with it, remove all clothes after use with it, wash all parts with warm water after use and then take a warm soapy shower. It is that bad! I changed my shirt but not my jeans and left them at the head of the bed last night....boy did I pay!! I have a HEPA filter(another dumpster save) that I use in my work area to clean up any remaining fumes. Speaking of working areas, I cleaned mine in order to get this job done!! And I had to work on my hons chair. As was said before I could even start this disassembly I had to clean the work area and work on the Hons Chair(Another dumpster save) I will do a separate post on that. Disassembly was pretty straight forward but I will give some advice with PHOTOS!!! First remember to always oil your nuts and well screws too for the ladies It will help to penetrate, loosen gunk, and then seep in when you break them free. I always tap the areas and/or the top of the screw driver to loosen up the bond before I try to break them free. If you take your time and use the correct screw drivers, you can take out/off the nuts/bolts/screws with out any damage.    Now you have to remove that half moon key on the shaft, always tricky. I use oil again, some tapping, some tugging and then it frees up. Don't LOSE it and DON'T let your cat eat it. You'll be sorry     Time to crack open the egg! First note, mark the alternator before you crack it open! I just crudely marked it with a regular screw driver.  Word of advice, and a stupid move on me. I have no idea why I did it. But don't tap the rotor out without first screwing the nut on! Or you'll ended up spending an hour reshaping the threads. You can see while everything is filthy there is only a little rust on the bare steel parts. More then likely from all the gunk causing moister to stay in the alternator and not get blown out.    Now we see why there was a little bearing noise, the grease looks like molasses and is hard like Jello. Both bearings are good, but just dry and high quality bearings. I don't know why people replace them with the 8$ ones from eHell.    All apart and in the bucket for cleaning!! Now I first say...SHAME on all you who don't have a wealth of random buckets, towels and reusable shopping bags!! If I attempted to put these in anything but a bucket....3/4's of the parts would have magically disappeared...   All cleaned!! Took a LONGGGGGGG time. First was scudding with a plastic scrub brush with gunk, let sit in a bucket covered with gunk, another scrub, hot water rinse, cleaned/wiped with towel, steel brush all parts, spray with simply green and scrub with steel wool! AND I was able to save all patina and original sticker!     Next will be repair and reassemble.
__________________
|
|
#11
02-22-2015, 08:57 PM
|
||||
|
||||
|
Thanks for this thread. You certainly demystify the alternator 'restoration'.
__________________
1979 300D 220 K miles 1995 C280 109 K miles 1992 Cadillac Eldorado Touring Coupe 57K miles SOLD ******************** 1979 240D 140Kmiles (bought for parents) *SOLD.SAN FRANCISCO/(*San Diego) 1989 300SE 148 K miles *SOLD
|
|
#12
02-22-2015, 10:01 PM
|
|||
|
|||
|
Not a problem, it is really not that hard to do as long as you have a good core! Installing a new voltage regulator really is a quick band aid fix, it really should be pulled and freshened up. The good things on have two of these 300's so you can pull these items and really spend a few days doing it correctly.
__________________
|
|
#13
02-23-2015, 01:07 AM
|
||||
|
||||
|
Do you take requests? What are the spoke of "diodes" in this pile of bits?
|
|
#14
02-23-2015, 01:30 AM
|
|||
|
|||
|
LOL I had a feeling that may become an issue
Maybe I should grab some cores from the junkyard and rebuild them but I looked and it would cost close to 60$ for an alternator in unknown condition from the junkyard! Wish I was setup for large scale rebuilding but with a profit margin of under 20$ for the many hours I put in..is just not a fair trade. Now if I could go back to the bartering system for the rebuilds that maybe an option! Soon Soon I will be able to have people exchange a day of work on the farm for a rebuild I don't see any diodes, the diodes for the alternator are hidden. I haven't yet looked at them to see their condition. There is a mono tube amp form a projector in the background.
__________________
|
|
#15
04-03-2015, 10:08 PM
|
|||
|
|||
 First I have to say, I thank all the Mercedes Gods and Goddess that this is done! I should stop thinking that any 30 year old anything is going to be fast and easy...  I started on the slip rings, I didn't have a lathe and so I had to do it the po folk way! I used a combo of a dremel, sand paper and files to smooth the slip rings as best as possible.   While doing that I noticed the insulation on wire was near gone. That could be a very nasty sort. So I wrapped it the best I could with heat shirk. You can see it on the left photo on the right. I then had to redo the coating on the rotor. I used lacquer.      Then I had to go over the stator. Cleaning, sanding, cleaning, sanding and finally painting. I went blue.    Next it was time for the electronics all the wiring insulation was toast and had to be replaced. All the diodes measured fine.   The new regulator came in too   Well time to assemble and get it on the car  Well lets see if it works! Ah yep perfect!!! Time will tell if it will keep the voltage steady. I got a new battery and well its almost a year old June 2014!! So I am sure it needs to ideal for a bit to build up voltage. I will keep an eye on it over the next few days. It also seems the evil climate control is acting up again! I am not looking forward to that hunting trip. I have some extra photos on my site below as well.
__________________
|
 |
| Bookmarks |
|
|


 Linear Mode


