

|
|
|
|
|
|
#1
 08-08-2014, 08:31 PM
|
|||
|
|||
|
Bilstein Bushings
First of all, hello and thank you to everyone who contributes to this forum. I have been lurking for the last 2 years reading up on repairs that I needed for my '85 300D and for repairs that I plan on completing in the future. You've all been so helpful. Which brings me to my first post asking for help.
I'm installing new Bilstein shocks up front and am having a difficult time deciphering the "Ikea like" drawings that are supposed to be instructions. The old one came out without a problem and the lower bracket is attached. The kit came with 2 bushings along with the dust sleeve, a wide washer and the nylon locking nut. My problem is that with the both bushings in place, I don't have any thread showing to tighten down the nut. Am I supposed to use both bushings? When I took off my very old shock, there was only 1 bushing on the top under the washer and double nuts. Any timely advice would be appreciated. I was hoping to get the car back on the road tomorrow but I'm losing daylight. 
|
|
#2
08-08-2014, 08:40 PM
|
|||
|
|||
|
You definitely use both bushings, yes. Your first photo illustrates the problem you're having. One 'stop disk' and one bushing go onto the shock shaft below the body mount point. And note the orientation of the lower disk, per the diagram (usually? hopefully?) included in the Bilstein package. There's a machined groove in the lower one - as I recall - which mates perfectly with the upper end of the shock shaft. It'll all seem pretty logical when you see how the lower one orients onto the shaft. And I think the lower one is mounted concavity downward, not upward - perhaps counterintuitive.
My fronts also have a bump stop (15 cm long?) over the shaft, with a plastic shroud/dust cover(?) over that. Raise the control arm just a tad with your jack to compress the shock slightly; this will expose just enough of the threads to attach lock nut.
__________________
'83 300 SD '68 Triumph TR 250 - The only car I ever loved more than the Mercedes; who needs electricity, anyway? - Damn, why did I sell it?! '59 Jaguar 3.4 'Le Chat Noir' - Damn, why did I sell it?! It's difficult to make predictions, especially about the future. - Niels Bohr Last edited by DrLou; 08-09-2014 at 07:21 AM. Reason: part names
|
|
#3
08-08-2014, 09:51 PM
|
|||
|
|||
|
Only 1 disk washer came with the shock. I guess I'll use that one on the underside closest to the shock. And I guessed that if I compressed the spring a little, it might draw up. Does my kindergarden diagram show the correct sequence?
|
|
#4
08-09-2014, 08:13 AM
|
|||
|
|||
|
You definitely need two washers...
Luckily, looks like you have the lower one. Check the machined groove in it - this will guide you as to its orientation: concavity up or down*. Lower rubber buffer is next. Fit shaft through mount point in body, place upper rubber buffer, then the large flat washer on top - Sounds like you don't have this one? Source a big, beefy washer anywhere to fit this bill. If it isn't obvious, its diameter should be a bit larger than that of the rubber buffer it's facing... *On the bottom end of my rear shocks, lower stop washer was oriented concavity down, directly off the Bilstein product insert. Machined groove in this 'stop washer' also made it clear. Mine is an SD - the setup looks different. Don't know your car. In addition, on my car, there is a bump stop over the shaft -this is about 15cm long(?)- then a plastic dust cover over all that. Separate parts on my car - dunno what shocks look like on yours. Your setup also has a bellows, doesn't it? Google search finds many diagrams of this shock setup.
__________________
'83 300 SD '68 Triumph TR 250 - The only car I ever loved more than the Mercedes; who needs electricity, anyway? - Damn, why did I sell it?! '59 Jaguar 3.4 'Le Chat Noir' - Damn, why did I sell it?! It's difficult to make predictions, especially about the future. - Niels Bohr
|
|
#5
08-09-2014, 08:17 AM
|
|||
|
|||
|
The order from bottom to top for a w126 is:
Bump stop Flat plate (sitting on the snap ring on the shock) Protective boot Rubber bushing Fender Rubber bushing Concave up metal plate Nut Both the plates are highly necessary. Re-use the old ones if they didn't come with the shocks. EDIT: Just realized you said 300D, not 300SD. Different chassis from what I know, so don't take my word on it.
|
|
#6
08-10-2014, 12:52 AM
|
||||
|
||||
|
One bushing goes on top, the other is below the metal.
See my thread for diagrams I've included. W123 Bilstein shocks replacement - photo documentary Front shock: 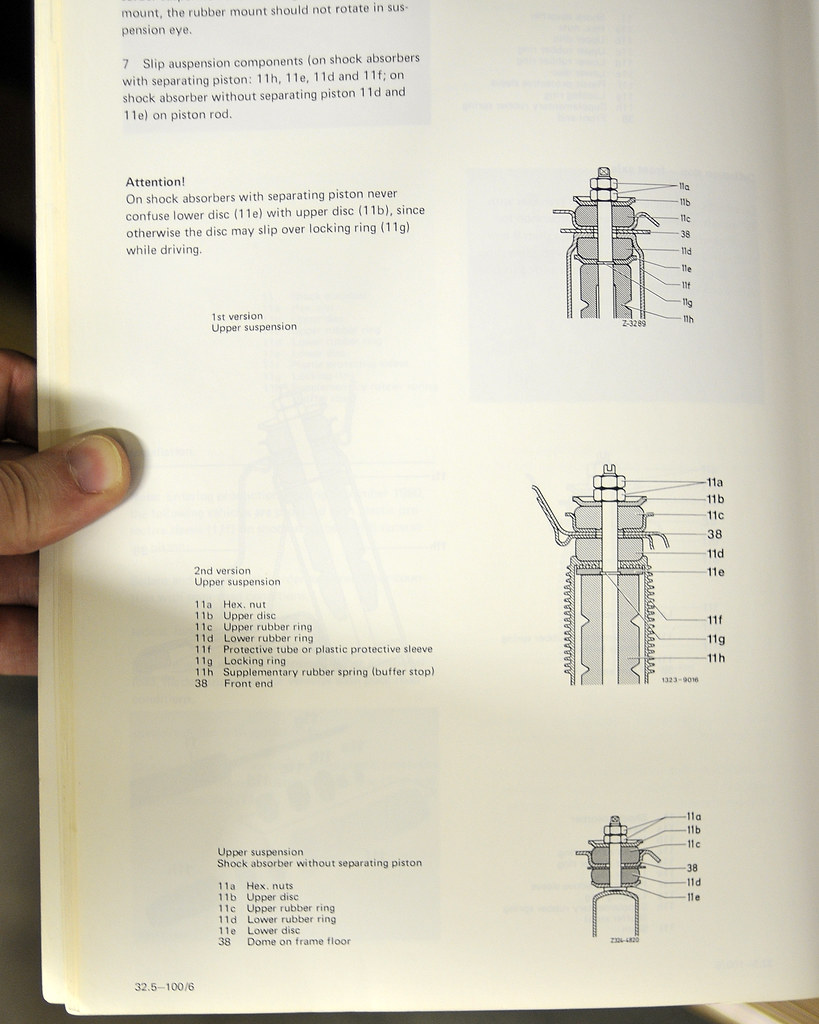
__________________
http://farm8.staticflickr.com/7271/7...144c3fc1dc.jpg
|
 |
| Bookmarks |
| Thread Tools | |
| Display Modes | |
|
|


 Linear Mode


