

|
|
|
|
|
|
#31
 10-10-2015, 03:26 PM
|
||||
|
||||
|
Pulled alternator, battery and tray.
Alternator bracket was a real pita. the final bolt (closest to the engine) was seized and I finally had to use a modified 17 wrench a 4x4 and a jack to get it to break free. The battery tray needs to be replaced. going to go and order one. Under the battery tray looks great. A little surface rust where the tray was rusted, but nothing serious at all, pictures forthcoming. I picked up so phosphoric acid to treat, and some rustolium primer and rustolium ivory paint thats pretty close to original color of car to keep it from getting any further. Took battery and alternator into tow and had them checked out... both failed. Battery under warranty so they gave me another brand new one for free.  Shows what it looked like under battery  After sanding, conditioning with phosphoric acid, priming with rustolium primer and painting with rustolium. still wet...  Along with a new battery tray, I also need this rubber drain going out of the firewall...  Still need to find someone that can do the inner control arm bushings. Nobody around here seems to have the correct spring compressor. Also still have to do rear axel and put on all the rest of the rear end that I have. Last edited by ngarover; 10-10-2015 at 08:03 PM. 
|
|
#32
11-11-2015, 06:38 PM
|
||||
|
||||
|
Cars been sitting since last post as I waited on parts.
Replace the rubber vent coming out of firewall by battery. Happen to have set that looked to be almost new. Started on the pit of hell that is replacing the oil cooler lines. quick refreasher... remove both engine mounts, remove drivers side engine mount (the aluminum part attaching to engine) Jack engine up and down 50 times to fine enough room to actually take out that mount. Remover the main vac line to the brake booster to give you more room... and quite a few of the vac lines for the same reason... finally get the oil cooler lines out after 2-3 hours of twisting this way and that... unless you removed the aluminum engine mount in the first place then you just saved yourself that 2 hours... get a bath in nice dirty oil... Will finish up the job tomorrow, ran out of light. But the new lines are in. Bought both new, and also picked up 2 new lemforder engine mounts to go in when I'm done. Once this steps done I'm going to replace the IP with the one from my spare engine due to this on leaking from one of the top elements. Make go ahead and swap the valve cover as well since the spare is much nicer. While it's off engine is due for a valve adjustment. Going to seem like a new car when all this is done.
|
|
#33
11-13-2015, 06:12 PM
|
||||
|
||||
|
Yay!
Oil cooler lines are done, new engine mounts are done Originals where not terrible, left was a little compressed. The right was fine as I had replaced it with an almost new one earlier in the summer. The metal plates that sit on top of the mounts where looking rough. So I wire brushed them, primed them and painted them to match the car. They look much better and it brightens up the engine compartment a little. Ran out of light, so in the morning I'm dropping the oil pan and putting in a new gasket as the old one is leaking a little. The should resolve and oil leaks on the engine. Steam cleaner after that and some scrubbing and all should look nice. Pictures then...
|
|
#34
11-13-2015, 06:38 PM
|
||||
|
||||
|
I'm doing mine soon, after they are built; I'm going the AN route.
I'm also waiting on the gasket for the oil filter housing, I believe I have a leak there too.
__________________
--------------------------------------------------------------- 1998 VW Cabrio 2001 Audi SomeRoad A/T (no air suspension) 2003 Audi DeadRoad M/T (no vroom, for later) 2002 Audi NoRoad A/T (nothing under the hood, being rebuilt)
|
|
#35
11-13-2015, 06:43 PM
|
||||
|
||||
|
Quote:
|
|
#36
11-14-2015, 04:17 PM
|
||||
|
||||
|
All that maintenance is done and car is drive-able again
You can see the nice shiny new oil cooler lines, the clean and resealed oil pan and 1 of the painted motor mount guard.Really need to get to the inner lower control arm bushings. May to have to break down and buy the generic spring compressor and enlarge the access holes. Blah. Next project is the rear and getting the pass axle replaced with my new one, and getting all the new bushings etc I have in.
|
|
#37
11-14-2015, 05:04 PM
|
|||
|
|||
|
The words euro and lovin made me click this thread ,
 carry on. carry on.
|
|
#39
11-27-2015, 10:35 PM
|
||||
|
||||
|
Today I replaced the injectors with the set from my spare engine. Nice bosch set. When I had the engine in my white sedan it got 32mpg... by far the best mpg I've ever gotten on one of these diesels and always ran clean, so I figured I might as well use them. Plan on sending a set down to Greazzer soon. As it turns out 2 of the injectors of my 5 had been replaced at some point with a different unmatched brand. Of course I put in a new set of heat shields as well.
Went ahead and did the valve lashings, and worked on cleaning the valve cover and injector lines better. They look 100% better. Not polished, but close. Also replaced the thermostat. New oil cooler lines and oil pan gasket are great, no leaks. Fuel take seems to have a leak that I can not find. the lines that I can see seem fine and dry, but the tank itself is wet down the pass side (fill side). Going to get the car up on stands tomorrow and start taking down the sub frame to replace all the bushings and also that funky pass axle that's been wrapped with inner tube tire and zip ties in lieu of good boots since I have owned the car (almost 70K miles on them). Have basically everything to make the rear end like new again except for new springs, but if I find I need those I can replace them at a later time.
|
|
#40
11-27-2015, 11:41 PM
|
||||
|
||||
|
I don't know how the fill tube is connected to the tank, but I wonder if there is a seal there that is your problem? As for mine, my breather hoses leak but that is on the topside of the tank and only visible Iin the parcel area with the tray removed. I have no leaks visible from below, but once the tank is topped up in the summer and I take a hard turn, it stinks of diesel.
__________________
--------------------------------------------------------------- 1998 VW Cabrio 2001 Audi SomeRoad A/T (no air suspension) 2003 Audi DeadRoad M/T (no vroom, for later) 2002 Audi NoRoad A/T (nothing under the hood, being rebuilt)
|
|
#42
11-28-2015, 01:25 PM
|
||||
|
||||
|
More
This is the cover for the floor above the washer bottle. Carpet got and stayed wet from a leaking rear hatch seal... (Get those seals replaced asap) My be able to recreate it if I can find a good one... seems to be pretty simple. 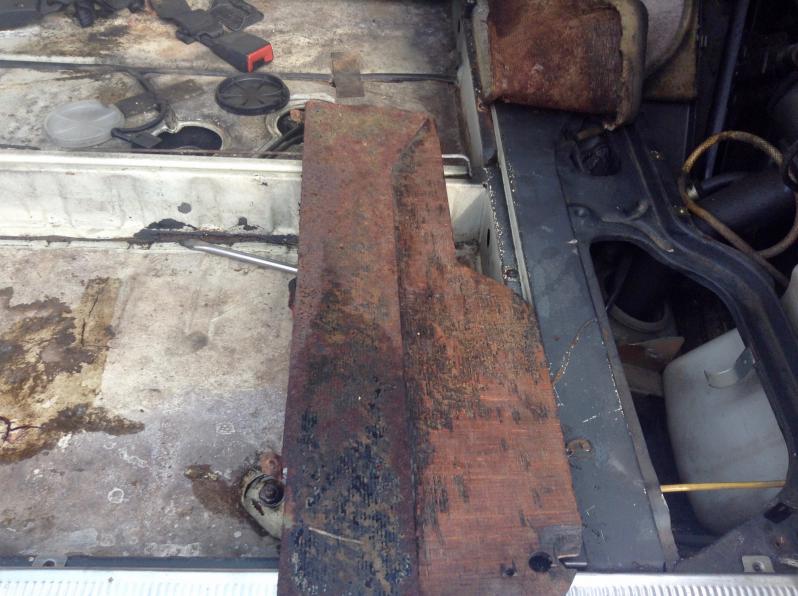 This is the "chrome" strip thats between carpet and spare tire. Mine had been painted black and was showing signs of corrosion. I wire wheeled it and did a coat of rustolium primer and ivory paint. If anyone has a good shiny piece I'll buy it...  Some surface rust and the lip of this cross member rusted. Looks like there is some sort of foam from factory between it and floor, if it gets wet, it stays wet. I hit any areas with phosphoric acid to neutralize it, then wire brush and I'll hit it with the rustolium primer and paint to protect it.  This trim piece is showing damage from the leaking hatch seal as well...  Good thing I'm planning on all new carpet for this car this coming spring.... 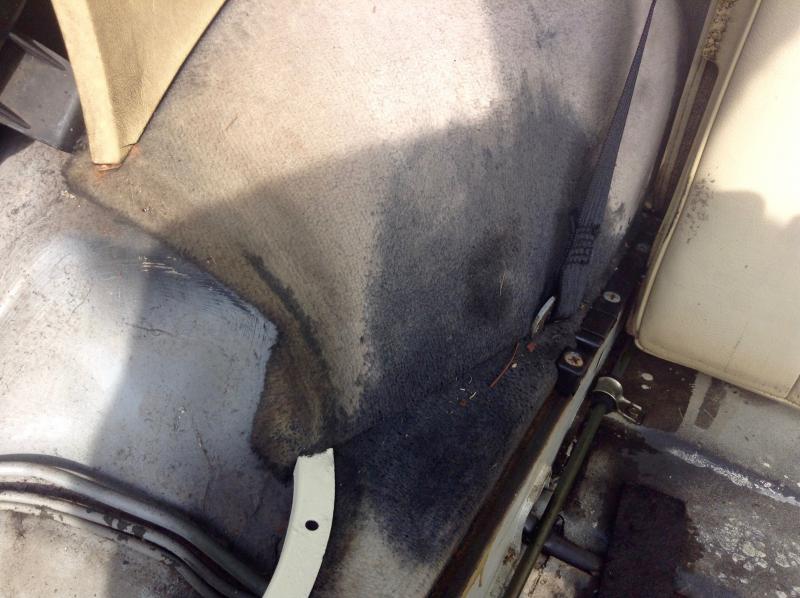
Last edited by ngarover; 11-28-2015 at 01:37 PM.
|
|
#43
11-28-2015, 04:58 PM
|
||||
|
||||
|
If those breather hoses weren't connected just as shown, that's your leak.
__________________
--------------------------------------------------------------- 1998 VW Cabrio 2001 Audi SomeRoad A/T (no air suspension) 2003 Audi DeadRoad M/T (no vroom, for later) 2002 Audi NoRoad A/T (nothing under the hood, being rebuilt)
|
|
#44
11-28-2015, 08:44 PM
|
||||
|
||||
|
Quote:
Took steam cleaner to the bottom of car while tank was out and went ahead and replaced the differential mount since it was such easy access. Got tank back up and most of car back together. will finish it up tomorrow. Dont think I can drop the sub-frame to do the bushings, I have no place to put the jack stands. I may have to locate a set of those adapters I hear about that go into the factory jack hole and let you use a standard jack/stand there instead. Wondering if I can go ahead and to the body mounds, as they seem to be in the front of the sub-frame, it looks like I could just drop that metal place holing them in and then pry them out... If that's the case let me know and I'll do that part tomorrow as well.
|
|
#45
12-06-2015, 07:16 PM
|
||||
|
||||
|
Today I got the rear subframe bushings (the 2 large ones in the front) in. Also replaced both rear sway bar connectors and put a new adjustment control between the anti sway and the SLS on.
I still have all the bushing for the rest of the subframe and that pass axel to do, but it's really hit and miss with the weather right now and I have to be able drive the car this week so I'm going to wait. While finishing up today I noticed that the rear brake lines are starting to crack. Will have to order a set of them front and rear and replace. May go Stainless this time around. Poured 5 gallons of gas in and took it for a drive and you can already feel the difference. I also still need to swap that IP from my other engine over since the top seal on mine seems to be leaking. Which is fine by me since the swap IP is a MUCH nicer looking piece. The current one looks like it came off a junk car and is painted gray. I have a receipt from PO where he had it replaced a couple years before I got the car. No idea why. Took a steamer to the rear carpet along with some deep purple and got the oil stain 95% gone. (took me 3 hours lol) Mechanically this car is almost done. I hoping to start on the body and interior this summer. Oh, some good news for me as well, The plates that go over the subframe bushings look almost new, along with the rear subframe itself. I could not find any rust at all
|
 |
| Bookmarks |
|
|


 Linear Mode


