

|
|
|
|
|
|
#1
 12-05-2015, 10:28 AM
|
||||
|
||||
|
W201 / W124 5 speed shifter refurbishment
G'day Folks,
I thought I'd start a fresh topic on this in DD because there's a strong crazy contingent here who seem to think manual gearboxes are better than automatics! To be honest I can't stand 'em but I'm stuck with the one I've got for the moment so I thought I'd see what was up with the sodding thing. Symptoms => 5th and reverse are not as good as they could be. Often I need to pull up the clutch pedal in neutral before reverse engages and 5th has always been a bit notchy. This could be a synchromesh problem in the gearbox but it all looked OK when I took it to bits => 717.412 (5 speed manual gearbox) refresh The unknown in the system after adjusting the shifter rods and replacing the bushings remains the shifter itself. So I'm now looking at that bugger! ########## Removal of the shifter is trivial If you can't get to this stage by yourself =>  <= abandon all hope! ########## EDIT before you get too carried away it is probably best to remove the reverse light switch  I'll have to look up the names for all the parts in a bit so that I can do an exploded view of all of the loose bits later on in the thread. For now I'll just show the progress of the deconstruction so far  Two obvious 10mm head bolts come out 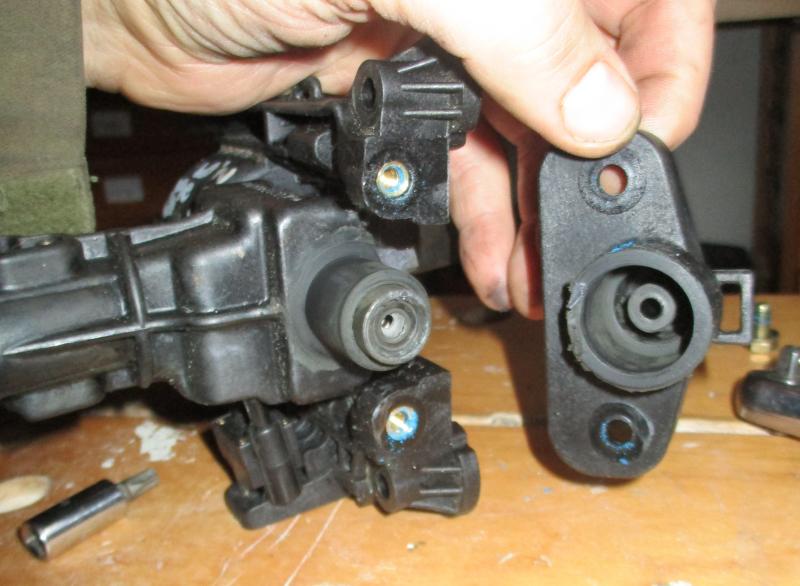 Be careful it is spring loaded! (No stress really - just kidding) 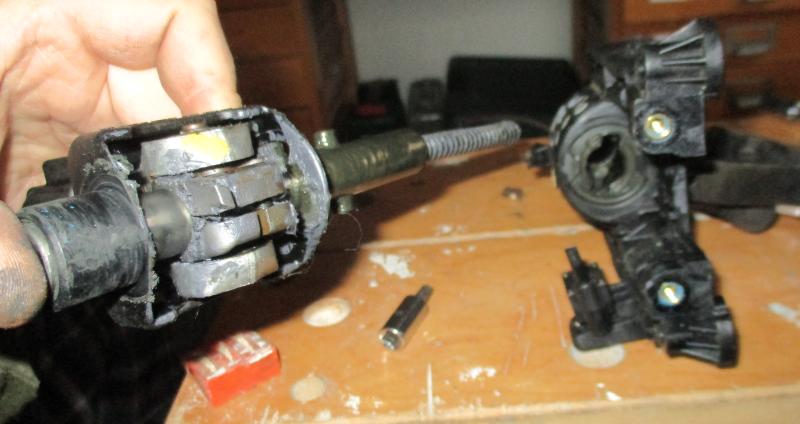 Poings out quite nicely 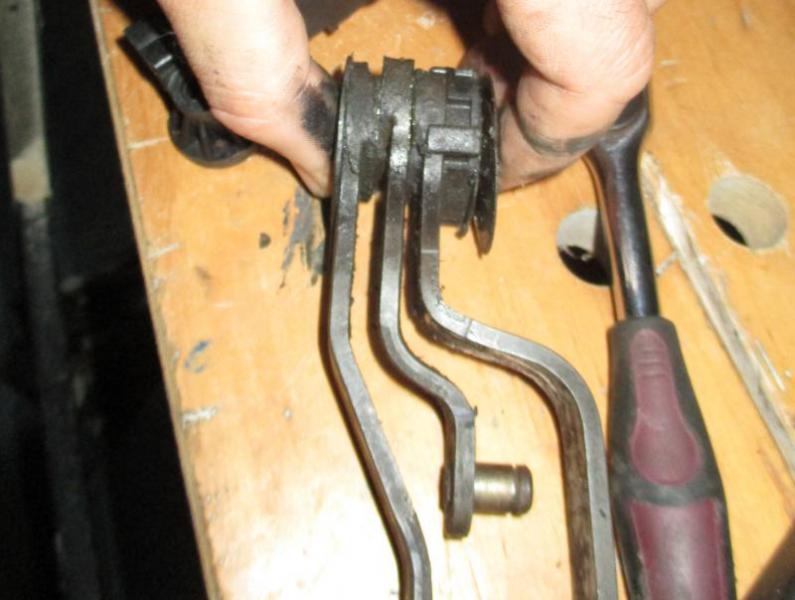 After which the levers for the shifter rods come out in a group. Whilst EPC has a nice break down of the positions of the washers and the spring washers it is worthwhile noting how they all go together again  Couldn't find any tie wraps (!) I did find a use for a glove though... 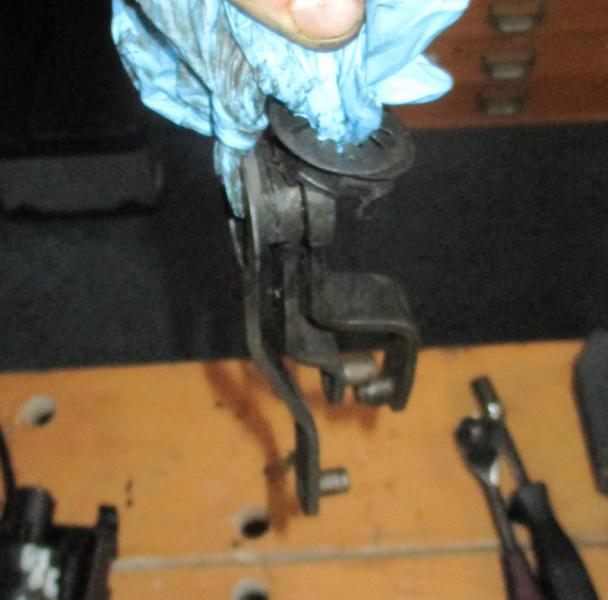 There's nearly always one left behind just after you tie the knot => 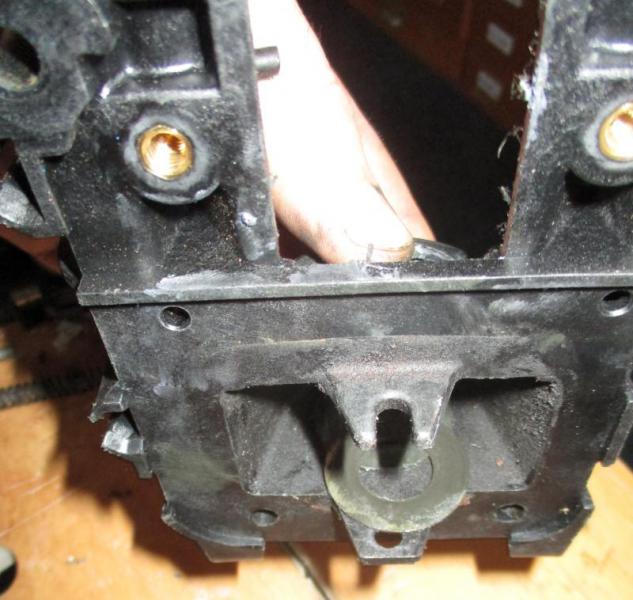 A clear plastic end cap can also be removed  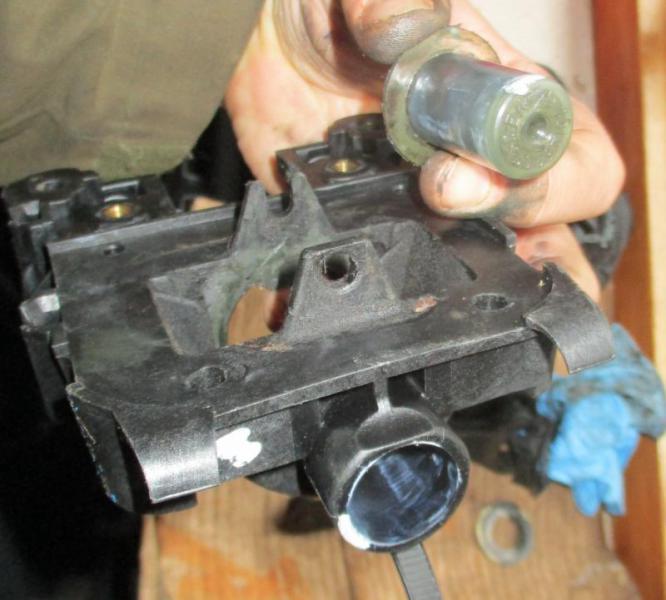 Fiddly little C clips on either end of a retaining pin can be pushed off with care and two electrical screw drivers  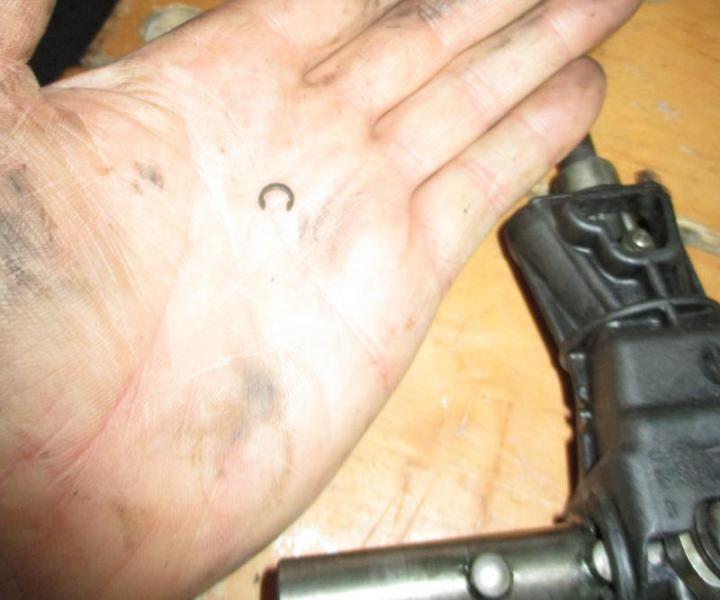 Little c clips - keep just in case (although they are also in the repair kit)   The next stage will be to remove the two torx headed screws but I want to make sure I don't loose my place on that shaft 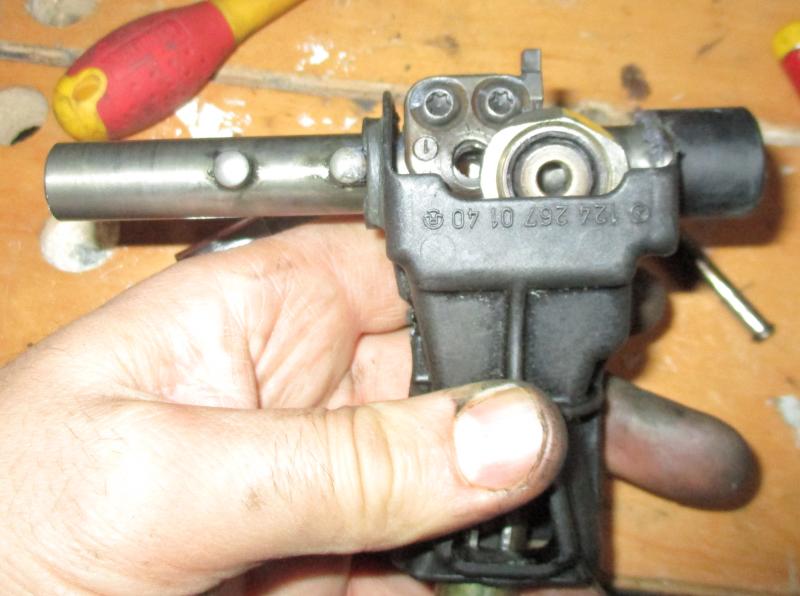   Sorry the pictures aren't so great today. The shortest length of that shaft pictured above is 34mm and the longer length shown in the last picture of the previous post is 69mm EDIT => it turns out that measuring the position of the clamp on this shifter bolt is not necessary (see later on in the thread) - however if you need comfort blankets then perhaps this isn't such a bad thing to do! Here's the repair kit I bought (turned out not to be 100% correct)  Please note part number 1242602539 is not for the more common grouping of 5 speed shifters! This kit is for the reverse with the up and back to the left next to 2nd gear configuration... ...I've also found out it isn't exactly the correct part for the shifter I have. I can modify it quite easily to save having to go back to the dealership!
__________________
1992 W201 190E 1.8 171,000 km - Daily driver 1981 W123 300D ~ 100,000 miles / 160,000 km - project car stripped to the bone 1965 Land Rover Series 2a Station Wagon CIS recovery therapy! 1961 Volvo PV544 Bare metal rat rod-ish thing I'm here to chat about cars and to help others - I'm not here "to always be right" like an internet warrior  Don't leave that there - I'll take it to bits! Last edited by Stretch; 12-10-2015 at 10:26 AM. Reason: Made some corrections based on what I now know! 
|
|
#2
12-05-2015, 10:36 AM
|
||||
|
||||
|
Disassembly continued
Shaft comes out like so
(I was worried about the position of the torx screw clamp but it looks like you just have to align a hole in the shaft with a hole in the clamp)  Next get the gear lever out of the housing   And then the push down spring for reverse  
__________________
1992 W201 190E 1.8 171,000 km - Daily driver 1981 W123 300D ~ 100,000 miles / 160,000 km - project car stripped to the bone 1965 Land Rover Series 2a Station Wagon CIS recovery therapy! 1961 Volvo PV544 Bare metal rat rod-ish thing I'm here to chat about cars and to help others - I'm not here "to always be right" like an internet warrior Don't leave that there - I'll take it to bits!
|
|
#3
12-05-2015, 10:39 AM
|
||||
|
||||
|
Spare parts confusion(1)
I'm not really sure what went wrong just yet but I'll show the problem
 The new part on the right has "two wing parts" I'm just going to file the one on the right hand side off and then I've made the correct part. The old part (LHS in picture) has a number #3 on the casting the the new part (on RHS in picture) has a number #4. The "double wings" won't fit into the plastic swivel casing I've got... ...to be continued...
__________________
1992 W201 190E 1.8 171,000 km - Daily driver 1981 W123 300D ~ 100,000 miles / 160,000 km - project car stripped to the bone 1965 Land Rover Series 2a Station Wagon CIS recovery therapy! 1961 Volvo PV544 Bare metal rat rod-ish thing I'm here to chat about cars and to help others - I'm not here "to always be right" like an internet warrior Don't leave that there - I'll take it to bits!
|
|
#5
12-05-2015, 04:58 PM
|
||||
|
||||
|
One of the more frustrating things on my 190D was rebuilding the shifter...
I got Delrin bushings off a guy from 190REV and set about cleaning and rebuilding. The first time I was told to use antiseize (by the bushing guy) to lubricate the shifter. That turned dry and tacky within a year, so I removed the shifter and did it all again recently when I replaced the clutch. This time I used white Lithium grease, and it's fantastic. Don't use too much in the center reverse lockout plunger or it'll hydrolock and get jammed.
__________________
'84 190D 2.2 5MT (Red/Palomino) Current car. Love it! '85 190D 2.2 Auto *Cali* (Blue/Blue) *sold* http://badges.fuelly.com/images/sig-us/302601.png http://i959.photobucket.com/albums/a...0/sideview.png
|
|
#6
12-06-2015, 06:32 AM
|
||||
|
||||
|
Quote:
I'm planning to use some good quality Mos2 grease (much like the original black stuff you can see in the pictures). I'll let you know how I get on with it.
__________________
1992 W201 190E 1.8 171,000 km - Daily driver 1981 W123 300D ~ 100,000 miles / 160,000 km - project car stripped to the bone 1965 Land Rover Series 2a Station Wagon CIS recovery therapy! 1961 Volvo PV544 Bare metal rat rod-ish thing I'm here to chat about cars and to help others - I'm not here "to always be right" like an internet warrior Don't leave that there - I'll take it to bits!
|
|
#7
12-06-2015, 06:52 AM
|
||||
|
||||
|
Right - trouble in paradise
Finding parts with out decent EPC help is as always a bit of a problem.
One of these days I guess I'm going to have to get a subscription. Still using the resources I have I managed to find the following pictures. This picture is as close as I can get to the parts I have although I've not seen the bracket 104 before!  The other variant of the 5 speed shifter (where I got the number for the repair kit) is here =>  Now this 5 speed shifter looks like it has been used for W202s W203s and SLKs up until this century / millennium ################ The problem with the repair kits:- First picture - part 10 - repair kit does not seem to exist. This is NLA - I can't even find a number for it. Second picture - part 14 - does exist and is the kit I have bought - part number 1242602539 So I could only get the repair kit for the wrong shifter. As shown above the biggest problem is the wings on the metal joint. This metal joint is meant to fit into a different plastic support. The plastic support I have is 124 267 01 40   And the metal joint don't fit  ################ Solution 1 Shave / cut off the edge of the expensive metal joint in the repair kit so that it fits into the plastic support Solution 2 Possible solution might be to upgrade to a new plastic support. This is a 4 euro part at the dealership so I'm going to gamble and see if it fits. I have a gut feeling that may be just may be in WIS there's information about an upgrade! But I'm unlikely to find that out for sure just at the moment. ########### I'm going to see if solution 2 is going to work.
__________________
1992 W201 190E 1.8 171,000 km - Daily driver 1981 W123 300D ~ 100,000 miles / 160,000 km - project car stripped to the bone 1965 Land Rover Series 2a Station Wagon CIS recovery therapy! 1961 Volvo PV544 Bare metal rat rod-ish thing I'm here to chat about cars and to help others - I'm not here "to always be right" like an internet warrior Don't leave that there - I'll take it to bits!
|
|
#8
12-08-2015, 12:58 PM
|
||||
|
||||
|
Looks promising
I was able to get the 4euro 51 cents support piece from the dealership today and it looks like it might fit. I don't know for sure just yet as there are some subtle differences.
 1242670140 is on the left (my original now NLA part) and 2022670161 is on the right (the new surprisingly cheap for Mercedes bit)  I should be able to assemble it and check to see if it works later on this week (with any luck).
__________________
1992 W201 190E 1.8 171,000 km - Daily driver 1981 W123 300D ~ 100,000 miles / 160,000 km - project car stripped to the bone 1965 Land Rover Series 2a Station Wagon CIS recovery therapy! 1961 Volvo PV544 Bare metal rat rod-ish thing I'm here to chat about cars and to help others - I'm not here "to always be right" like an internet warrior Don't leave that there - I'll take it to bits!
|
|
#9
12-08-2015, 01:19 PM
|
||||
|
||||
|
Bit late to ask, but did you make sure the 5-R arm on the side of the gearbox was screwed in tight and had no lost motion? That was the source of one of my headaches.
__________________
CC: NSA All things are burning, know this and be released. 82 Benz 240 D, Kuan Yin 12 Ford Escape 4wd You're four times It's hard to more likely to concentrate on have an accident two things when you're on at the same time. a cell phone. www.kiva.org It's not like there's anything wrong with feeling good, is there?
|
|
#10
12-08-2015, 01:40 PM
|
||||
|
||||
|
Quote:
J.G.
|
|
#11
12-09-2015, 11:35 AM
|
||||
|
||||
|
Quote:
Quote:
The wings fit inside the housing and help with a pivoting sliding motion for the lever as you slide the shifter from the left to right
__________________
1992 W201 190E 1.8 171,000 km - Daily driver 1981 W123 300D ~ 100,000 miles / 160,000 km - project car stripped to the bone 1965 Land Rover Series 2a Station Wagon CIS recovery therapy! 1961 Volvo PV544 Bare metal rat rod-ish thing I'm here to chat about cars and to help others - I'm not here "to always be right" like an internet warrior Don't leave that there - I'll take it to bits!
|
|
#12
12-09-2015, 11:42 AM
|
||||
|
||||
|
Assembly (1)
Starting with the shifter lever
Fitting the new bushings to the alloy shifter assembly I used a washer on either side to make sure the new parts weren't damaged and just started the pressing in process with a set of pliers  I did this on both sides Then I found some open ended spanners to use as a temporary block in the opening between the two bushings  The spanners were quite tight in there for the next stage Pressing in with my hydraulic press (total over kill - a decent vice would do just as well) 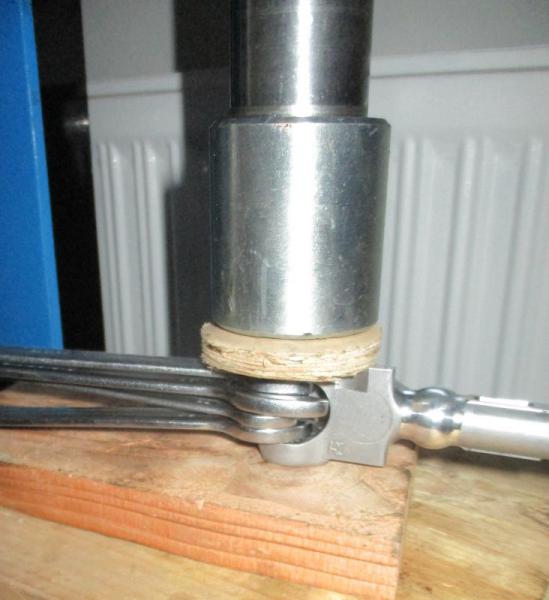 Note I'm pressing into wood as well (top and bottom)  There we go Bob's my uncle.
__________________
1992 W201 190E 1.8 171,000 km - Daily driver 1981 W123 300D ~ 100,000 miles / 160,000 km - project car stripped to the bone 1965 Land Rover Series 2a Station Wagon CIS recovery therapy! 1961 Volvo PV544 Bare metal rat rod-ish thing I'm here to chat about cars and to help others - I'm not here "to always be right" like an internet warrior Don't leave that there - I'll take it to bits!
|
|
#13
12-09-2015, 11:52 AM
|
||||
|
||||
|
Assembly (2) Grease time!
My chosen grease is this one
 I don't expect it is easy to find the same brand outside of the Benelux countries so find yourself some good quality black MoS2. I'm pretty sure that's what has been used originally. Manny (see post above) says his wheel bearing grease works too - but that anti-seize tended to bung stuff up. (see post #15 below as well) Note the orientation of the bend in the shifter rod that attaches to the gear lever handle. (Not massively important at this stage as you can still rotate it if absolutely necessary - but it is good to get your head used to it)  You have to grease this steel rod before fitting it to the alloy housing - with my MoS2 lots of excess just got pushed out. Wipe off.   With spring in place you need to push down the spring and insert the clip. I found bent needle nosed pliers were good for this. A combination of finger and flat screw driver blade also helped with the spring!  Picture above shows clip going on - just push home with flat screwdriver blade
__________________
1992 W201 190E 1.8 171,000 km - Daily driver 1981 W123 300D ~ 100,000 miles / 160,000 km - project car stripped to the bone 1965 Land Rover Series 2a Station Wagon CIS recovery therapy! 1961 Volvo PV544 Bare metal rat rod-ish thing I'm here to chat about cars and to help others - I'm not here "to always be right" like an internet warrior Don't leave that there - I'll take it to bits! Last edited by Stretch; 12-10-2015 at 04:16 AM. Reason: Got it a bit wrong
|
|
#14
12-09-2015, 11:58 AM
|
||||
|
||||
|
Assembly (3) more grease
Dreadful picture below shows approximately how much and where I applied grease on the alloy part before I fitted it to the new plastic housing.
(I hate Canon point and shoot cameras when they have to have the flash on)  As this solution (solution 2 see above) might not work I may get a second chance to get a better picture! So anyway - install the pin again  That's all for now folks. Must cook decent lamb curry for dinner tonight. I might be back with this tomorrow.
__________________
1992 W201 190E 1.8 171,000 km - Daily driver 1981 W123 300D ~ 100,000 miles / 160,000 km - project car stripped to the bone 1965 Land Rover Series 2a Station Wagon CIS recovery therapy! 1961 Volvo PV544 Bare metal rat rod-ish thing I'm here to chat about cars and to help others - I'm not here "to always be right" like an internet warrior Don't leave that there - I'll take it to bits!
|
|
#15
12-09-2015, 08:04 PM
|
||||
|
||||
|
I'll be curious how the Moly grease works for you. Does it smell bad? I did have a Moly grease but it must have EP additives in it because it smells bad (like gear oil) and I didn't want that in the cabin. The antiseize was HORRIBLE after a few months had gone by and I was thrust into the winter. The antiseize lost its grease quality and turned into a dry crumbly mess. The white Lithium seems to be holding up well, and it's winter now. Slicker than it's ever been.
My shifter had the original 30+ year old rubber bushings in it, and they had totally come apart leaving me with a spongey throw that felt like a spoon in pudding. There also seemed to be 30 year old coffee inside that contributed to the gritty sticking action. As of now, I have a custom setup. Inside the shifter is a delrin bushing instead of the stock rubber one. It gives a precise feel to the shifter and I like it. WL grease inside the shifter itself on the washers and sliding parts, but the delrin bushings require no lube since they are naturally slick like nylon. On the underside I have delrin bushings in the shifter arms where they connect to the shift rods, but on the transmission gear selector arms I stayed with stock rubber. Silicone lubricates those rubber bushings. I stayed with rubber on the trans bushings because the delrin is VERY stiff and mechanical feeling, but because of that the shifter is very notchy feeling. So I left one part of the linkage with rubber to help dampen the notchiness feel that I dislike. This works well for my personal taste. Since my pattern is 1 3 5 2 4 R It isn't any help for me to post my diagrams.
__________________
'84 190D 2.2 5MT (Red/Palomino) Current car. Love it! '85 190D 2.2 Auto *Cali* (Blue/Blue) *sold* http://badges.fuelly.com/images/sig-us/302601.png http://i959.photobucket.com/albums/a...0/sideview.png
|
 |
| Bookmarks |
|
|


 Linear Mode


