

|
|
|
|
|
|
#16
 11-16-2016, 01:07 PM
|
||||
|
||||
|
New pad ordered, spent couple of hours today removing the old one.
Need to order adhesive but other than that should be good to go. 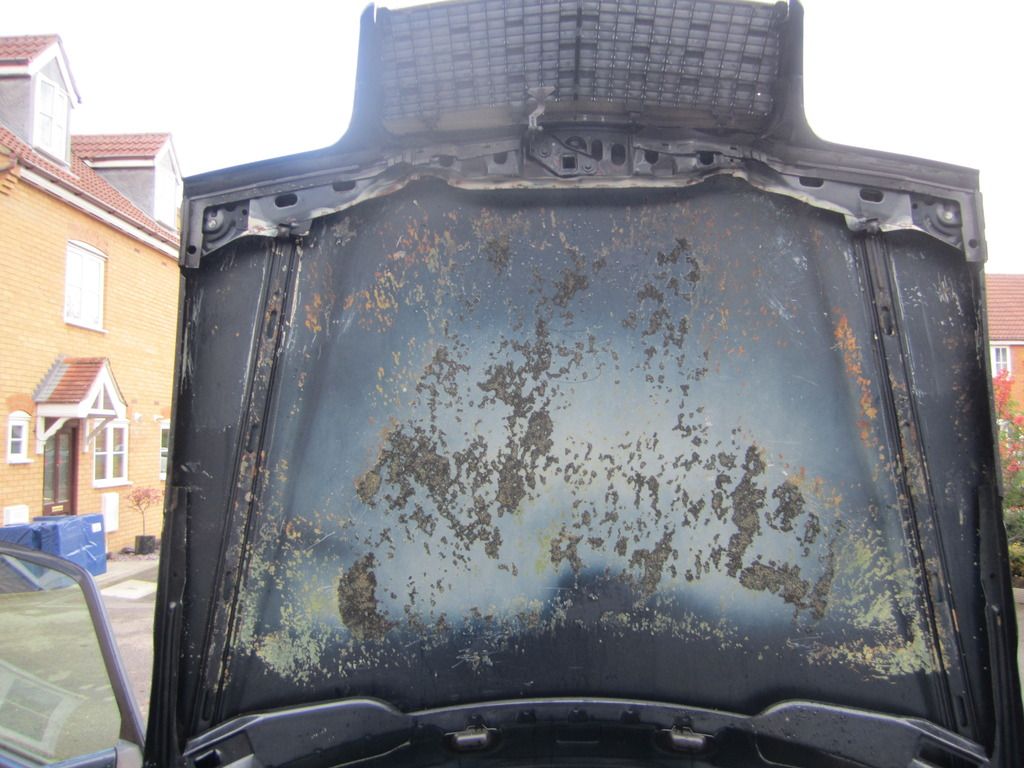
__________________
David 1996 Mercedes S124 E300TD - 129k - rolling restoration project - 1998 Mercedes W210 300TD - 118k (assimilated into above vehicle) 
|
|
#17
11-16-2016, 02:05 PM
|
||||
|
||||
|
Just buy a can of 3M-77, it will hold, I've used it for decades putting much heavier sound insulation around big Detroit and Cat engines in coaches. 3M makes a stronger version also, should be able to buy it at your local NAPA.
Soundown - Barrier Acoustic Insulation, Carpet Underlay, Acoustic Absorption Materials is the source I've used for lots of the high-end stuff, but frankly for a hood, I've just bought the pre-cut OEM-style from various M-B parts suppliers, it isn't expensive and does a good job. I don't think that soundown sells direct to retail, and you need to understand the frequencies that you're looking to absorb/reflect/isolate before you choose your own material. In the OM603 hood application I suggest something similar to the original as it will absorb and block a fair amount of the higher-frequency clacking and clatter as well as being a decent heat barrier for the hood. It is also not too heavy for your current hood springs.
__________________
 Gone to the dark side - Jeff
|
|
#18
11-16-2016, 02:30 PM
|
|||
|
|||
|
Since the 77 is also made by 3M I suggest that the description of the uses they provide are important... the 77 is only listed to 150 degrees....
the 08098 is listed on the 3M site as doing these things well : '''3M™ Trim Adhesive securely bonds vinyl, heavyweight liners and hood silencer pads where high strength and heat resistance are needed. Our versatile automotive adhesive is perfect for attaching vinyl, insulation, foam, padding and rubber parts to metal and other surfaces. Easy, spray-on aerosol offers convenience.''''
__________________
1980 240d , chain elongation, cam marks reference: http://www.peachparts.com/shopforum/diesel-discussion/10414-help-i-need-check-stretch.html http://www.peachparts.com/shopforum/diesel-discussion/305365-9-degrees-chain-stretch.html evap fin cleaning: http://www.peachparts.com/shopforum/diesel-discussion/156207-photo-step-step-post-showing-w123-evaporator-removal-1983-240d-1982-300td.html?highlight=evaporator A/C thread http://www.peachparts.com/shopforum/diesel-discussion/297462-c-recommendations-mb-vehicles.html
|
|
#19
11-16-2016, 09:22 PM
|
||||
|
||||
|
Probably not good in TX then, on a hood, or even on a black roof. I used a lot of it, in large motorcoach engine and genset applications with some heavy decoupling insulation products from Soundown, never had one come loose.
Not sure what the temp limit is for the 08098, is it listed also?
__________________
Gone to the dark side - Jeff
|
|
#20
11-16-2016, 09:36 PM
|
|||
|
|||
|
Just FYI, besides the hood pad, there is another piece of insulation/sound deadening along the leading edge of the hood that you may be interested in.
|
|
#21
11-16-2016, 09:49 PM
|
|||
|
|||
|
Quote:
I am just going by what I have used in the long ago.. and others.. if you read that reference I gave in the thread already.. it is a good discussion. while it does not give a temperature.. it does say this about the 08090 ::: ''''''''3M Trim Adhesive securely bonds vinyl, heavyweight liners and hood silencer pads where high strength and heat resistance are needed. Our versatile automotive adhesive is perfect for attaching vinyl, insulation, foam, padding and rubber parts to metal and other surfaces. Easy, spray-on aerosol offers convenience.'''' ''''' This is a messy job which one does not want to have to do twice... lol
__________________
1980 240d , chain elongation, cam marks reference: http://www.peachparts.com/shopforum/showthread.php?threadid=10414 http://www.peachparts.com/shopforum/diesel-discussion/305365-9-degrees-chain-stretch.html evap fin cleaning: http://www.peachparts.com/shopforum/diesel-discussion/156207-photo-step-step-post-showing-w123-evaporator-removal-1983-240d-1982-300td.html?highlight=evaporator A/C thread http://www.peachparts.com/shopforum/diesel-discussion/297462-c-recommendations-mb-vehicles.html
|
|
#22
11-17-2016, 05:05 AM
|
||||
|
||||
|
Quote:
Couldn't get the 3M stuff over here (UK) but opted for HD contact adhesive with good reviews. In case anyone is thinking of replacing with non OEM hood pad as I did, consider the thickness and how easy it compresses. Its important the hood pad is of the right thickness to seal against the bulkhead trim seal, failure in this respect may let engine fumes into the cabin (and noise). edit, Bob just re-checked mine, looks as though my plastic trim is missing altogether.
__________________
David 1996 Mercedes S124 E300TD - 129k - rolling restoration project - 1998 Mercedes W210 300TD - 118k (assimilated into above vehicle) Last edited by spock505; 11-17-2016 at 08:00 AM. Reason: Chk info posted
|
|
#23
11-17-2016, 09:54 AM
|
||||
|
||||
|
Surface prep is important if you want it to stick well. You want it a lot cleaner than in the pic. I have found brake clean, terry cloth and elbow grease can get it spotlessly clean.
If your replacement pad is an open cell foam (on the side that needs to stick), make sure when you apply the glue, be it by spray or brush, that you set the foam up as if painting a ceiling, not a floor. If you take the easy route like painting a floor, most of the glue will sink and soak into the air pockets and not stay on the surface, requiring a lot more adhesive and resulting in poor adhesion.
__________________
85 300D turbo pristine w 157k when purchased 161K now 83 300 D turbo 297K runs great. SOLD! 83 240D 4 spd manual- parted out then junked
|
|
#24
11-17-2016, 10:16 AM
|
||||
|
||||
|
I think also that many people do not understand nor follow directions properly with contact adhesive.
It is very important that the adhesive on both surfaces is dry to the tacky point as directions specify, or it will not hold. Spray both surfaces, wet the foam a little more and first as it will take longer to cure, then the hood, wait until both are tacky then line up and stick. Be sure to test-fit first, and plan where you will line it up before touching the surfaces because once it sticks you will not be able to remove it without tearing the pad.
__________________
Gone to the dark side - Jeff
|
|
#25
11-17-2016, 11:49 AM
|
||||
|
||||
|
Cheers gents, pad not arrived yet but should be here tomorrow.
Rubbed down the inner edges today, treated with Hammerite as a temporary winter coat until spring, it reminded me just how cold it's getting as really gloopy to apply. Hope the contact adhesive works in low temps.
__________________
David 1996 Mercedes S124 E300TD - 129k - rolling restoration project - 1998 Mercedes W210 300TD - 118k (assimilated into above vehicle)
|
|
#26
11-17-2016, 02:43 PM
|
|||
|
|||
|
I just did mine. Used a genuine mb pad as it was still pretty cheap. Also used Wurth high temp adhesive spray. Really helps if you have another person. I dry fit it first and used masking tape to make a couple alignment marks.
|
|
#27
11-18-2016, 08:33 AM
|
|||
|
|||
|
I used a scrap piece of wood about a quarter of an inch thick to hold the pad in position while I fine adjusted it. I could then drape both sides down over it and spray with 3M 8090, gluing and pressing in place one side at a time. Pad can be fairly easily glued by one person using this technique.
The car pictured is not the one with the new pad although it will need one soon.
|
|
#28
11-18-2016, 02:56 PM
|
||||
|
||||
|
Quote:
__________________
David 1996 Mercedes S124 E300TD - 129k - rolling restoration project - 1998 Mercedes W210 300TD - 118k (assimilated into above vehicle)
|
|
#30
11-19-2016, 08:31 AM
|
|||
|
|||
|
The Wurth hi-temp adhesive spray I found on Pelican is awesome. It comes out kind of like silly string, so it's really easy to control the spray and what you hit. I use it on many things, including the membranes in my doors.
|
 |
| Bookmarks |
|
|


 Linear Mode


