

|
|
|
|
|
|
#1
 12-07-2016, 07:57 AM
|
|||
|
|||
|
1982 300 D resurrection thread
I've been asking questions here and there on the site but I thought it best to combine everything into one thread.
I have owned a number of VW NA/TDI and Cummins 12v diesels in first gen Dodge trucks over the years but never a Benz diesel. Last Benz I worked on was in the late 80's and it was a gas "stacked headlight" car with twin Zenith carbs. Anyway.... My son wanted a diesel Benz project and my philosophy has always been to buy out of state sheet metal and deal with the mechanicals. We are in the rust belt and saw a lot of bondo buckets and fresh primer/paint jobs so we settled on a California car that needed some body work after an accident. It isn't minor, it moved the cowling slightly and tipped the front wheel inwards but the rest of the car is very solid.  It had been just driven in from California this spring and was driving the day it was hit so theoretically it should have needed little mechanically. It was very cold when we looked at it and it had been sitting for weeks but it did fire up on a single glow cycle. It ran kind of rough and "lumpy" but I've always thought that a good cold start on a diesel means good compression and a good place to start. So we bought it and had it hauled home on a rollback, it ran well enough to get it on and off as needed and we stowed it in the barn. 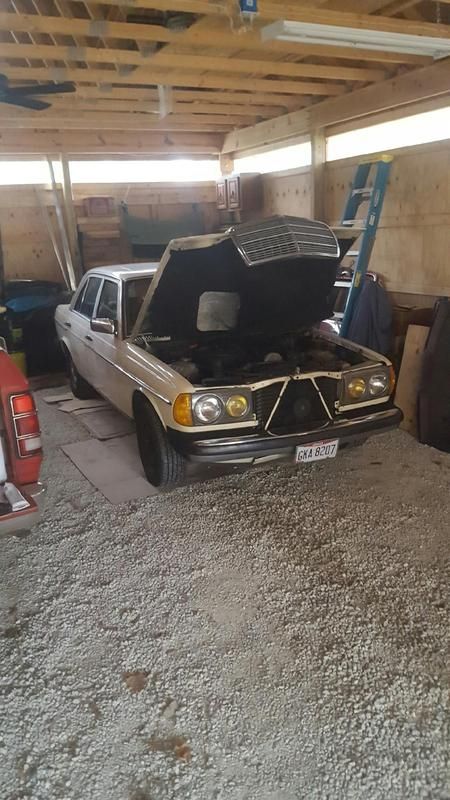 Digging into it, I discovered that the air filter bracket was missing the back "leg" and the hard plastic C shaped pipe to the turbo was loose at the turbo end, the entire filter/housing assembly was rocking around in the engine compartment. There was a lot of oil residue and the air filter was quite clogged. 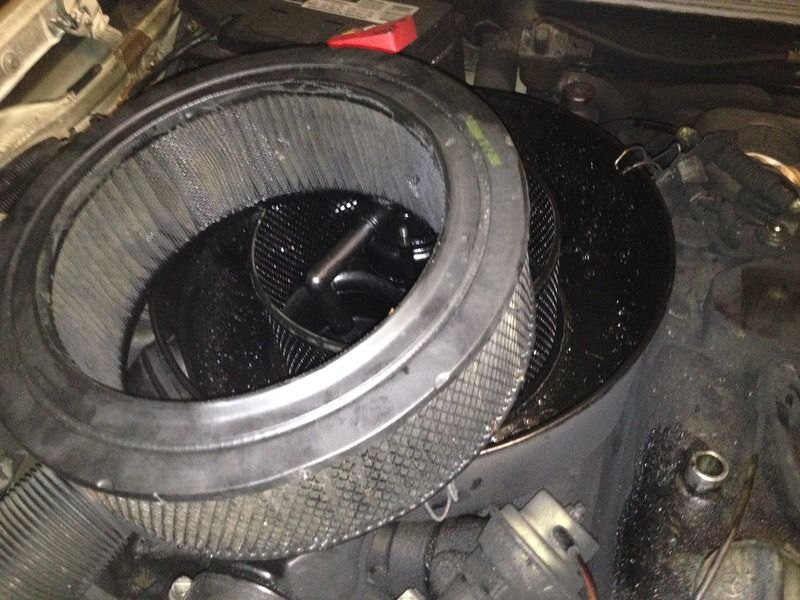 I took everything related to the filter housing and piping apart, cleaned it out, and bought a replacement OEM filter bracket (with all three legs and new isolators!) from a member on here, replaced the air filter, and put it all back together. 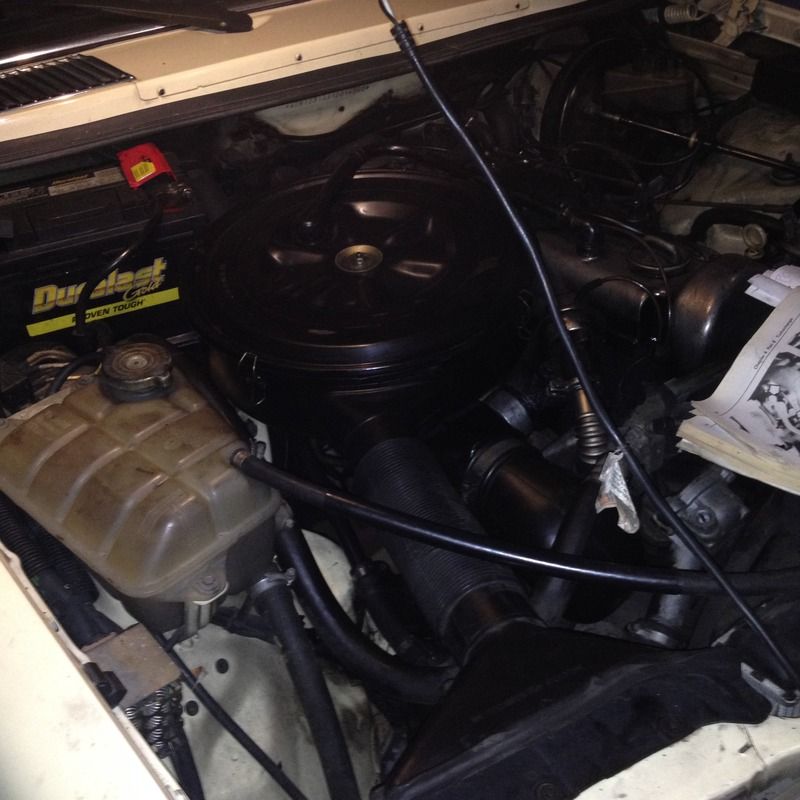 I also changed both fuel filters, which were quite dirty. Last night was the moment of truth for seeing how it started and ran after all this initial work had been done. The front end is blocked up to deal with the front suspension (more on that later) so this was just a start and run test. It had been sitting a few weeks in the cold so it took two tries to start and once it started, even after allowing for time for any air to purge out from the filter change (I did get the pump to work). it didn't run all that well. Fortunately, my son was watching the engine compartment while I was in the car (can't get out the driver's door) and he noticed a little diesel from the bolt on top of the main filter housing. I tightened that up and tried it again. It started much better and ran much more evenly. Little to no smoke and I would have seen it in the barn if there was. The oil was pretty dark, and I don't know if a Benz is like a VW where the oil usually gets black in a hurry or like a Cummins where it takes some time and it doesn't get that dark. I knew the PO used 5w40 Mobil 1 so that was good. Regardless, we were going to change it because we didn't know when it had been done last. I used some 15w40 Valvoline oil as "sacrificial cleaning solution" so we filled with that, ran it for a while, and changed to the "final" Rotella T6 5w40 after removing the oil filter and cleaning the inside of the housing, and installing a new filter. There is a pretty significant dent in the oil pan so we are going to pull that off and replace it with a new one purchased from Pelican, along with a new gasket. (Yes, I know we should have done that when we changed the oil but it was getting late and cold and we were running out of time. We'll just catch the T6 in a clean container and reuse it). I fired it up once more and it idled nicely and reacted fairly well to the throttle I suppose. I have no experience with how these things are supposed to react, I only know they are slow, so I may have to wait till I can get the front end fixed and drive it up and down the driveway a few times. Based on what I saw in the fuel fliters, I think it would be best to run a few filters worth of diesel purge through the injectors to clean them up a little. I have a can of Moly diesel purge I got with a TDI years ago so I have it available and this seems like a good place to try it. I've added some white bottle (Winter) Power Service to the tank, it appears to be about 1/4 full. I've always used Power Service on my other diesels winter and summer with good results. I do have a bottle of the Howes additive based on some comments here but I've not used it yet. Next, I have to deal with the front suspension damage. The body does not appear to be affected in the area of the suspension (guide rod for example), it just appears that the wheel was hit and the steering knuckle bent inwards in the middle of the unsupported span, which is what caused the wheel to tip inwards at the top. You can see how close to the shock the steering knuckle is, there is 3 or 4x the clearance between them on the other side and there is an impact mark from the inside of the wheel on the steering knuckle. 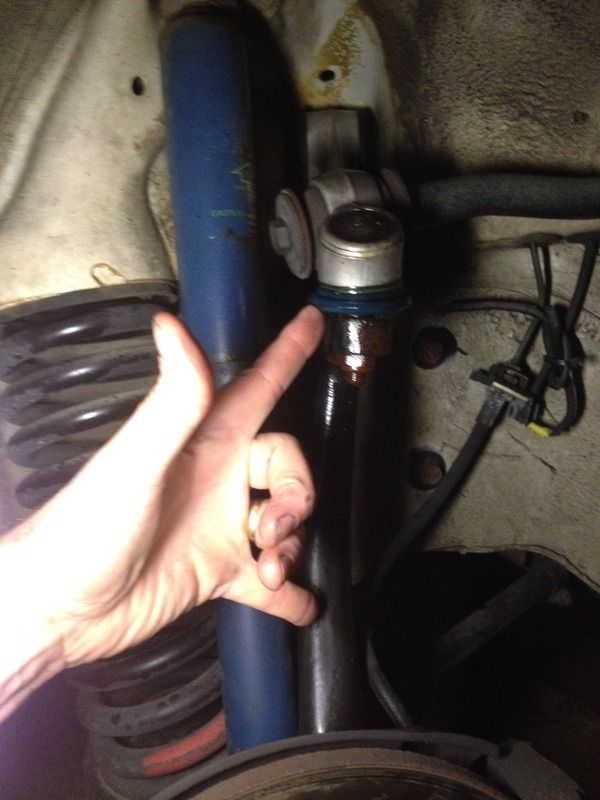 I have a replacement steering knuckle provided by another member and I'm having a Lemforder lower joint pressed in at a local import shop a buddy owns. I'll be picking that up today, I have a Lemforder upper control arm assembly purchased on here to put on as well. I've replaced Jeep suspensions before but nothing like this one. My plan is to block the lower control arm in place where it is and remove and replace the UCA, steering knuckle, and go from there. I'm open to suggestions and comments on how to safely do this if there is a better/smarter way. Hopefully, this gets the front wheel back where it needs to be and makes the car safe to drive a little up and down the lane. I know an alignment will be needed but hopefully this gets me in the same zip code. A member on here has found a nice replacement fender and door the same color in a California junkyard but I want to be sure we have a solid engine and front wheel situation before we get into cosmetics. Although it would be nice to not have to crawl in the passenger side door to get into the car. I'm nominated for that since I'm only 6' and my son is 6'6", haha. I also need to find out exactly where the vacuum line for shutoff is damaged or come loose because we need to use the lever on the IP to shut it off, but that's down the list. That's the story so far, we're trying to keep the old girl on the road. I'll update as things get better or go south. 
|
|
#2
12-07-2016, 09:21 AM
|
||||
|
||||
|
Quote:
Examine the inside of the engine bay to make sure the structure isn't damaged. You will need to replace the entire upper control arm. I think in the days of yore you could get a separate joint but these days I've only seen the entire assembly. The front anti-roll bar may also have been damaged. Compare with the other side of the car. Replace the doughnut bushings on the anti-roll bar too. It is probably best to do this on either side. Check the mountings / structure behind the inner / main mounts for the anti-roll bar too. If they are now distorted or loose the whole front end will be unstable. Whilst you feel that most of the damage is to the upper part of the suspension don't disregard the lower control arm and the attachment to the frame. Now is the time to look hard and it necessary measure before buying spare parts.
__________________
1992 W201 190E 1.8 171,000 km - Daily driver 1981 W123 300D ~ 100,000 miles / 160,000 km - project car stripped to the bone 1965 Land Rover Series 2a Station Wagon CIS recovery therapy! 1961 Volvo PV544 Bare metal rat rod-ish thing I'm here to chat about cars and to help others - I'm not here "to always be right" like an internet warrior  Don't leave that there - I'll take it to bits!
|
|
#3
12-07-2016, 10:35 AM
|
|||
|
|||
|
It's possible the vacuum control lines running to the door got damaged in the collision. Hence the shut off problem.
__________________
1977 300d 70k--sold 08 1985 300TD 185k+ 1984 307d 126k--sold 8/03 1985 409d 65k--sold 06 1984 300SD 315k--daughter's car 1979 300SD 122k--sold 2/11 1999 Fuso FG Expedition Camper 1993 GMC Sierra 6.5 TD 4x4 1982 Bluebird Wanderlodge CAT 3208--Sold 2/13
|
|
#4
12-07-2016, 10:44 AM
|
|||
|
|||
|
Quote:
I bought the entire upper control arm assembly complete with steering knuckle upper joint, suspecting the impact to the steering knuckle had to distort the UCA somehow even though it looks the same as the other side and the joint MAY have flexed a bit and helped absorb everything. The front anti roll bar is what connects to the upper control arm "inboard" of the UCA joint to the top of the steering knuckle and passes through the body back towards the firewall, correct? I did buy a set of bushings that should fit in the UCA bore where that roll bar meets the UCA. I suspected the roll bar may be bent and that's on my list of things that may need attention. it looks okay but that's not a real scientific way of making decisions. I have not found anything yet that gives me dimensional information for doing comparisons between sides. The main impact was to the body and right in the cowl rearward of the front wheel. I believe the front wheel was secondary impact. The cowl is pinching the hood release cable against the dash a bit so I know it has moved slightly. There is nothing I see in the engine compartment that looks like it has moved, the impact was farther back and above where the guide rod to the LCA is located. That doesn't mean it didn't move, it only means I can't really see anything near suspension component/body attachment points that looks like it has been affected. I'm relatively sure that I'll need professional help to get the body shell back where it needs to be to get the cowl back and the front door to hang properly. I have a lot of small Enerpac hydraulic jacks and cylinders that may be capable of moving things around but I think this is beyond what I can do myself and do not want to try. Without dimensions, it's pointless to even think about it. Right now, my aim is to do enough to judge it mechanically (engine/transmission/front end bits) on my 200' of driveway before committing to the body shell work. As it stands now, we probably have $900 in it so we are not out a lot if it's toast. The Cali sheet metal has value here in Ohio and the interior is nice so we can probably get our money back out of it in parts if we need to. We would really rather get it back on the road, though.
|
|
#5
12-07-2016, 10:54 AM
|
|||
|
|||
|
Quote:
Thanks
|
|
#6
12-07-2016, 11:04 AM
|
|||
|
|||
|
Any vacuum leak any where in the car will effect the shut off valve. Using a Mityvac check the shut off valve itself first for proper operation. If the valve is good then use the Mityvac to check for other possible leaks. There is a good diagram on this forum of all the vacuum operated components with their assorted vacuum tubes that are color coded.
|
|
#7
12-07-2016, 12:42 PM
|
|||
|
|||
|
Quote:
Honestly, I'm glad you guys said something. I never thought to look beyond the brown lines, I thought the shutoff circuit would be isolated so it wasn't affected by a problem elsewhere.
|
|
#8
12-07-2016, 07:03 PM
|
||||
|
||||
|
Quote:
__________________
1983 123.133 California - GreaseCar Veg System 
|
|
#9
12-07-2016, 07:59 PM
|
|||
|
|||
|
Quote:
|
|
#10
12-07-2016, 08:40 PM
|
|||
|
|||
|
I 2nd post #8. I didn't do anything special when I removed the spindle to replace the lower ball joint, though a support wouldn't hurt. I use cut 4x4 fence posts for such things.
As long as you can align the front-end, it will be fine. Probably would have been fine w/ the bent spindle if it didn't bump the shock. Our 96 Voyager was hit on the side, bending the strut tower inward. I replaced the strut but couldn't get that wheel camber proper (leaned in too much), but it drove straight and fine. I eventually pushed the strut support back (porta-power) when I had the tranny out, and got it perfect. The main thing is to ensure toe-in is correct and all parts are tight. Most of the problems you found are typical. I agree that if it starts right up on a cold morning, the compression is probably good. Watch for the HF diesel compression test gage kit on sale. I recall getting for ~$25. My 1985 required a block heater to start on cold mornings (=35 F here) when it had ~250 psig compression. The engine failed a year later at 330K miles. If a cylinder measures >400 psig it is excellent. They will still start with 300 psig down to freezing. Also, check the glow plugs (easy regular task - measure resistance of each to gnd at connector, replace any open ones). The cracked air filter bracket is an endemic problem. I retrofitted a 1985 CA frame-mounted air cleaner to my 1984. I began that on my 1985 after installing an earlier engine (search post). Others use an aftermarket conical air filter w/ silicone tube to turbo inlet. Either way, you must manage the PCV blow-by oil (several ways). If you get air in the IP, I don't know how long it takes to work thru. Shouldn't happen if you purge air upstream after a main fuel filter change, per the manual. Once in the IP and outlet tubes, you crack the tube nut on each injector (engine running) until fuel dribbles out. Otherwise, perhaps that injector may never pop open to purge the air, with the air bubble sitting there like a spring, absorbing IP pulses. The door and fender are easy bolt-on replacements. Too bad you couldn't get those swapped in CA. You get extra credit if the replacements are the correct color.
__________________
1984 & 1985 CA 300D's 1964 & 65 Mopar's - Valiant, Dart, Newport 1996 & 2002 Chrysler minivans
|
|
#11
12-08-2016, 07:57 AM
|
|||
|
|||
|
Quote:
The front wheel was tipped inwards when we got it due to the bent steering knuckle so leaving it as is didn't seem to be a good option. I'm hoping the nut and bolt work to replace the front end components gets me within alignment range. I have a buddy with an import shop and he got me some dimensions for the body shell, not sure how accurately I can measure. I do have some large bore gauges in the shop I could possibly use if I can find a spot to compare sides, it appears to be symmetrical. It may be more a matter of getting the door hinge area back where it needs to be to get the door on correctly. I did use the hand pump to purge the air as per the manual after the filters were changed and prefilled both filters with diesel when installing them. I'm familiar with bleeding out IP's via loosening injectors, I had to do that on my old diesel Rabbits after changing a head gasket. This one starts and idles okay, it just doesn't seem to react linearly or quickly to throttle input. This is in park with the front wheels removed and blocked up, just throttle input with no load but there is sort of a dead spot at the beginning of throttle pressure. I don't hear the turbo spooling either, but that may not mean anything, the way the intake appears to be laid out. My Cummins trucks are fairly quiet with the factory intake as well. I think it needs a good dose of diesel purge via filling the filter a few times to see what that brings to the party. The top of the old fuel filter had some black oily residue on it and the prefilter was pretty dark as well so I wonder what ended up in the injectors. The new prefilter is remaining clear so the tank doesn't appear to be a source for anything bad. My son has been doing some research (he's a machinist and has idle time while his jobs run) and he's been talking about something called an ALDA adjustment screw and a banjo bolt somewhere that can fill up with soot. I haven't Googled this yet but given the condition of the filters on this car, I think I need to find this banjo bolt and clean anything that needs cleaning. My son has talked about the alternative intake system but I'm trying to be sure the fundamentals are good before we start playing with anything. I wish this car would have been hit and fixed while still in Cali. Unfortunately, it made it to Ohio before that happened and finding good sheet metal around here is nearly impossible unless you find a car like this....one that has been here a year or less. I need to head to HF for some tarps, I'll check for the compression tester. 
|
|
#12
12-09-2016, 01:43 AM
|
|||
|
|||
|
At the rear of the Intake Manifold is the Banjo Bolt. Remove the bolt and clean out the gunk
that is created from the EGR Soot and Oil Blow By. There is a plastic tube which runs over to the drivers side Fire Wall and connects to the Switch Over Valve. A line from it goes to the ALDA (square thing) on the Injection Pump. If the banjo bolt gets plugged up, it will affect the performance of the engine. Here is a good link to the W123 vacuum system W123 Vacuum InterLock Diagram . . . .
__________________
there were three HP ratings on the OM616... 1) Not much power 2) Even less power 3) Not nearly enough power!! 240D w/auto Anyone that thinks a 240D is slow drives too fast. 80 240D Naturally Exasperated, 4-Spd 388k DD 150mph spedo 3:58 Diff We are advised to NOT judge ALL Muslims by the actions of a few lunatics, but we are encouraged to judge ALL gun owners by the actions of a few lunatics. Funny how that works
|
|
#13
12-09-2016, 08:49 AM
|
|||
|
|||
|
Quote:
I took the bolt assembly apart at the intake end and found this one wasn't bad, which was a good sign. It was missing a sealing ring/crush washer on one side of the banjo bolt so I'll get repalcements from the inventory we keep upstairs for our machine central lubrication systems. Moved on to the bent side of the front suspension. Gotta love California cars, the 19mm bolts holding the caliper in place came off with a breaker bar and minimal pipe torque. I probably would have sheared those off on an Ohio car. The caliper is wired up out of the way and I see the caliper on this car is two piece with (4) large bolts holding the halves together versus the usual single piece casting. Another thing new to me, having never worked on a MB before. The lower steering arm 19mm bolts came loose nicely as well. I found that MB uses a threaded clamp with socket head screw to hold the rotor and bearing in place on the spindle versus a star washer and slot in the spindle. Once I cleaned off the grease and found that clamp screw, the rotor and bearing were out of the way. What concerned me was the little tiny socket head screws holding the sheet metal rotor splash guard on to the steering knuckle. My replacement steering knuckle had those screws included and they were coated end to end with blue Loctite. Seems to be a German thing, the guys who build our machines over there upend the bottle and drown every last thread on every screw in the stuff, we typically put a drop on the end and let the threads carry it back. Anyway, the socket heads came loose, I only had to use a pipe on one of them and wince a bit till it came loose, which was good. I'm probably 3 or 4 bolts from having everything apart and ready for reassembly with the new parts so I can see how much of the wheel lean this work cleaned up. I think I have sockets large enough for the UCA correction to the body shell, that's the only thing I didn't check last night, it was too cold to do more. I can also get back in there better and tell how wrinkled the cowl is. I don't think it affected the suspension but I think it will affect the ability to hang a door and have it close correctly. That's a decision for another day, after the suspension is reinstalled.
|
|
#14
12-09-2016, 08:20 PM
|
|||
|
|||
|
I'm in need of a little help here. I have everything loose to remove the steering knuckle but the threaded area of the lower joint will not come loose from the lower control arm, or whatever the stud passes through. I've been using my grandfather's bronze hammer as hard as a dare but it does not appear to be releasing. do I need to use a ball joint tool or something else to separate this joint?
Thanks in advance. Joe 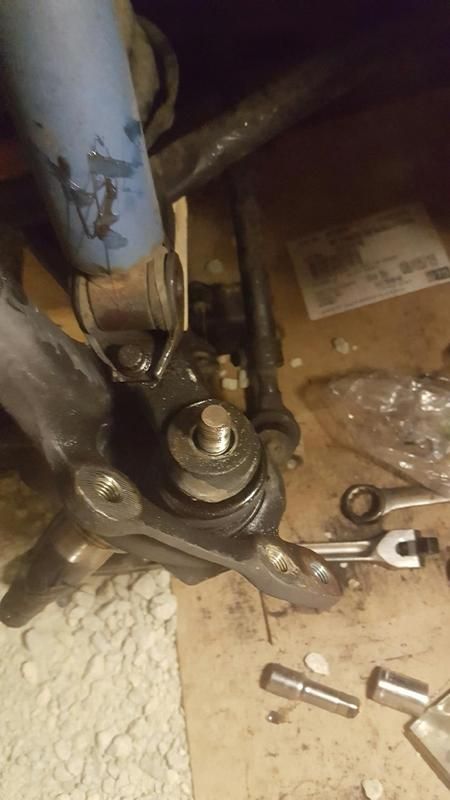 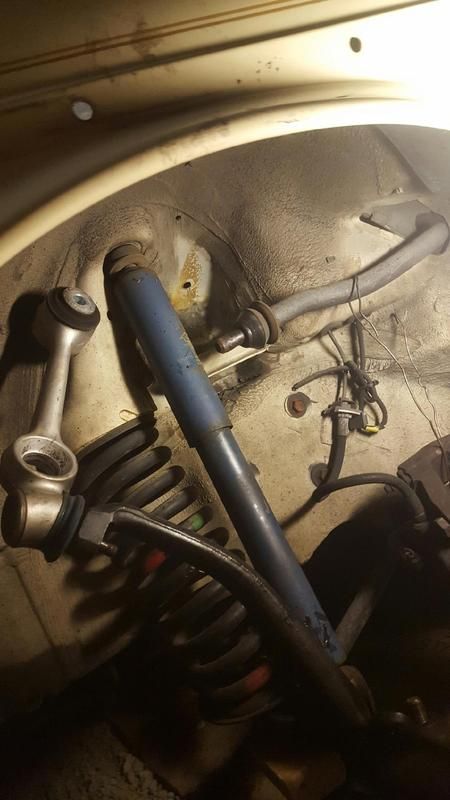
|
|
#15
12-09-2016, 09:18 PM
|
|||
|
|||
|
Use two hammers, the bigger one braced against the outside of the knuckle and the smaller one to strike the knuckle on the opposite side.
You may need to whack it a couple of times. FSM job 33-400 (page 4, step 7) shows the use of a ball joint puller. I believe the 2 BFH technique will work also, however it is safer to use the ball joint puller. https://www.startekinfo.com/StarTek/outside/12265/disc_2/program/Chassis/33-400.pdf
__________________
78 W116 300SD 'Desert Rose' new as of 01/26/2014 79 W116 300SD 'Stormcloud' RIP 04/11/2022 Last edited by Alec300SD; 12-09-2016 at 09:43 PM.
|
 |
| Bookmarks |
|
|


 Linear Mode


