

|
|
|
|
|
|
#16
 04-25-2017, 06:39 PM
|
|||
|
|||
|
I am using the service disconnect under the seat. Every time that I plug in the control unit I hand tighten the nut.
The main ground point on the firewall on the passenger side look very clean. Where is the harmonica connector? 
|
|
#17
04-26-2017, 06:42 AM
|
||||
|
||||
|
The harmonica connector is beneath the carpet under the front passenger door sill. It has a bunch of 2-wire connections going to it. This is your Body CAN bus that controls all the interior systems. The key switch, instrument cluster, climate control, PSE pump, the door controllers, seat control boxes all live on this bus.
**edit** I found my W210 diagrams and got hold of the Body CAN bus diagram. The participants are: N72 - lower field control module (power window/mirror/trunk switches) N70 - roof control module (dome light/sunroof/central lock antenna in 98+/IR receiver in mirror 96-97) N73 - key switch (this also serves as the bridge between the power train and body CAN buses) N10/1 - Front SAM (in the drivers side fuse box) N32/3 and N32/4 - power seat controllers drivers/passenger N69/1, 2, 3, 4 - door controllers (LF, RF, LR, RR) A37 - PSE pump The climate control does not directly interface to either CAN bus. There is a single wire data line to the instrument cluster (A1). Among other things this line passes the commands to actuate the auxiliary fan to the front SAM to the aux fan drive near the front bumper. **more edits** I found this link, it describes the control networking There are actually 2 data lines instruments cluster A1 -> climate control N22 and the other goes the opposite direction All the data interchange with the car goes through either these 2 lines or direct wire connections. http://bayhas.com/mercedes/w210/contents/climcontrol_dtrans.htm
__________________
The OM 642/722.9 powered family Still going strong 2014 ML350 Bluetec (wife's DD) 2013 E350 Bluetec (my DD) both my kids cars went to junkyard in 2023 2008 ML320 CDI (Older sons DD) fatal transmission failure, water soaked/fried rear SAM, numerous other issues, just too far gone to save (165k miles) 2008 E320 Bluetec (Younger son's DD) injector failed open and diluted oil with diesel, spun main bearings (240k miles) 1998 E300DT sold to TimFreeh 1987 300TD sold to vstech Last edited by jay_bob; 04-29-2017 at 03:09 PM.
|
|
#18
04-26-2017, 07:39 AM
|
||||
|
||||
|
When you reassembled the dash are you sure you routed all the wiring harnesses correctly? It is easy to get something misrouted and thus it could get pinched.
Smoking and overheated sounds like voltage going where it should not. I wonder if a wire got pinched that is either crossing voltage into a circuit or grounding it out. I remember having to back off and reroute the main harness running to the center (with the key switch and all the tails for the center console devices) after trying to fit the dash cover and not getting it to fit. Best source for a 210 wiring diagram is the bootleg copies of WIS on eBay. Or pay for a 1 day pass on MB startek site and download all the pdfs.
__________________
The OM 642/722.9 powered family Still going strong 2014 ML350 Bluetec (wife's DD) 2013 E350 Bluetec (my DD) both my kids cars went to junkyard in 2023 2008 ML320 CDI (Older sons DD) fatal transmission failure, water soaked/fried rear SAM, numerous other issues, just too far gone to save (165k miles) 2008 E320 Bluetec (Younger son's DD) injector failed open and diluted oil with diesel, spun main bearings (240k miles) 1998 E300DT sold to TimFreeh 1987 300TD sold to vstech
|
|
#19
04-26-2017, 10:50 AM
|
|||
|
|||
|
smoke and heat
 the wiring is shorted somewhere. remove the center panel to check.
__________________
2012 BMW X5 (Beef + Granite suspension model) 1995 E300D - The original humming machine (consumed by Flood 2017) 2000 E320 - The evolution (consumed by flood 2017)
|
|
#20
04-26-2017, 07:20 PM
|
|||
|
|||
|
Found 2 wires that seem to have been hot and tracked the compressor wire to behind the washer fluid container and it appears to have been cut with a razor in the past.
also attaching the air conditioning circuit schematic 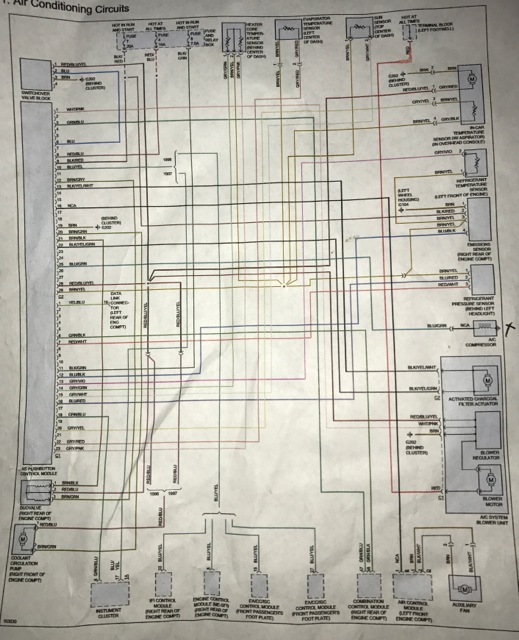
|
|
#21
04-26-2017, 11:32 PM
|
|||
|
|||
|
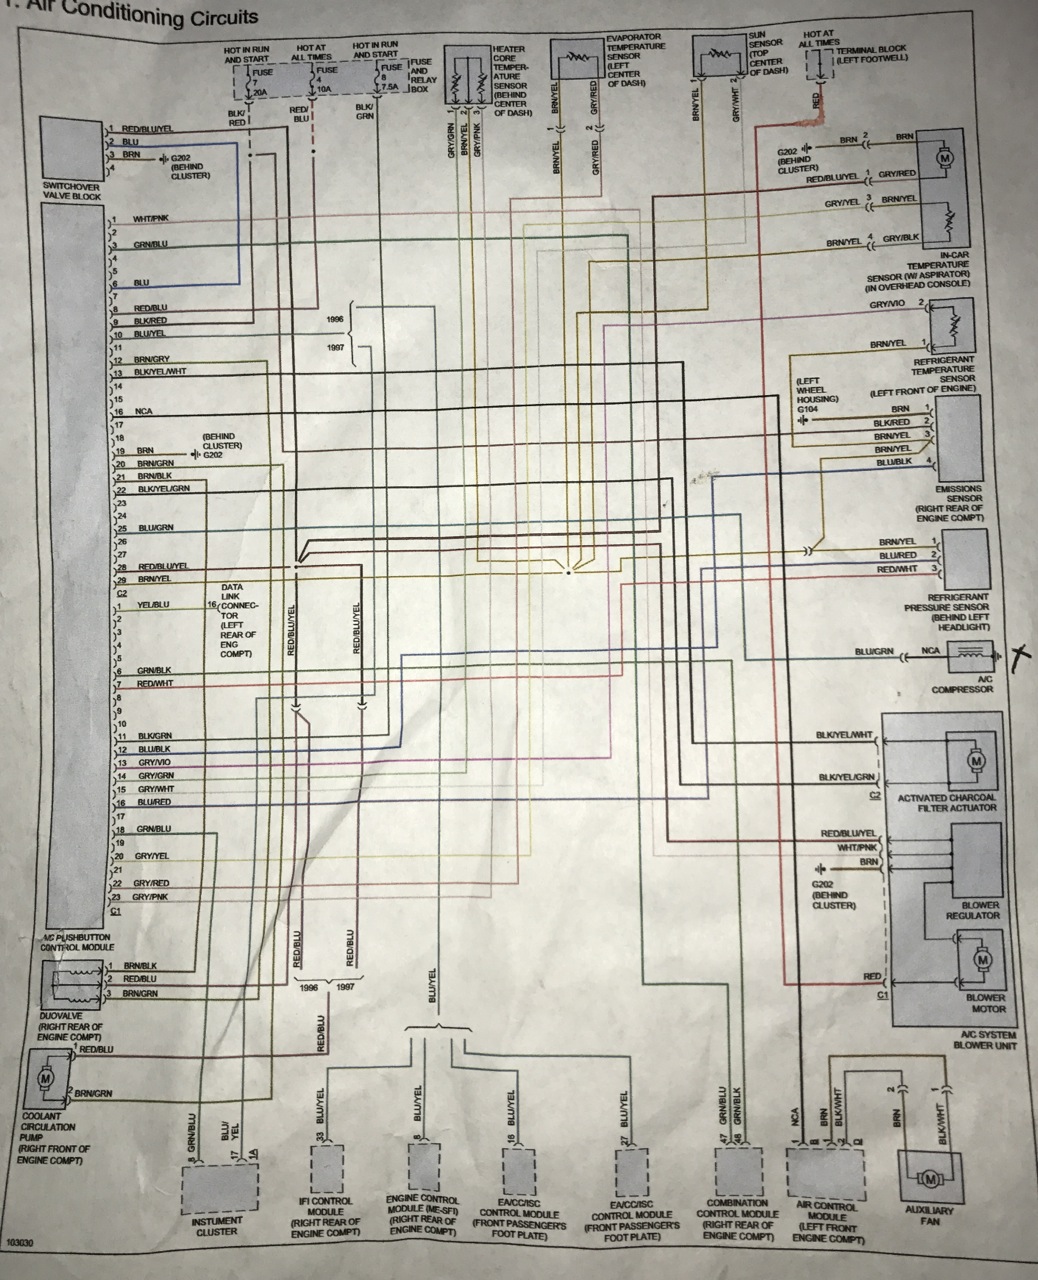
W210 A/C schematic higher quality
|
|
#22
04-27-2017, 02:09 PM
|
|||
|
|||
|
I would suggest to disconnect the fan speed controller and the compressor clutch wire then quickly see if the panel behaves.
It could be a shorted magnet coil on the compressor clutch. ohm it out and test it with a 10 amp fused wire.
__________________
2012 BMW X5 (Beef + Granite suspension model) 1995 E300D - The original humming machine (consumed by Flood 2017) 2000 E320 - The evolution (consumed by flood 2017)
|
|
#23
04-27-2017, 02:17 PM
|
|||
|
|||
|
saga continues
Today I ohmed out the BLU/GRN and GRN/BLU wires and everything seemed good so I taped up the cut compressor wire and plugged it all back together.
First I tried the old control unit and with the key in the run position the unit was all gibberish. Next I disconnected the battery and switched to the new control unit and it looks normal 72 F but no compressor and only the fan speed buttons work. Pressing the EC and Rest button for the diagnostic mode will only display the first code that reads 1 = 28 through 35 No heat or smoke. Are we now at the point of having to get a third control unit?
|
|
#24
04-27-2017, 04:35 PM
|
|||
|
|||
|
how much refrigerant in the system?
the unit will not start if its too low.
__________________
2012 BMW X5 (Beef + Granite suspension model) 1995 E300D - The original humming machine (consumed by Flood 2017) 2000 E320 - The evolution (consumed by flood 2017)
|
|
#25
04-27-2017, 08:35 PM
|
|||
|
|||
|
about 16 oz. I am schlepping it in with cans.
What is the proper method to charge with coolant? I have been told, by and A/C professional, to always fill from the high side with liquid. Most people say no no that you must fill from the low side. Would too little coolant in the system affect the control unit? It looks like its working but only the fan speed control buttons work.
|
|
#26
04-27-2017, 09:21 PM
|
||||
|
||||
|
Quote:
You need to take it to a reputable a/c shop and have them evacuate, vacuum for 45 mins min and then recharge to the proper amount. If it does not work then then something is still wrong. Don't do anything else till you have done this.
__________________
Jim
|
|
#27
04-28-2017, 08:28 AM
|
|||
|
|||
|
high or low side
The system has been vacuumed 3 separate days for 45 min at least and doesn't leak.
I ask if the correct procedure is to charge from the high or low side because the closest shop with an A/C machine is of the opinion that charging is done from the low side. I will button up the car and drive it to a shop this morning. Would like your opinions on the charge procedure. Thank you for your time.
|
|
#28
04-28-2017, 10:05 AM
|
||||
|
||||
|
I have a cd FSM. Does anyone know if the proper procedure is in there and, if so, what section. CD is very hard to use.
|
|
#29
04-28-2017, 10:28 AM
|
|||
|
|||
|
Pressing the EC and Rest button for the diagnostic mode will only display the first code that reads 1 = 28 through 35
So you can not scroll through all of the valves? I feel your frustration sure would be nice to know that end was 100% and be able to see what was happening.
__________________
92 e300d2.5t 01 e320 05 cdi 85 chev c10
|
|
#30
04-28-2017, 10:53 AM
|
|||
|
|||
|
Quote:
If you tried this on a running compressor with the little cans - please consider yourself extremely super lucky as the can will blow apart in your hands if the liquid pressure got above the can pressure. Liquid pressure in the system on a pleasant day can be close to 190 psi when fully charged - while the can would be at 80 or so at ambient temperature.When charging a system, its vacuumed out, manifold left in place, a refrigerant can connected, the high side opened first - till the gauges stop moving, the high side valve closed off - engine is then started and then the compressor is kicked on while the low side of the manifold is opened up to let the system suck in vapor from the little can. a pot of warm water to hold the can helps in this case as it raises its internal pressure and avoids stalling out the refrigerant transfer. The compressor will not kickstart uptil there is enough refrigerant in the system - this is a failsafe to ensure the compressor is not run dry. I would suggest you hook up the manifold, command the system to max cool (readout should say LO) and open all doors and sunroof - to let the evaporator work at maximum heatload. then open up the low side valve with your yellow hose on the r134 can, if its lower than normal, you will see refrigerant rush in from the sight glass and the compressor clutch should kick on, dont be startled at the high side reading as the compressor is a variable displacement like older chevys had. The high side will read correct once you get closer to correct charge volume. if the EC light sticks on - reset the HVAC and start again.
__________________
2012 BMW X5 (Beef + Granite suspension model) 1995 E300D - The original humming machine (consumed by Flood 2017) 2000 E320 - The evolution (consumed by flood 2017) Last edited by Zulfiqar; 04-28-2017 at 11:03 AM.
|
 |
| Bookmarks |
|
|


 Linear Mode


