

|
|
|
|
|
|
#76
 05-08-2018, 08:43 PM
|
||||
|
||||
|
Fittings
I am glad you are able to get the fittings you need in steel. However, I can probably get them to you for half the cost of what A/C parts warehouse sells them for. PM if you would like.....Rich
__________________
 All Diesel Fleet 1985 R107 300SLD TURBODIESEL 2005 E320 CDI (daily) LOTS of parts for sale! EGR block kit http://www.peachparts.com/shopforum/diesel-discussion/355250-sale-egr-delete-block-off-plate-kit.html 1985 CA emissions 617 owners- You Need This! Sanden style A/C Compressor Mounting Kit for your 616/ 617 For Sale + Install Inst. Sanden Instalation Guide (post 11): http://www.peachparts.com/shopforum/diesel-discussion/367883-sanden-retrofit-installation-guide.html 
|
|
#77
05-13-2018, 03:49 AM
|
||||
|
||||
|
ROLLGUY tried to help get a better deal on the compressor fittings, but acparts.com's prices were about as low as they get, so I ended up ordering from them. Unfortunately, a couple days later they called me and said most of the parts were out of stock, but they think they'll be able to order them and have them in stock next week. It seems I always need the odd-sized things.
I've been spending a lot of time trying to find replacement firewall grommets. So many of them are no longer available! Some other rubber parts I wanted to buy are ridiculous. $35 for a rubber boot for the pressure switch, $67 each for firewall drain tubes (fortunately I found some used ones), $119 for a little heater hose... I think the golden age for affordably owning a W116 and having good parts availability is starting to pass. The manual climate control case I was planning to use is cracked. Fortunately, I have another one, but it doesn't have air conditioning. I think I will use the heater-only case because it's in better condition, and will put the air conditioning parts into it. Unfortunately, the W116 heating and air conditioning service manual states that in the event of evaporator leaks or flap malfunction in cases made before January 1979, the entire case assembly must be replaced because it is not possible to take it apart without damaging the case. What?! I'm hoping it's just because they used a mastic sealer between the parts, which can be replaced with butyl cord. Another unfortunate thing I noticed is that both manual climate control cases I have only have two drains instead of four. Manual cllimate control cases with two drains:  The W116 heating and air conditioning service manual states that in September 1977, two additional drains were added for faster removal of condensate. The automatic climate control case with four drains:  With the way the cases are designed, I can't just swap the section of the automatic climate control case with the extra drains without having the extra parts on top like vacuum pods and ETR switch. I'd probably rather just live with only having two drains than having all those extra automatic climate control parts on top. But, I really want the two extra drains because I'm going to be running the air conditioning constantly, year-round. I might try to add two extra drains to the bottom of the manual climate control case. The only way I can think to add them that won't eventually leak and cause water to drip on the floor is to drill holes (there are molding lines where they would go) and then insert a plastic tube on each side and use a plastic welding system to run a bead on both the inside and outside so the tubes are firmly attached and won't leak.
__________________
Stop paying for animal enslavement, cruelty, and slaughter. Save your health and the planet. Go vegan! I did 18 years ago. https://challenge22.com/ DON'T MESS WITH MY MERCEDES!  1967 W110 Universal Wagon, Euro, Turbo Diesel, Tail Fins, 4 Speed Manual Column Shift, A/C 1980 W116 300SD Turbo Diesel, DB479 Walnut Brown, Sunroof, Highly Optioned, 350,000+ Miles
|
|
#78
05-13-2018, 07:52 AM
|
|||
|
|||
|
You live is AZ where the relative humidity is 14%, not FL where it is 98%.
__________________
Greg 2012 S350 BlueTEC 4Matic 2007 ML 320 CDI 2007 Leisure Travel Serenity 2006 Sprinter 432k 2005 E320 CDI 1998 SLK230 (teal) 1998 SLK230 (silver) 1996 E300D 99k, 30k on WVO Previous: 1983 240D, on WVO 1982 300D, on WVO 1983 300CD, on WVO 1986 300SDL 237k, 25k on WVO (Deerslayer) 1991 350SDL 249k, 56k on WVO - Retired to a car spa in Phoenix 1983 380 SEC w/603 diesel, 8k on WVO 1996 E300D 351k, 177k on WVO
|
|
#79
05-14-2018, 01:31 AM
|
||||
|
||||
|
Quote:
 I took apart the automatic climate control heater case from my car. It came apart without too much effort--mostly removing clips and being careful to not break the fragile plastic. I wanted to see how feasible it would be to cut the second set of drains from it and graft them onto the manual heater case either plastic welding or bonding them using methyl ethyl ketone. I also wanted to see the condition of the heater core and evaporator so I could pick out the best parts from the three heater cases I have. As I expected, the evaporator was very dirty, mostly from debris that got sucked in through the rust holes in the firewall partition at the blower motor opening. I'll have to do some hole patching--perhaps I'll try welding in new metal (I have almost no welding experience).  The heater cases have been full of unpleasant surprises. One was discovering that the heater core in the manual heater cases is much smaller than the one the automatic climate control cars have. The surface area of the manual heater core is 13X5", or 65in². The surface area of each core in the automatic heater core is 7X6" or 42in²--making 84in² total, which is 19in² more surface area than the manual heater core. One thing I've enjoyed about my car is the massive amount of heat the heater would put out back when the heater worked and I lived in a cold climate. I definitely don't want to downsize the heater core!  Unfortunately, there isn't enough room to install the large version heater core in the manual climate control case, because the flaps which control how much air pressure from the blower motor is allowed to pass through the heater core, are in the way. With the manual heat system, the heater valve is either fully closed or fully opened, so the amount of cabin heat is regulated by these flaps.  Another disappointment I encountered was finding that the heater cases made before January 1979 (which is both of the manual cases I have) really aren't intended to be taken apart. The parts that did come off were glued with a mastic filler, and the rest seemed to be plastic welded together. So, like the heating and air conditioning service manual states, if the evaporator leaks, you cannot remove it without damaging the case, and the whole case assembly must be replaced. So stupid! So, most W116s have this type of case, which means that if the average owner's evaporator leaks, they can write off ever being able to use their air conditioning again. So, I found myself being stuck with downsizing to a smaller heater core in order to use the manual case and having to use the broken case that's set up for air conditioning and already has an evaporator in it, while hoping it doesn't leak and then crying when it does--or cutting apart the uncracked case, installing the evaporator, and then somehow putting it back together. Either option didn't sound good to me. I came up with a compromise; I plan on using the automatic climate control case from my car so I can use my large heater core and can remove and replace the evaporator if it ever leaks in the future. I'll also have the four drains. I inspected the cases that had only two drains--yikes! Condensation dripping off the evaporator goes through these skinny little rubber tubes (which were both clogged and torn) which route into heater core section--certainly not adequate! I can't use the front part of the manual case on my automatic case because it doesn't have the grooves to hold the butyl sealing strips (remember the early cases just used mastic filler). So, I will need to remove the cable bracket from the manual case and rivet it onto the automatic case. I will also need to remove the vacuum pods on top of the automatic case and fill in the holes. It appears that I can use the lower part of the manual case with the control levers on mine--but I will need to cut away the plastic partition in the center. There are also plastic sheets over the flaps which would make the already seemingly impossible job of replacing the flap foam completely unfeasible unless those are cut off as well. Or--I could use the lower part from my case if I remove the vacuum pod (yes, they hid one in there, totally inaccessible!), drill holes for the control lever mounting and tap in the splined nuts.  Because I'll be using the automatic case and large heater core, that means the heat regulating flaps from the manual case can't be used. I decided this is fine because it's a lot of clunky linkage, more flaps needing new foam, and I drove my car for years with the heater valve either fully opened or closed with no complaints other than having to open the hood each time. Now that I'll actually have a blower that can operate at multiple speeds, I think this will be adequate. I'd rather lose some fine-tuning of the heat temperature than lose heating capacity. I had thought about making the heater valve cable-actuated instead of by vacuum, but this would be a bit of a hassle to integrate into the system without making it look like a hack job. I also don't think that the slider levers are stout enough to handle that much resistance from a cable that long, especially if it gets gummed up. So, I am just going to leave it as intended with the heat lever on each side opening and closing the heater valve by vacuum. It will be a bit redundant having a heat lever on each side, but oh well. It's no different than the way it was intended other than the flaps won't be adjustable separately between the left and right sides.
__________________
Stop paying for animal enslavement, cruelty, and slaughter. Save your health and the planet. Go vegan! I did 18 years ago. https://challenge22.com/ DON'T MESS WITH MY MERCEDES! 1967 W110 Universal Wagon, Euro, Turbo Diesel, Tail Fins, 4 Speed Manual Column Shift, A/C 1980 W116 300SD Turbo Diesel, DB479 Walnut Brown, Sunroof, Highly Optioned, 350,000+ Miles
|
|
#80
06-21-2018, 05:56 AM
|
||||
|
||||
|
I've been facing some difficulties getting parts. Besides many parts being no longer available, I've been having issues with general air conditioning parts being difficult to find or out of stock in the type I need. ACParts.com was the only place I could find that had the compressor fittings I needed in steel. I ordered them and a few other parts on May 9th (a Wednesday), but immediately decided I needed to use a #8 reduced barrier hose, so I placed a second order for a reduced barrier hose and a couple reduced barrier fittings. I messaged them and asked if they would remove the #8 hose and fittings from the first order and combine my two orders to save on shipping. The salesman said he would adjust the two orders and combine shipping.
A couple days later I got a call saying the fittings were out of stock, but they should have them in stock by next Tuesday the 15th. On Friday the 18th, I emailed them and asked them if they had the fittings yet. The salesman wrote, "Everything left here yesterday sir sorry for the delay, had trouble getting a few of the fittings". May 29th came (a week and a half later), and I never received the order, so I sent an email asking for a tracking number. The salesperson called me and said that it will be a few days before the parts ship. He said, "If you remember, per our last conversation, we were still waiting on two fittings that you ordered." I said, "I don't remember that. The last conversation was that the parts had already shipped the day before." Then he backtracked and said that the two fittings were holding up the order because they had to order in 6,000 fittings from the supplier just to get the two that I wanted, and it's going to take them at least another 2-3 days of hard work to sort through them to get my two fittings out of them. And then he said that they had a storm that knocked out the power and they were without electricity for a while, and all these other stories that sounded made-up. I told him that's it's been almost 3 weeks since I placed my order, and he said that usually ordering from them isn't like this, but I picked two fittings that are hard to get. But, he said he's going to "bird-dog it" and try to find a way to somehow get my fittings out of the pile and ship them off before too long. On June 6th, nearly a month from the date I placed the order, it arrived. The order was correct other than they sent me regular #8 hose that was mislabeled as #8 reduced barrier hose. They also hadn't refunded my card for the parts I had cancelled and weren't shipped, nor for the second shipping charge--a total of $40.35 due back. I emailed ACParts.com and the next day the salesman said he would send it to someone else for corrections. I hadn't heard back, so on June 13th, nearly a week later, I emailed them again. A week from then, now the 20th, I still haven't gotten a response, so I disputed the purchase on my credit card. Maybe that will get some action. Meanwhile, I still need #8 reduced barrier hose. One of the fittings I got from them was a #10 female O-ring 180 degree steel fitting. Unfortunately, it was too tall and hit the oil cooler line bracket. I tried to compress it down shorter, but it was really tough, so I put it between a jack and my parts car and squished it down that way. It was close, but just a little too far, so I carefully bent it back a little and it snapped. This is one of the fittings that I waited so long to get. I decided, though, that a 135 degree fitting would work better, but ACParts.com doesn't carry them. I looked and couldn't find anyone that sold them in steel, but then came across one on eBay, so I bought it. I had previously placed an order from another place, called NostalgicAC.com, but didn't use any of it because I decided that it wouldn't work for what I wanted to do. They have a 60 day return policy with a 20% restocking fee, so I called them up because their website says I need to call to get a return goods authorization number. The lady that answered was really nice and I thought, "Finally, a place that will let me return items without making me feel like a criminal." She got me started, and then said, "Hold on a moment." Then this rough-sounding guy came on the phone and asked, "What's going on?! Now you want to return everything?" I told him that my plans for my project have changed and I'm going to have to use steel fittings instead of aluminum ones, and need R-12 service ports instead of R-134a, so I need to buy something different." He responded, "You ordered that hose online. I had to cut it, so you can't return it." I said, "That's fine." Then he said, "I can only take back the fittings. So I guess you're going to ship it all back to me?" I said, "Yes." Then he said, "Fine." and hung up. I thought, "I didn't even get a return authorization number." So, I called back and got the same guy. I told him that I had just spoken with him, and hadn't gotten a return goods authorization number. He sounded grouchy and said, "It's your order number!" and then hung up. I don't think I want to give them my business anymore, either! I've also been having problems with packages being damaged in transit. There have been lots of delays, for sure. For anyone interested, at the suggestion of floyd111, I started a GoFundMe campaign https://www.gofundme.com/squiggle-dog039s-116-project-research to raise money with some of the research I'm doing to find suitable replacement part numbers for no longer available W116 parts. Donations also fund this 300SD project, which would help a lot since I'm not currently working. I've already received donations. Amazing! I'm so grateful. Now for some progress pictures! So, I decided against using a manual climate control case. They have four awkward flaps that regulate the air going to the heater core. The linkage is cumbersome and every flap jams up every single time on all three manual cases I have. They also have smaller heater cores, and I do not want to lose any heating capacity. I removed the vacuum pods on top of my automatic climate control case.  There were holes left behind and I wanted to fill them properly, ideally so that it looked like they were never there. I cut a chunk of plastic off of a lower flap housing to use as filler material.  I put it under the hole and traced the outline of the circle.  I cut out the circle with a Dremel tool and it was such a perfect fit that it stayed right in place.  I had a 20% off coupon and used one of the $15 Harbor Freight Plastic Welding Kit irons to melt the plastic circle into the case. This project was my first time attempting to weld plastic. 
__________________
Stop paying for animal enslavement, cruelty, and slaughter. Save your health and the planet. Go vegan! I did 18 years ago. https://challenge22.com/ DON'T MESS WITH MY MERCEDES! 1967 W110 Universal Wagon, Euro, Turbo Diesel, Tail Fins, 4 Speed Manual Column Shift, A/C 1980 W116 300SD Turbo Diesel, DB479 Walnut Brown, Sunroof, Highly Optioned, 350,000+ Miles
|
|
#81
06-21-2018, 05:59 AM
|
||||
|
||||
|
In trying to make sure there were no low spots, I got carried away and ended up with globs of plastic.
 I had to figure out how to level it out, and discovered Dremel has EZ-Lock sanding discs that looked ideal. Unfortunately, no place local seemed to carry them, but when I went to Lowe's, they had an accessory kit which included the EZ-Lock arbor and all the sanding discs for less money than it would have cost to buy just the arbor and discs separately.  The sanding discs did a good job of flattening the surface.  I found a box of high-quality Testors hobby sanding film and a headlight polishing kit in my garage, so I used those to sand and polish the surface. 
__________________
Stop paying for animal enslavement, cruelty, and slaughter. Save your health and the planet. Go vegan! I did 18 years ago. https://challenge22.com/ DON'T MESS WITH MY MERCEDES! 1967 W110 Universal Wagon, Euro, Turbo Diesel, Tail Fins, 4 Speed Manual Column Shift, A/C 1980 W116 300SD Turbo Diesel, DB479 Walnut Brown, Sunroof, Highly Optioned, 350,000+ Miles
|
|
#82
06-21-2018, 06:01 AM
|
||||
|
||||
|
The results were less than perfect. I think that I used sanding discs and sheets that were too coarse, so I wasn't able to sand the scratches out completely. Some of the plastic I filled in also seemed to have air bubbles or shrunk, so the holes that were once there weren't undetectable like I had hoped. But, it was my first time attempting this. Looking back, I probably should have just left the globs of plastic. I actually tried brushing acetone on the surface to remove the scratches from the sandpaper, and though it filled them, it left a bumpy surface which I had to sand AGAIN. I also filled in the holes where the ETR switch and copper probe tube used to be.
  The boot that goes between the case and the blower motor case was held on with clips and three rivets, as was the rubber cover on the opposite side. In order to facilitate changing of these parts in the future, I drilled out the rivets...  ...and replaced them with M4 0.7mm stainless steel press-fit nuts for plastic from McMaster-Carr. To install them, I drilled the holes larger with a 1/4" drill bit and then carefully tapped them into place while supporting the backside with a metal autobody tool. They work very well.  
__________________
Stop paying for animal enslavement, cruelty, and slaughter. Save your health and the planet. Go vegan! I did 18 years ago. https://challenge22.com/ DON'T MESS WITH MY MERCEDES! 1967 W110 Universal Wagon, Euro, Turbo Diesel, Tail Fins, 4 Speed Manual Column Shift, A/C 1980 W116 300SD Turbo Diesel, DB479 Walnut Brown, Sunroof, Highly Optioned, 350,000+ Miles
|
|
#83
06-21-2018, 06:02 AM
|
||||
|
||||
|
The evaporator was badly corroded at the bottom from debris gathering up, so it needed replacing. A new one is $1,050.00 from Mercedes and used ones tend to have corrosion problems. Fortunately, Four Seasons makes one that supposedly fits (because it also fits the R/W107, and I'm sure that's the ONLY reason an aftermarket evaporator is available for the W116), part number 54131, and they sell for $100-$200. I got one for $68 and free shipping from Summit Racing, of all places.
The evaporator is constructed entirely of aluminum other than the steel side plates. Some pictures show copper tubes, but this is misleading. However, I've read that all-aluminum construction is better as dissimilar metal corrosion doesn't effect it. Apparently even evaporators for cooling of buildings and homes are now all-aluminum and are lasting longer. There are also six rows of tubes instead of five, so it should be more efficient than the original. Unfortunately, the pipes entering and leaving the evaporator weren't correctly aligned. Design flaw? Poor quality control? One-size-fits-all not what it seems?  I had to tweak them quite a bit before the evaporator would fit into the case--to the point of nearly kinking the small tubes and having to squish them back round with pliers. And then more before the case halves would fit together. It was disappointing. I'm glad I didn't inadvertently puncture a hole, as afterward I loosened one of the caps to check fitment of a flare fitting, and it made a loud hissing noise as air pressure escaped. I let it vent off for what seemed like a very long time. Finally, I untwisted the cap and heard a BANG so loud that it almost popped my ear drums and the cap shot off. They put these things under some serious air pressure to test them at the factory!  The evaporator needed foam in between it and the housing to prevent air from flowing around it rather than through it, where it is the most effective. But, this was challenging as the tubes were much tighter than the original. All I could think to do was cut some 1/8" thick resilient high temperature silicone foam (from McMaster-Carr) into 1/2" strips and wedge them into the left side where it's really tight, and then push in some 1/4" thick, 1" wide high temperature silicone foam next to it for a tight seal.  The right side of the evaporator got just a 1" wide strip of 1/4" foam. Oh, here's another fun fact about the Four Seasons evaporator--the mounting holes aren't just lacking threads, but they are also off by a lot. I had to drill new holes and install captive nuts. Then I had to cut off the upper corners of the mounting tabs because they stuck up too high and were sharp.  I put 1/4" foam on the bottom of the case and 1/8" foam on the top of the case. It was tricky to put in the evaporator, but it's in there snugly and shouldn't have any major air flow leakage around the sides of it. Yes, I am building a space shuttle. Big whoop! Wanna fight about it? 
__________________
Stop paying for animal enslavement, cruelty, and slaughter. Save your health and the planet. Go vegan! I did 18 years ago. https://challenge22.com/ DON'T MESS WITH MY MERCEDES! 1967 W110 Universal Wagon, Euro, Turbo Diesel, Tail Fins, 4 Speed Manual Column Shift, A/C 1980 W116 300SD Turbo Diesel, DB479 Walnut Brown, Sunroof, Highly Optioned, 350,000+ Miles
|
|
#84
06-21-2018, 06:05 AM
|
||||
|
||||
|
The automatic climate control cases use two sizes of neoprene foam sealing cord. EPC only showed one size, part number 000 987 51 33, however, it's about 6mm thick and the larger size of the cord in the case seemed closer to 5mm. But, it worked. For the smaller size cord, I used 3/16" diameter neoprene foam cord from McMaster-Carr. It looked identical to the stuff Mercedes uses.
 In an effort to be prudent, I took the heater core to the most highly acclaimed radiator shop in Phoenix to have it cleaned, checked for leaks, and rodded out if needed. The shop owner thought that was a crazy idea and a waste of money. He said to just run it until it leaks. I said that it's a big job to replace one of these, and I'd rather have it worked on now and have peace of mind. He said that they can't be rebuilt because when you try to solder one part, it opens up another part. He looked at it and said, "What is this out of?" I said, "A Mercedes." He said, "Ah! Mercedes! No wonder. They can't just build a normal heater core. That's why their cars don't cool worth a darn and they always have overheating problems." He said that he couldn't rebuild it if it leaks because it's "too delicate", and the most he could do is soak it in a tank to clean it and check it for leaks. He said that if it leaks, he probably couldn't fix it and I'd have to buy a new one. I told him that a new one is probably $2,000 from Mercedes, and no one makes an aftermarket one. He said, "I'll make you a new one for $1,000!" I feel like whenever I take something to a shop, they don't want to work on it and act skeptical about being able to fix it. I told the shop owner to boil it out in the hot tank and check it for leaks. When I picked it up, he said that it was a really good thing that I brought it in, because it was totally plugged up and nothing was flowing out of it. That's a different story than when he suggested that it was a waste of money to try cleaning it, because "Either they're good, or they're not, and if they're no good, I can't fix it." He said he hooked it up to pressure and it took a lot of time to get it unclogged and flowing freely. He tested it for leaks and says it's fine. I'm glad I spent the $45, but he didn't hot-tank it, which was upsetting because I specifically asked him to do it to remove the corrosion and rust and clean out whatever was inside of it. I mixed up some oxalic acid and soaked it overnight. It came out nice and sparkly. I painted it with high temperature semi gloss black paint to protect it from the moisture it will see from being next to the evaporator.  The defroster flaps come off after the shaft is slid out. This can be difficult because the shaft gets gunk and rust on it. The cleaner it is, the easier it slides.  I drilled out the rivets holding the defroster cable bracket onto the front cover of a manual climate control case so I could install it on the automatic climate control case.  I drilled holes in the automatic climate control front cover next to the round indentation for the temperature wheel so that I could install stainless steel M4 0.7mm press-fit nuts into it for attaching the cable bracket. The bracket had some indentations from the rivets that needed to be pounded flat, and I tried to match the contour of the cover. I threaded M4 0.7mm X 6mm long button head black oxide hex key screws into the press-fit nuts. 
__________________
Stop paying for animal enslavement, cruelty, and slaughter. Save your health and the planet. Go vegan! I did 18 years ago. https://challenge22.com/ DON'T MESS WITH MY MERCEDES! 1967 W110 Universal Wagon, Euro, Turbo Diesel, Tail Fins, 4 Speed Manual Column Shift, A/C 1980 W116 300SD Turbo Diesel, DB479 Walnut Brown, Sunroof, Highly Optioned, 350,000+ Miles
|
|
#85
06-21-2018, 06:07 AM
|
||||
|
||||
|
The foam on the early style defroster flaps are held on by adhesive and metal rivets, which isn't very nice. Fortunately, I have the later style ones that have retainers that snap on. Sometimes an evil Behr employee would plastic weld the ends of the snaps so the retainers couldn't be removed. Mine were like this, so I used a spare set. With care, the retainers can be pried off of the flaps.
 I used 1/8" thick extra soft resilient high temperature silicone foam from McMaster-Carr for the defroster flaps. The stuff is very difficult to make small cuts in, so accuracy is key. I cut the foam larger than the flaps because it's necessary for them to actually seal. They are about 2mm larger at each side, and about 5mm larger at the front and back. Put basically, I cut a hollow rectangle of the proper size with rounded corners so it would fit onto each flap in one piece around the molding lines and then snapped the retainers on top, which have teeth that hold the foam in place. I found that the ETR switch probe wire from the manual air conditioning dial switch won't reach up to the top of the case where the one from the automatic system is supposed to enter. So, I decided to drill a hole in the front cover for the copper tube from the manual cover to fit through, as was intended for the manual system. However, the inside of the automatic case is reversed compared to the manual case--just inside the front cover of the manual case, the area above the heater core is covered with plastic, and the copper tube goes over this and then goes down into the evaporator through the open area above it. Just inside the front cover of the automatic case, it's open above the heater core and closed off above the evaporator. So, I had to drill an oval-shaped hole in the covering above the evaporator for the copper tube to slide through. But, the angle was wrong, so I had to carefully bend it to shape--which is not easy because it's easy to kink and having the probe wire inside it while bending is a must! I eventually got it to fit and used tar-impregnated cork tape to seal up the gaps and insulate the tube.  In order to have slider controls, I had to use a lower flap housing from a manual system. But, in the manual systems, they have plastic covers welded over the flaps, also known as "blend doors". I have no idea how you would remove the blend doors with the plastic covers in place--maybe it can't be done, and it certainly seems they weren't designed to be removed, anyway. So, I cut off the covers for access to the blend doors. Once they were cut, I carefully pried on the side of the doors in an effort to lift them out. I was so afraid I was going to break the plastic. I used a heat gun to soften the plastic, but on the first one I got it a bit too hot and it deformed a little. Fortunately I was able to heat it up and bend it back.  Once I had one side lifted up, I was able to angle the door and then pop the other side out of socket.  On top is the lower flap housing from the automatic case. On bottom is a lower flap housing from a manual case after I cut off the covers above the blend doors and the center partition between them which would have interfered with the large version heater core. After cutting off the excess plastic with a Dremel tool and carefully filing them flat, I brushed some acetone on the cut edges, which made them smooth and shiny. 
__________________
Stop paying for animal enslavement, cruelty, and slaughter. Save your health and the planet. Go vegan! I did 18 years ago. https://challenge22.com/ DON'T MESS WITH MY MERCEDES! 1967 W110 Universal Wagon, Euro, Turbo Diesel, Tail Fins, 4 Speed Manual Column Shift, A/C 1980 W116 300SD Turbo Diesel, DB479 Walnut Brown, Sunroof, Highly Optioned, 350,000+ Miles
|
|
#86
06-21-2018, 06:08 AM
|
||||
|
||||
|
I cleaned off the old foam and adhesive from the blend doors with paint stripper, being very careful to not get any on the plastic parts, because it will eat plastic. Remove the plastic pivots first and protect the plastic fin on the left door. After this, I cleaned them with brake cleaner (the doors, not the plastic parts). The right side door naturally has a couple holes in it from the tabs that stick up, so I covered them with aluminum HVAC tape. Then I covered each side with adhesive-backed 1/8" thick extra soft resilient high temperature silicone foam, again from McMaster-Carr.
You'll be shocked to know that I've spent well over $200 on a small amount of foam that's barely enough to do this project (one 12"X12" square of 1/8" thick extra soft resilient high temperature silicone foam at $26.81, three 12"X12" squares of adhesive-backed 1/8" thick extra soft resilient high temperature silicone foam at $38.05 each, and one 15' roll of 1" wide 1/4" thick soft high temperature silicone foam with adhesive back at $60.95). I didn't want some cheap foam that would only last a few years and couldn't find anything else much better than what the factory used. It's easiest if you cut the inside holes for the fin and tabs first and then align it over, cutting the edges of the doors with a razor last after the foam is installed. I tried just doing one side and folding it over the other side like the factory did, but it does not work well with this type of foam. The blend doors in place. This foam is ideal for the job except for two drawbacks; the very high price and the fact that even the extra soft foam is rather hard to compress. This means that it doesn't pinch down well by the pivots, so it can impede the doors from fully shutting, leaving about a 1mm gap. I'm hoping that the foam will eventually collapse at the high-pressure points and allow for a better overall seal. At least I won't have foam blowing in my eyes while I'm driving and it will be a vast improvement over deteriorated foam. 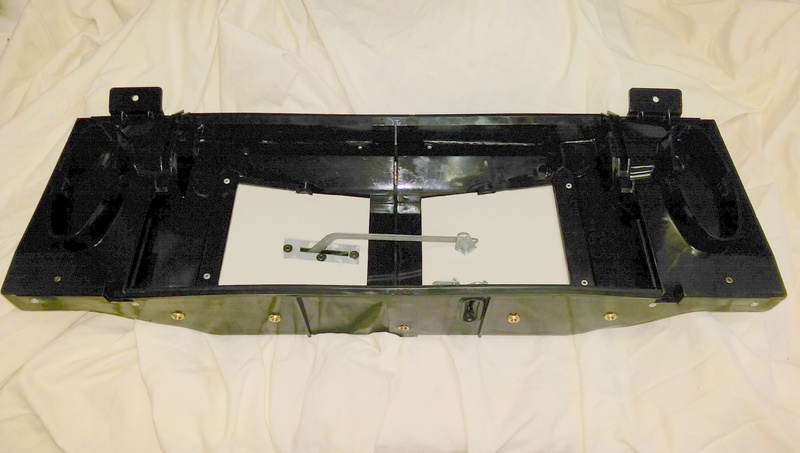 The foam squares under the lower flap housing are still available from Mercedes, part number 107 831 01 42. They also fit the R/W107 chassis, so that explains it. I attached them with contact cement.  The 1/8" adhesive-backed 1/8" thick extra soft resilient high temperature silicone foam that I used around the heater core was too thick for the lower flap housing to fit on the case, so I had to scrape it off of the lower sides.  This was my first attempt at sealing up the lower flap housing using Mercedes non-hardening sealing compound, part number 001 987 56 46. It is similar to Silly Putty. 
__________________
Stop paying for animal enslavement, cruelty, and slaughter. Save your health and the planet. Go vegan! I did 18 years ago. https://challenge22.com/ DON'T MESS WITH MY MERCEDES! 1967 W110 Universal Wagon, Euro, Turbo Diesel, Tail Fins, 4 Speed Manual Column Shift, A/C 1980 W116 300SD Turbo Diesel, DB479 Walnut Brown, Sunroof, Highly Optioned, 350,000+ Miles
|
|
#87
06-21-2018, 06:10 AM
|
||||
|
||||
|
I found that I had used too much sealing compound and the lower flap housing wouldn't fit correctly, so I removed it all and installed it differently, and much thinner this time. Fortunately, it's a very forgiving substance which can be reused.
 There is a little gap on the sides when the lower flap housing is installed, so I used extra putty in this area to compensate. I also used a heat gun and straightened out the warped front cover so it would fit better against the lower flap housing.  A much better fit now. Before, the clamps wouldn't slide on very far. Use barely enough compound to seal, and hopefully the excess gets pushed into the grooves.  I soaked the slider controls in Evapo-Rust, but it removed the paint, which is unusual. So, I stripped off the rest of the paint, cleaned up the metal with fine steel wool, and then masked and painted the controls in semi flat black paint, trying to mimic the partially paint-dipped look.  Fitting the slider controls was tedious and I had a problem where the defroster flap cable kept popping off of the slider. In an effort to correct this, I tried bending the tab on the slider and it broke. So, I removed a slider from another unit and painted it. The metal clip that holds the plastic push-in lever in place was loose, so I flattened down the "rivet" against it a bit tighter. I'm really hoping I don't have the same issue with the cable popping off. 
__________________
Stop paying for animal enslavement, cruelty, and slaughter. Save your health and the planet. Go vegan! I did 18 years ago. https://challenge22.com/ DON'T MESS WITH MY MERCEDES! 1967 W110 Universal Wagon, Euro, Turbo Diesel, Tail Fins, 4 Speed Manual Column Shift, A/C 1980 W116 300SD Turbo Diesel, DB479 Walnut Brown, Sunroof, Highly Optioned, 350,000+ Miles
|
|
#88
06-21-2018, 06:15 AM
|
||||
|
||||
|
Partially assembled climate control case.
 I noticed that the boot that goes between the climate control case and the blower motor case was dry-rotted and cracked in one area, which is strange because the rest of it is nice and supple. Unfortunately, it is different than the ones used on manual climate control cases. It's part number 116 831 07 88, and while it has an affordable MSRP of $53.00 from Mercedes, it's no longer available. So, I tried repairing it. I bought a can of Rustoleum Leak Seal (rubber in a can), and sprayed over the cracks. The sealant sprayed out at high pressure and was messy. It ended up going on way too thick, had bubbles, and after I let it set for a while and thought it was dry, I picked up the boot and it cracked. Fortunately, it was the Leak Seal, not the boot. So, I rubbed off as much Leak Seal as a I could, and then used brake cleaner to get the rest of it off. I tried spraying some Leak Seal in a glass jar, and then brushed it over the cracks one coat at a time. I think it worked!  I installed the boot with the clips and some M4 0.7mm X 12mm long black oxide hex key socket screws, which threaded into the press-fit nuts which I had installed into the case. The uppermost screw is tricky and requires some flexing of the boot to get the wrench in there.  The same is done for the other side and there is plenty of room for the wrench. 
__________________
Stop paying for animal enslavement, cruelty, and slaughter. Save your health and the planet. Go vegan! I did 18 years ago. https://challenge22.com/ DON'T MESS WITH MY MERCEDES! 1967 W110 Universal Wagon, Euro, Turbo Diesel, Tail Fins, 4 Speed Manual Column Shift, A/C 1980 W116 300SD Turbo Diesel, DB479 Walnut Brown, Sunroof, Highly Optioned, 350,000+ Miles
|
|
#89
06-21-2018, 09:35 AM
|
||||
|
||||
|
I love this thread .
I remember doing many similar jobs in the 1960's on oldies that no parts were available for . Your dedication and attention to the details is amazing and pleasant to read about .
__________________
-Nate 1982 240D 408,XXX miles Ignorance is the mother of suspicion and fear is the father I did then what I knew how to do ~ now that I know better I do better
|
|
#90
06-22-2018, 01:30 AM
|
||||
|
||||
|
Quote:
I got the spare defroster control lever cleaned up and painted to match the other three levers. This time, for whatever reason, the cable popping off was not a problem. I think it had to do with me bending the loop of the wire at an angle so it lined up parallel to the lever. Unfortunately, I was trying to bend the plastic shield slightly and the pin broke off. I put a drop of acetone on each end of the broken parts and pushed them together. Then I brushed acetone around the outside and the pieces melted together. It is repaired and seems as strong as ever.  Here is the custom climate control box with the control levers in place. The heater valve is opened and closed by a little vacuum switch on the far left and right. It's funny because only a slight movement of the lever moves the switches as far as they will go and the rest of the travel won't do anything--originally it was intended to move the inner flaps which would have controlled the left and right heat level separately, but I'm going for simplicity.   I can't install the case just yet. Besides having to complete the wiring, I have a rusted firewall to repair. The metal partition that is supposed to prevent water and debris from getting into the blower motor has holes in it, so water and debris from the cowl have been leaking in.  The 280SE that I bought for parts, though rusty, had a partition that's not rusty. So, I used a Blair Rotabroach spotweld cutter and removed it. I'll also cut out some parts of the firewall to use to patch mine. I'll have to weld in the parts (I haven't done much welding other than making tandem bicycles when I was a kid) and will make sure to use a lot of seam sealer. 
__________________
Stop paying for animal enslavement, cruelty, and slaughter. Save your health and the planet. Go vegan! I did 18 years ago. https://challenge22.com/ DON'T MESS WITH MY MERCEDES! 1967 W110 Universal Wagon, Euro, Turbo Diesel, Tail Fins, 4 Speed Manual Column Shift, A/C 1980 W116 300SD Turbo Diesel, DB479 Walnut Brown, Sunroof, Highly Optioned, 350,000+ Miles
|
 |
| Bookmarks |
|
|


 Linear Mode


