 |
 |
 |
 |

|


|
|
|
|
|
|
|||||||
 |
|
|
LinkBack | Thread Tools | Display Modes |
|
#1
|
|||
|
|||
|
W123 300D Front Suspension Rebuild- IE: A thread for my stupid questions
Hey all,
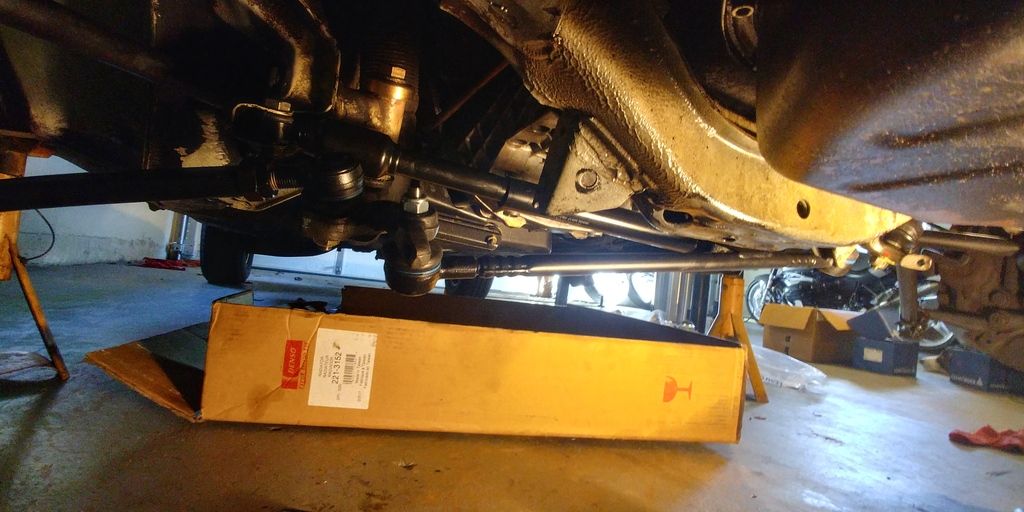
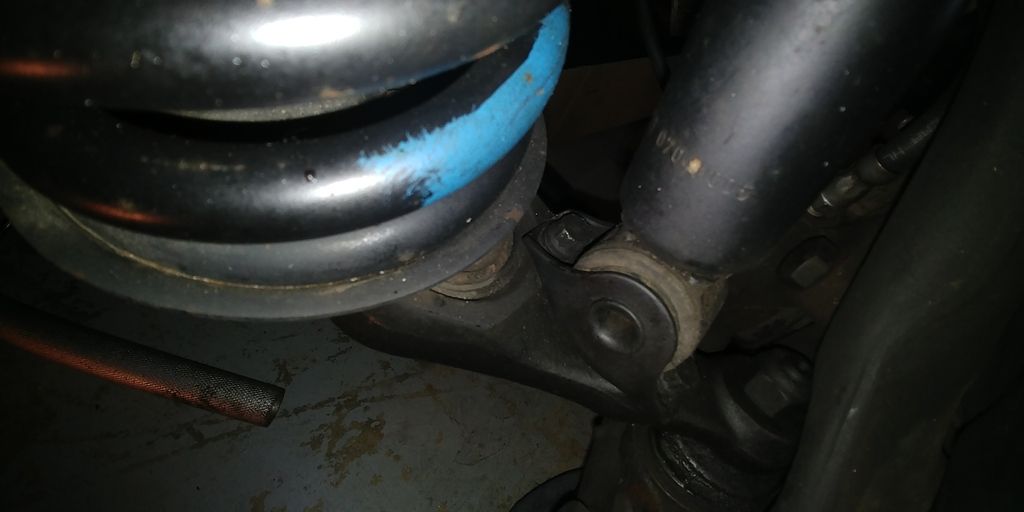
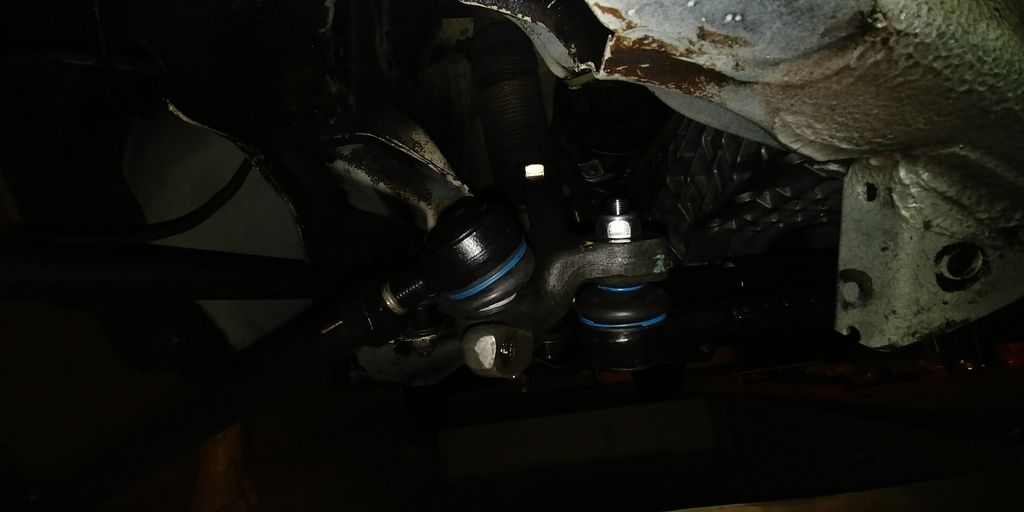
I've just gotten my '85 300D back from Blue Ridge after a hefty list of repairs and maintenance (trans rebuild, timing chain,valve adjustment, OFH gasket, turbo return line gaskets, oil line rebuilds, steering coupler, vacuum lines, IP rebuild etc) For the next week, my goal is to get my entire front suspension rebuilt before taking her to GTE to get dialed in (Good luck Mr. K) What I'll be replacing: Idler arm bushing Drag link Steering damper Complete new tie rods UCA and LCA bushings (UCA complete replacement) Bilstein HD Shocks (3 month wait from Germany!) Guide rod mounts All ball joints So far I've gotten the idler arm bushing done, tie rods, drag link and steering damper complete. So, stupid question #1: I don't remember how the steering damper was positioned relative to the drag link before disassembling. I've gotten it all together and the two are not parallel to each other. I've been looking through the DIYs and can't really see a clear picture where the two aren't already disconnected (or caked in grease). I can only imagine I have the, installed correctly (they really only go in one way) but it just looks 'off' to me the way mine are relative to each other now. Am I losing it, or could it possible the idler arm is on upside down? Again, I think they only go one way so maybe I'm just looking for some assurance.   Stupid questions #2: I've purchased a proper spring compressor with the plates and telescopic shaft. I will need to open up the upper spring perch some, but the springs are still compressed enough that I'm unable to get the plates between the coils and have the ability to rotate them to lock in place. Is it possible to disconnect the top shock mount and allow the spring to droop some more in order to make this work out? If so, I assume I'm best to compress with my jack under the control arm and loosen the top nut, then slowly allow it to expand. Can anyone confirm this? Ideally this all gets done without losing half of my face. Stupid question #3: For the lower shock mount: With the angle of the shock relative to the control arm, I'm unable to access the inner bolt. Is it SOP to disconnect the top and move the shock closer to me (outside of the car) in order to access this bolt? I've read about thin walled sockets but the one I have seems to fit fine and I can't see how a thin walled unit would give me any better clearance against the shock itself.  Thanks! Last edited by MongooseGA; 01-07-2018 at 02:35 AM. |
|
#2
|
|||
|
|||
|
Quote:
SOP or not, it will get you the access you need. An offset box end wrench would probably work as well.
__________________
When cryptography is outlawed, bayl bhgynjf jvyy unir cevinpl. Last edited by tangofox007; 01-06-2018 at 05:22 PM. |
|
#3
|
|||
|
|||
|
Quote:
For the idler arm, am I understanding correctly that it should be mounted at the TOP of the bushing tube? Meaning, remove the arm, flip it over, and the bushing side of the arm should be on top of the protective 'hat' on the top of the tube?  Go figure. Go figure. I did end up figuring out the shock issue; I did exactly as we'd each described. Compress shock, move it toward me, buffer it with some cardboard in the wheel well and remove second bolt. My next issue is going to be finding a grinding tool that will tackle this sheet metal. I've gone through 3 dremel grinding stones and still haven't gotten one side opened enough to put the compressor tube through. What recommendations are there to decompress the spring/ lower the LCA enough to comfortably slide the compressor plates in? I see how everything connects but I guess I'm not sure what can be removed with the spring still in place. **Edit: Just swapped the idler arm around and up top. That looks much better! Thanks again. Just in case this comes up in a search later on for someone else that made the same mistake I did, here is how it looks corrected: (don't forget to replace the now used lock nut)  https://photos.google.com/u/1/photo/AF1QipPz3COyJojMAsjEqp3xbis3tpVX-w8vF458IJty Last edited by MongooseGA; 01-07-2018 at 02:40 AM. |
|
#4
|
|||
|
|||
|
#5
|
|||
|
|||
|
I ran into the "can't get wrench on inner, lower shock absorber bolt" problem a few weeks ago. Same trick - unbolt shock top nut and lower spindle to pull shock out of top hole and pull toward wheel, then you have room. I changed shocks w/ the wheels on (lazy), but is easier if you remove the wheel.
Not sure what is so threatening in the post 4 photo. The spring isn't compressed and nothing is going anywhere. To be safest, it is always good to loop a chain thru the spring when working w/ big springs. Even nylon rope would help keep it from getting too excited. The toughest job you will have is replacing the lower ball joint, but there are many posts on how to remove from the spindle (easy, big hammer) and install the new one (hard, big C-clamp tool w/ just the right shell adapters, heat and hammer).
__________________
1984 & 1985 CA 300D's 1964 & 65 Mopar's - Valiant, Dart, Newport 1996 & 2002 Chrysler minivans |
|
#6
|
|||
|
|||
|
With the correct press, installing the lower ball joint is a walk in the park. It takes all of two minutes and can be done with an ordinary combination wrench. The last member who borrowed my press said the only part of the job that was easier was removing the hub caps.
__________________
When cryptography is outlawed, bayl bhgynjf jvyy unir cevinpl. |
|
#7
|
|||
|
|||
|
Quote:
Hopefully I'm able to source the right compressor quickly. As for the LCA bushings and lower ball joint, I'm just going to take the parts into Blue Ridge and have them remove and press in the new units. I'm not the most accurate with my hammer swings and I don't have a press...yet. |
|
#8
|
|||
|
|||
|
Not sure why my pics all went away. Must be a new thing for photobucket...
Anyway, the whole front end is disassembled and Blue Ridge has my control arms to swap the bushings and the LBJ. On to the rear while I wait to finish the front. Rear Bilstein HD shocks went in this afternoon. Super easy job. The car does seem to sit a good bit higher now in the back. Could just be a matter of putting full weight on all 4 corners? (Front is still on jacks) |
|
#9
|
||||
|
||||
|
If the shocks were completely ruined, you can gain a good inch by replacing them. The SDL gained about an inch, the SL gained nearly 2 (still had the original 1983 shocks!). It'll settle in a little bit once they break in some.
__________________
Current stable: 1995 E320 149K (Nancy) 1983 500SL 120K (SLoL) Black Sheep: 1985 524TD 167K (TotalDumpster™) Gone but not forgotten: 1986 300SDL (RIP) 1991 350SD 1991 560SEL 1990 560SEL 1986 500SEL Euro (Rusted to nothing at 47K!) |
|
#10
|
|||
|
|||
|
Quote:
Yikes, I hope they do settle some more with some driving, though. This thing is so high it's tipping the tires in on the bottom! I wish I had the front wheels on to get a good balanced look at it. |
|
#11
|
||||
|
||||
|
If you had the wheels jacked off the ground, they're probably not sitting where they normally would when rolled. Drive it and see where it settles, I'd be willing to bet it'll be within 1/2" of where it was originally.
__________________
Current stable: 1995 E320 149K (Nancy) 1983 500SL 120K (SLoL) Black Sheep: 1985 524TD 167K (TotalDumpster™) Gone but not forgotten: 1986 300SDL (RIP) 1991 350SD 1991 560SEL 1990 560SEL 1986 500SEL Euro (Rusted to nothing at 47K!) |
 |
| Bookmarks |
| Thread Tools | |
| Display Modes | |
|
|