

|
|
|
|
|
|
#136
 11-28-2018, 11:04 AM
|
||||
|
||||
|
Quote:
__________________
 All Diesel Fleet 1985 R107 300SLD TURBODIESEL 2005 E320 CDI (daily) LOTS of parts for sale! EGR block kit http://www.peachparts.com/shopforum/diesel-discussion/355250-sale-egr-delete-block-off-plate-kit.html 1985 CA emissions 617 owners- You Need This! Sanden style A/C Compressor Mounting Kit for your 616/ 617 For Sale + Install Inst. Sanden Instalation Guide (post 11): http://www.peachparts.com/shopforum/diesel-discussion/367883-sanden-retrofit-installation-guide.html 
|
|
#137
11-28-2018, 02:31 PM
|
||||
|
||||
|
The one on the left is W116, right W126 (fittings welded on).
__________________
All Diesel Fleet 1985 R107 300SLD TURBODIESEL 2005 E320 CDI (daily) LOTS of parts for sale! EGR block kit http://www.peachparts.com/shopforum/diesel-discussion/355250-sale-egr-delete-block-off-plate-kit.html 1985 CA emissions 617 owners- You Need This! Sanden style A/C Compressor Mounting Kit for your 616/ 617 For Sale + Install Inst. Sanden Instalation Guide (post 11): http://www.peachparts.com/shopforum/diesel-discussion/367883-sanden-retrofit-installation-guide.html
|
|
#138
11-28-2018, 06:08 PM
|
||||
|
||||
|
Thanks for clarifying that. Makes sense, my manifold lines point the wrong directions and the discharge side doesn’t have a fitting till you get all the way to the condenser.
I’ll PM you when I figure out what exactly I want to do. I’m kind of overwhelmed by the different solutions at this point.
__________________
79 300TD Old Smokey AKA The Mistake (SOLD) 82 240D stick shift 335k miles (SOLD) 82 300SD 300k miles 85 300D Turbodiesel 170k miles
|
|
#139
11-29-2018, 10:16 AM
|
||||
|
||||
|
Quote:
The only way to determine where/ if a hose is leaking is to pressure test it submerged in water, like after fixing a flat tire. That said, I have tested about 15 used/ original W123 AC hoses that way and have not found a leaker yet. A few of the hoses I tested were pretty sad looking on the outside and I thought they were surely bad until I tested it and found to be not leaking. W123 hoses are thick with multi layers and quite tough! In your situation, I am not suggesting removal of the hose for testing. You can easily determine where the oil on the hose is leaking from. IMO, it is more likely from the fitting o-ring rather than from the hose. Clean / degrease the hose, then wrap the entirety of the hose (including the fittings) with a strip of cotton cloth from an old white shirt. Run the AC and you'll be able to see/ pinpoint the origin of the leak.
__________________
85 300D turbo pristine w 157k when purchased 161K now 83 300 D turbo 297K runs great. SOLD! 83 240D 4 spd manual- parted out then junked
|
|
#140
11-29-2018, 01:31 PM
|
||||
|
||||
|
Quote:
__________________
All Diesel Fleet 1985 R107 300SLD TURBODIESEL 2005 E320 CDI (daily) LOTS of parts for sale! EGR block kit http://www.peachparts.com/shopforum/diesel-discussion/355250-sale-egr-delete-block-off-plate-kit.html 1985 CA emissions 617 owners- You Need This! Sanden style A/C Compressor Mounting Kit for your 616/ 617 For Sale + Install Inst. Sanden Instalation Guide (post 11): http://www.peachparts.com/shopforum/diesel-discussion/367883-sanden-retrofit-installation-guide.html
|
|
#141
11-29-2018, 10:46 PM
|
||||
|
||||
|
If I stare at the oil encrusted rubber section long enough I can see oil bubbling out of a pinhole at one location. I tried soap and a small bubble blew up slowly to the size of a pea and popped. There is no doubt in my mind that this section of the hose is leaking. It is covered in refrigerant oil, parts of it glow under blacklight and it is little cracks on it where the outer layers are delaminating. I really missed this. I think I fooled myself into ignoring it and not cleaning the layer of crusty dirt off it during my compressor swap because I was hopeful and foolish. Its 30 years old for goodness sakes.
This definitely goes in the thread about changing ALL big hoses when doing an AC rebuild. I am condemned to do the fill again. I feel like an idiot. Losing $30 of R134a isnt a big deal but I hate doing things twice. I also suspect the system had been worked on. That is, the rubber sections of hose do not match. They are different types and seem to have differing degrees of aging even though hey are on the same discharge line. There also appear to be braze on barbs on the steel ends. Not welded bead locks like on my SD. I think somebody monkeyed with the hoses at some point. Im going to have to think over exactly what I want out of this. The car blows cold now. And its currently raining and cold outside my place right now. Im not really keen on paying to have the remainder of the gas recovered now. There are a bunch of things to do. Not an impossible situation at this point. Its just a matter of picking a path forward.
__________________
79 300TD Old Smokey AKA The Mistake (SOLD) 82 240D stick shift 335k miles (SOLD) 82 300SD 300k miles 85 300D Turbodiesel 170k miles
|
|
#142
11-29-2018, 10:54 PM
|
||||
|
||||
|
Quote:
I actually wish there were more o-ring couplings because then I could just swap out the rubber section. But if you can picture it, it is all one big crimped together monstrosity from the compressor to the condenser. It is pretty obvious to me the rubber is trashed under the engine. Just wish I noticed this when it was all opened up.
__________________
79 300TD Old Smokey AKA The Mistake (SOLD) 82 240D stick shift 335k miles (SOLD) 82 300SD 300k miles 85 300D Turbodiesel 170k miles
|
|
#143
11-30-2018, 10:35 AM
|
||||
|
||||
|
Quote:
Quote:
I like to weld on male O ring fittings so the hoses can be replaced, and the metal parts stay in place.
__________________
All Diesel Fleet 1985 R107 300SLD TURBODIESEL 2005 E320 CDI (daily) LOTS of parts for sale! EGR block kit http://www.peachparts.com/shopforum/diesel-discussion/355250-sale-egr-delete-block-off-plate-kit.html 1985 CA emissions 617 owners- You Need This! Sanden style A/C Compressor Mounting Kit for your 616/ 617 For Sale + Install Inst. Sanden Instalation Guide (post 11): http://www.peachparts.com/shopforum/diesel-discussion/367883-sanden-retrofit-installation-guide.html
|
|
#144
12-26-2018, 10:44 PM
|
||||
|
||||
|
Window Glue Debacle
AC is on hold for awhile. I noticed my pressure switch bubbles a tiny bit when I put soap on it. Car still blows cold though. Just waiting and enjoying the car till I have to make a decision on hoses.
Today I decided to start working on the front window seal. It is really cracked up. I've never changed one but I've done the back window on my W126 which is similar to the front window of this 300d. So here is what I've got. After I struggled getting the window out, I realized it was really glued in. There were tell tale signs of black rubber cement around the cracks on the outside, but it was only until I really tried to get the glass out when I discovered how much glue was in there. Is this stock or did the PO put a window seal in with black rubber cement? It is amazingly tough stuff. Still pliable. Penetrated deep into the seal all the way to the pinch weld. I suspect the only way to get it in this deep was to put it on before installing the glass. Maybe the glass was replaced at some point. Now I know why it didn't leak even though the seal was hardened and cracked up. It is going to be an awful cleanup job with a scraper and razor knife. I'll try a heat gun with sparing amounts of heat. I don't want to melt the dash or peel the paint off the car. I think I'll have to seal all my little razor scratches with primer or grease. Any thoughts? 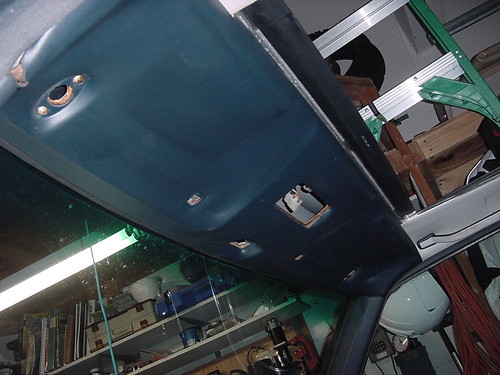 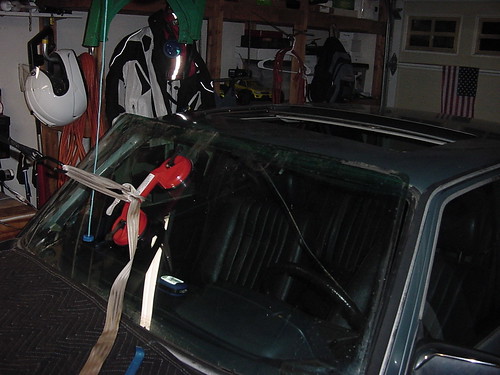 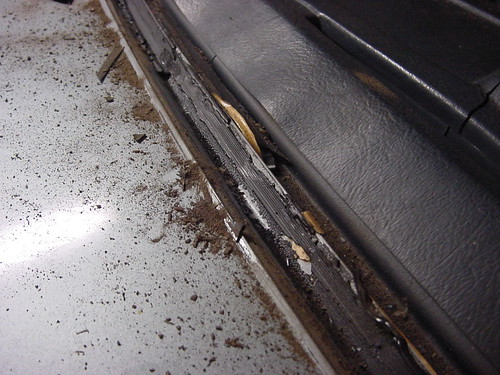 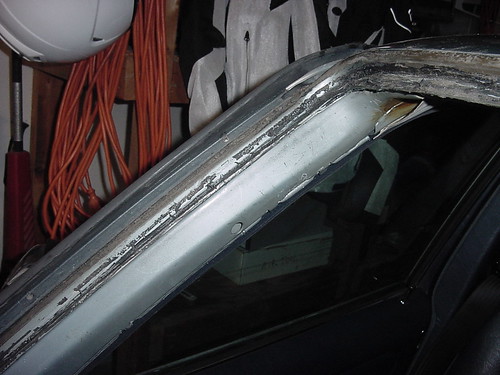 Ugh! This is what I'm talking about.  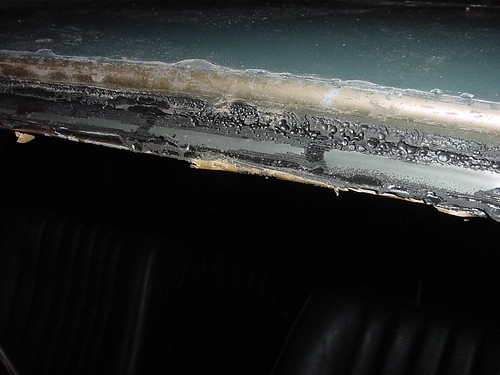
__________________
79 300TD Old Smokey AKA The Mistake (SOLD) 82 240D stick shift 335k miles (SOLD) 82 300SD 300k miles 85 300D Turbodiesel 170k miles Last edited by ykobayashi; 12-26-2018 at 10:48 PM. Reason: add title
|
|
#145
12-27-2018, 08:42 AM
|
||||
|
||||
|
Looks like someone laid in a lot of 3M windshield sealer, it's handy stuff when you have a cheap used car in rain country, right until someone decides to fix it properly of the windshield gets broken .
Consider using nylon or stiff plastic scrapers to remove the old goop, this way you won't be scratching the glass now removing the paint down to the bare metal, always a very, very bad thing . If you must use razor blades to clean glass, get a box of good quality single edge ones, new will not scrape the glass at all .
__________________
-Nate 1982 240D 408,XXX miles Ignorance is the mother of suspicion and fear is the father I did then what I knew how to do ~ now that I know better I do better
|
|
#146
12-27-2018, 09:46 PM
|
||||
|
||||
|
window done
Yeah that glue was amazing stuff. Very flexible yet tough. Looks like it would be good for shoe repair. I used a razor scraper, utility knife, plastic scraper and finally Walmart Brake cleaner and a no name scotch brite pad. It took awhile but I must say it was relaxing work.
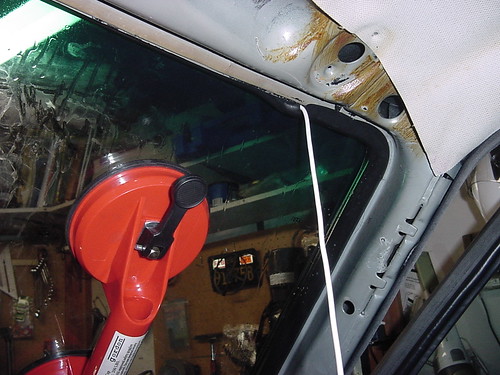 Yep, I got it in. Wow. URO's w123 front seal is okay so it seems. It seemed really loose when I put it on. It really didn't want to stay put till I got the aluminum trim in. Then the whole thing stiffened up. After that, it went into the car really fast. No fight. About 20 minutes to get the seal around the pinch weld. Wow. I did it alone too just like on my w126 rear window. I use the double suction cups from Harbor Freight Tools. I lost my old pair but they were so cheap I just bought two more. After you get the glass positioned on the car, you put the cups on the inside and pull on them while you pull the clothes line. It is really a one man job. I almost asked my teenage son to help but I felt bad after we watched the YouTube video of the grouchy old man installing the front windshield on a w116. Its a great video, but the old guy is harping on his son so bad I didn't feel like asking my boy to come out and push down on the glass. So the double suction cups were a great tool. I got to work on the car without raising my blood pressure and he got to play with his christmas gifts. All good things here. I'm starting to run out of stuff to do on this car. Sadly I'm seeing all these nice 300d sedans on Craigslist in LA. They cost a lot less than the parts I've sunk into mine. I'm up to $3500 now counting the original cost of the car. I feel kind of bad knowing I'll never be able to sell it for that much. I got a really good deal I felt...no rust, nice engine, fair paint, rebuilt tranny 8k ago. I guess we are the only people who appreciate these cars. I love this car but I guess the prospect of maintaining the car using professional mechanics is prohibitively expensive for everyday folks. Just buy an Honda or Toyota and tootle off to the office. Well I'm happy. Fun hobby. Merry Christmas everyone!
__________________
79 300TD Old Smokey AKA The Mistake (SOLD) 82 240D stick shift 335k miles (SOLD) 82 300SD 300k miles 85 300D Turbodiesel 170k miles
|
|
#147
01-13-2019, 03:36 PM
|
||||
|
||||
|
Made a mirror from Home Depot glass
Put on a new mirror I made.
old mirror got these splotches on it. I tried cleaning it with polish to get some stubborn water spots out and I took off the silver. I didn't realize MB plates and optically coats the first surface. 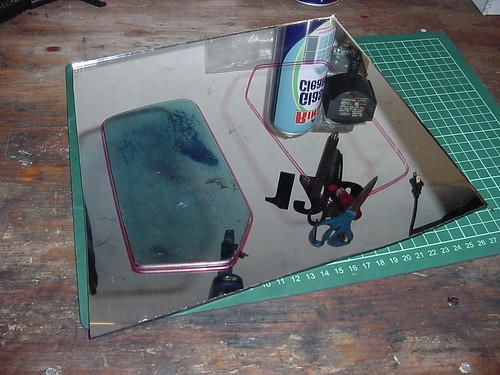 So I got some glass at Home Depot and a glass cutter. Cost me $22. I could have gone to the JY to get a mirror, but I didn't want another spotty mirror. The ones on ebay look pretty worn.  Lightly scribed the glass with a carbide scribe. Then went over the scribe mark with the glass cutter. 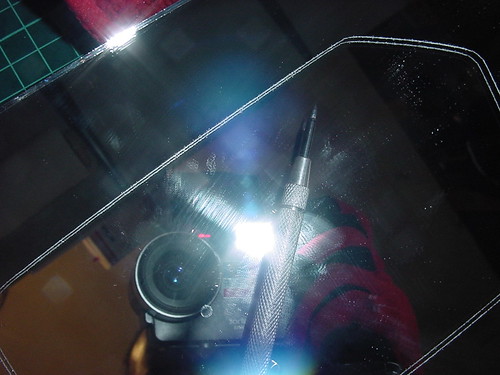 I got the idea from this YT video. https://www.youtube.com/watch?v=mTZBLLdQtKo It looks easier than it was. So I got a big piece of glass...30"x30" or so. I figured I'd need to make a few attempts. I trashed five pieces of glass before I cut one I liked. The glass seems to have a mind of its own when cutting the curves. I figured stained glass artists do this all the time. Anyhow starting the crack is important. The YT video shows some interesting ways to do this by pressing and tapping. He actually propagates the crack all the way around the perimeter before separating the pane. I was not able to do this. New Pane 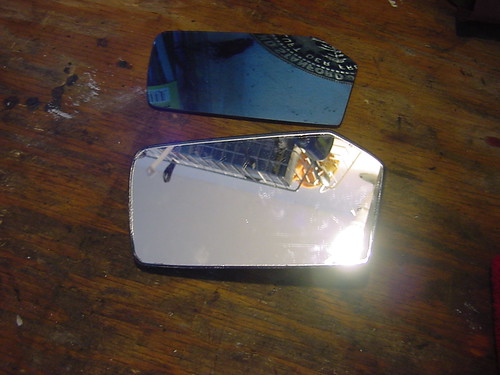 Installed. Spots are on my window glass not on the mirror. This is stubborn water spotting. I'll need to find a way to take it off. 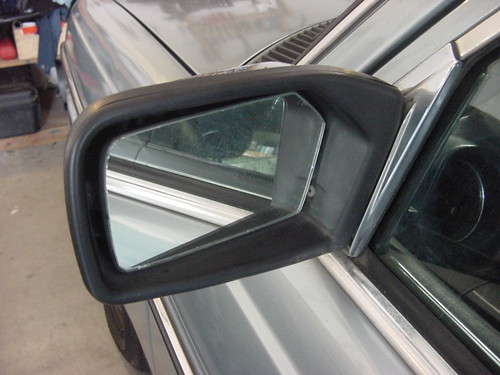 I cut the pane a little big and cut it down with wet dry sandpaper and water slurry. It worked out. I ran out of 60 grit and that slowed me down. It took about an hour. I think if you cut it a little big, then shave off the ragged edge with coarse wet dry, then clean it up with 200 grit paper it'll go faster. I was a little inefficient because it was my first attempt. I think I'll be able to do another in half an hour. Using a power sander will definitely cut the fab time down too.
__________________
79 300TD Old Smokey AKA The Mistake (SOLD) 82 240D stick shift 335k miles (SOLD) 82 300SD 300k miles 85 300D Turbodiesel 170k miles
|
|
#148
01-14-2019, 09:49 PM
|
||||
|
||||
|
That's fantastic ~ I hope the silvering with stands the elements .
Getting the hard water spots off the window glass is a PIA ~ I like to use white vinegar , others use very fine abrasive polish, like Met-All or other alloy polish, ask any pilot who has an old aircraft, whatever they use on the Lexan windshields will do the trick .
__________________
-Nate 1982 240D 408,XXX miles Ignorance is the mother of suspicion and fear is the father I did then what I knew how to do ~ now that I know better I do better
|
|
#149
07-19-2019, 02:01 AM
|
||||
|
||||
|
updates. Got a hose crimper.
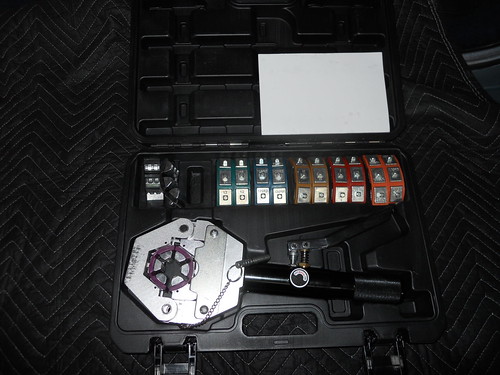 Made oil cooler hoses out of good year galaxy.    Made new AC hoses. Just cut off fittings and crimped on new barrier hose. There were no barbs underneath the rubber. Just grooved tubes. So I put on some Oetiker clamps and wired both sides together to try to have blow off protection.     It was actually pretty hard to remove the metal fittings as they were brazed on to the crimps by Mercedes.  This is what the hose fitting looks like underneath. Not much barb. Had to grind down brazing.   Used the Oetiker pliers to fix my tranny cooler hoses while I was at it.   this was kind of a dubious achievement because the new hoses are so cheap. I guess I just wanted to try it. So the car is together I've been daily driving it. Summer is here and the AC isn't the coldest bone chilling AC. It gets cool but I suspect I need a parallel flow condenser since I changed to R134. I kind of regret not buying one. This spring I installed AC in my 65 F100 pickup and I put in a parallel flow condenser, new hoses, a Sanden and a new evaporator. I was actually pleasantly surprised how cheap it all came out to be. I think the whole system cost me only $400 including rx drier, hard lines, barrier hose, fittings. I had to fab some brackets but I did that with sheetmetal. What I'm getting at is I should have put a Sanden and a parallel flow condenser in this 300d too. I thought it was too hard at the time but the pickup build convinced me it wasn't a big deal. The parallel flow condenser was really cheap too. Only $50. I was worried about hard lines but I got some of the "U bend em" type from Summit made by Vintage Air. It was a piece of cake to cobble a system together. Does anyone know if the Mercedes o ring fittings are the same as the SAE ones on the Vintage Air hard lines? For example, will an ebay Parallel flow condensor hook up to Mercedes hose fittings without special adapters? This is something to think about in the future. I must say my truck makes little ice crystals around the edges of the evaporator. It is really cold. I can see why Rich recommends going Sanden, PF, R12. I guess my AC is cold enough...but I want that meat locker cold. Oh well, another project.
__________________
79 300TD Old Smokey AKA The Mistake (SOLD) 82 240D stick shift 335k miles (SOLD) 82 300SD 300k miles 85 300D Turbodiesel 170k miles
|
|
#150
07-19-2019, 11:08 AM
|
||||
|
||||
|
All A/C O ring fittings are the same. Remember, Mercedes-Benz designed the A/C using the GM R4 back in the day, so everything in the system was SAE. Standard #6-#12 O ring fittings work in the system, and in all aftermarket parts.
"Does anyone know if the Mercedes o ring fittings are the same as the SAE ones on the Vintage Air hard lines? For example, will an ebay Parallel flow condensor hook up to Mercedes hose fittings without special adapters?" I use those ebay condensers on all the jobs I do, and they work great. However, the stock condenser fitting sizes are different. The stock condenser uses a #10 and #6, the aftermarket uses a #8 & #6.
__________________
All Diesel Fleet 1985 R107 300SLD TURBODIESEL 2005 E320 CDI (daily) LOTS of parts for sale! EGR block kit http://www.peachparts.com/shopforum/diesel-discussion/355250-sale-egr-delete-block-off-plate-kit.html 1985 CA emissions 617 owners- You Need This! Sanden style A/C Compressor Mounting Kit for your 616/ 617 For Sale + Install Inst. Sanden Instalation Guide (post 11): http://www.peachparts.com/shopforum/diesel-discussion/367883-sanden-retrofit-installation-guide.html
|
 |
| Bookmarks |
|
|


 Linear Mode


