

|
|
|
|
|
|
#1
 06-24-2019, 12:53 AM
|
|||
|
|||
|
W116 door check maintenance & repair
Door checks tend to get neglected and they can cause a number of problems should they fail from lack of lubrication.
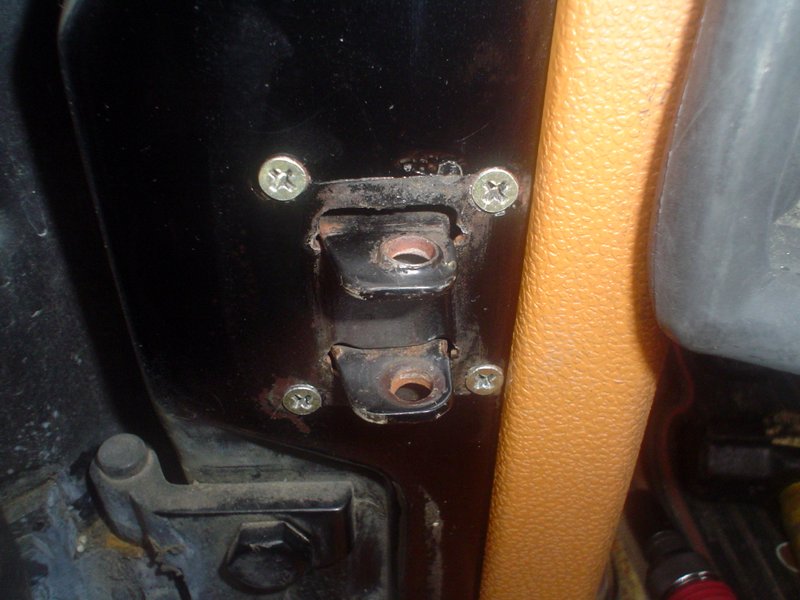
The door can stay stuck open, it may not close readily unless slammed shut, or A or B pillar can get mangled when the check strap hinge tears out the sheet metal. Over the decades, the old dried grease reacts with the paint and primer on the door check roller path and rollers to form an adhesive sludge. This prevents rotation the central bronze wheel. The shaft gets bent and the smaller outer rollers no longer run parallel. The mechanism will become loose in the half open (first stop) position. It will be very tight in the full open (second stop) position requiring excessive force to close the door. The excessive force to close the door can deform the check strap and/or cause a tearout of the check strap hinge from the sheet metal in the A (or B) pillar. The excessive force can also cause breakage of the pot metal in the door check housing and a loss of any door check capability. Under previous ownership, Stormcloud suffered a tearout of the DS door check strap hinge in the A pillar. This was functionally repaired with a couple of welds by a PO. Because of excess weld material that was not removed, the hinge pin clip will not seat on the hinge pin. Also, the rubber seal for the door check does not seat. The right front door check failed to hold the door open at the first position, and the door would self-close at inopportune times. I got tired of my shins getting banged up, so I removed the broken door check to replace it with a good used replacement. Removing the door check: First, I removed the check strap hinge pin. When present, the rubber seal needs to be pulled off the ears of the hinge to gain access to the lower retaining clip on the hinge pin. The hinge pin retaining clip has a finger pull that makes it simple to remove. Next, I drove the hinge pin up with a couple of light hammer blows. The top of the hinge pin is splined and cant be pulled out by hand. I used a scrap machine screw as a punch to free the hinge pin. I held the scrap machine screw with needle nose vise grip pliers to protect my fingers from the hammer blows. Both the thin upper and thick lower white plastic (Delrin?) washers for the check strap hinge were missing. The factory countersunk machine screws mounting the door check to the door have blue thread locker and the heads are painted over. I used a new #2 Phillips hex bit with a quarter inch drive rachet to loosen the door check screws and a 10mm box wrench to loosen the painted flanged nut. A large nail was inserted in place of the hinge pin and the door was positioned at the first stop. The loosened machine screws and flanged nut were removed, and the door check was taken out of the door. If the door check is removed in the full open position, it is hard to move the check strap to the half open position that is required to disassemble the mechanism.
__________________
78 W116 300SD 'Desert Rose' new as of 01/26/2014 79 W116 300SD 'Stormcloud' RIP 04/11/2022 Last edited by Alec300SD; 06-24-2019 at 01:09 AM. 
|
|
#2
06-24-2019, 01:02 AM
|
|||
|
|||
|
Disassembling the door check:
A decent used door check made with blended PNP parts was disassembled. With the rollers in the half open position (first stop) the 10mm bolt was removed and the leaf springs were then removed by sliding them out of the slot towards the front of the check strap. The check strap and the rollers were removed from the housing. The outer rollers simply lift off the roller shaft. The bent roller shaft was frozen and stuck in the check strap. The check strap was placed on a scrap 2X4, and the bent roller shaft was removed with light hammer blows. The straighter original door check strap roller shaft was re-used.
__________________
78 W116 300SD 'Desert Rose' new as of 01/26/2014 79 W116 300SD 'Stormcloud' RIP 04/11/2022
|
|
#3
06-24-2019, 01:06 AM
|
|||
|
|||
|
The check strap its self was also bent.
It was straighted with some light hammer blows. All in all there are 17 pieces that should be present. The dried grease/paint sludge on the door check was removed using a clean rag and liberal amounts of fresh DeoxIT mechanical marine grease to soften the sludge. Cotton swabs dipped in the DeoxIT grease were used to remove the sludge where the roller shaft contacted the inner and outer rollers, and to remove the sludge on the check strap hinge leaves. With all the sludge removed, fresh grease was applied to the rollers and the roller shaft, and they were reinstalled on the check strap. The check strap was placed into the lubricated housing in the first stop position. The spring leaves were reinserted into the slot and the 10mm bolt was reinstalled. The replacement door check was installed in the door. The check strap hinge pin was lubricated with DeoxIT grease. The missing plastic washers were replaced, lubricated with Sil-Glyde, and the hinge pin was reinstalled with light hammer blows. The excess weld material from the prior repair still needs to be ground off or filed away. The exposed metal will be painted with rustproofing paint. Then, the rubber seal and hinge pin retaining clip can be installed. Its nice to have a DS front door that will stay propped open. Hope this DIY pictorial has been helpful
__________________
78 W116 300SD 'Desert Rose' new as of 01/26/2014 79 W116 300SD 'Stormcloud' RIP 04/11/2022
|
|
#4
06-24-2019, 10:30 AM
|
||||
|
||||
|
Great write-up! The door check strap hinge on my car suffered a tear-out, as well. You can read here to see how I fixed that problem without welding: My Custom 1980 W116 300SD Project
__________________
Stop paying for animal enslavement, cruelty, and slaughter. Save your health and the planet. Go vegan! I did 18 years ago. https://challenge22.com/ DON'T MESS WITH MY MERCEDES!  1967 W110 Universal Wagon, Euro, Turbo Diesel, Tail Fins, 4 Speed Manual Column Shift, A/C 1980 W116 300SD Turbo Diesel, DB479 Walnut Brown, Sunroof, Highly Optioned, 350,000+ Miles
|
 |
| Bookmarks |
|
|


 Linear Mode


