 |
 |
 |
 |

|


|
|
|
|
|
|
#1
|
||||
|
||||
|
124 Mono-Wiper linkage failure
Yesterday I had to drive a 180 mile roundtrip to Seattle with a co-worker in the pouring rain for a business meeting. It turns out that I had to do 120 miles of that trip without the benefit of the mono-wiper on my 300 td. The dang thing decided to quit without obvious warning, leaving me to squint through heavy rain in even heavier traffic. It was a frightening experience and I thought I'd post some info about this problem so that other 124 owners could think about doing some preventative maintenance to avoid this dangerous situation.
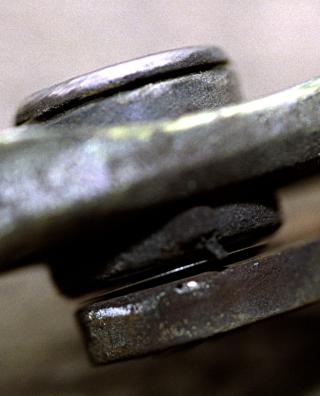
Here you can see where a linkage joint has come uncoupled, leading to the wiper failure.  Here's a pic (from a listmember at MBZ.org) showing one of the sloppy joints most of us with older 124's are bound to have at this point. All of the joints on my linkage were roughly in the same shape, so any one of them could have failed.  If you have quite a bit of side to side slop in your wiper arm, you more than likely have linkage joints that're ready to fail. I highly recommend that you at least inspect your wiper linkage before it's too late. I'll be replacing the entire linkage assembly as soon as it arrives in the mail. |
|
#2
|
|||
|
|||
|
Glad you're safe. Thanks for the tip, I'll check my wiper.
__________________
'91 300D 2.5 Turbo 330K '00 VW TDI Golf, 190K '67 BMW R50/2 '73 Norton Commando Interstate |
|
#3
|
|||
|
|||
|
Were you able to rebuild anything? Or did you have to buy an entirely new assembly?
|
|
#4
|
||||
|
||||
|
Quote:
Keep in mind that accessing the wiper assembly is a bit of a production, requiring the removal of lots of brittle plastic pieces for the air intake screen and windshield drip rail. I'd prefer to do this just once if could. I'll post a follow-up when I find out a part number and cost for the linkage assembly. Since this job is such a chore, it makes sense for someone heeding my advice to pre-order the assembly and do the R&R all at once. If I end up rebuilding the unit, I'll post some pics of the final results. |
|
#5
|
||||
|
||||
|
Well, here's a follow-up post as promised. I foolishly opted to be a cheapskate and simply 'fix' the old wiper linkage.
I lubed the joint bushings up with silicone spray since the bushings themselves were still in pretty decent shape. Pounding against an anvil, I first re-staked the end (doubling the original number of stakes) with a cold chisel, then used a centerpunch to expand center of the post, and finally peened everything with a medium sized drift. The result should hold the post tightly for a while. Here's two of the four joints that required fixing.  If you have the CD service manual, you'll require Job 82-0760 to help line up the linkage if it's removed. I just removed the wiper arm end, so I only needed to line up that end upon re-assembly. These two notches need to be lined up in order to properly re-assemble the wiper arm end of the assembly.  The biggest hassle of the whole job is removing all the trim pieces and then re-assembling everything without snapping any of the brittle plastic parts. It's a time consuming task, but I bet I could do it again in 2 hours, or possibly less. I highly recommend that folks purchase a new linkage set, but if you're cheap and impatient like me, the linkage can be fixed. I don't know how long this will last, but I hope folks will at least investigate their wiper condition so they don't experience a terminal loss of function like I did -- especially at night. |
|
#6
|
|||
|
|||
|
How does one go about accessing this linkage? Do you just pry up the odd shaped plastic cover at the base of the wiper arm?
__________________
1999 MB SL500 (110,000 mi) 2004 Volvo V70 2.5T (220,000 mi) 2014 Tesla Model S 85 (136,000 mi) MBCA member |
|
#7
|
|||
|
|||
|
#8
|
||||
|
||||
|
I should've taken more pictures of this portion of the project.
You'll need to remove the entire air intake screen that rests directly below the base of the wiper arm. First you remove the grey rubber trim pieces at the base of the windshield. These are pressed on with a friction fit. (I got to the wiper assembly without removing them, but had to pull them off in order to re-assemble all the other trim pieces.) The screws for the two drip rails on either side of the intake screen reside below the grey trim pieces. Remove the two little hidden screws holding the intake screen to the body (see pic). Then remove the screws holding the crescent ring that retains the rubber bellows below the base of the wiper arm. There are a few other trim pieces that're part of the sound proof insulation, but the rest should be fairly obvious. Remove the intake screen, which reveals the wiper assembly and linkage below it. Here's a picture of the air intake with everything removed (except the windshield trim pieces [I.]) There are two nearly hidden screws that hold the intake screen to the body [II.]. 
|
 |
| Bookmarks |
|
|