

|
|
|
|
|
|
#1
 05-15-2004, 02:10 AM
|
|||
|
|||
|
Spark Plug Replacement - ML320
Hi,
I thought I'd post a rundown of the steps I needed to replace the sparkplugs on a 1999 ML 320. Difficulty: moderate (only because of the sheer amazing amount of force needed to remove the spark plugs - which gave me fits of self doubt: "WAIT, I didn't miss some advisory about them using left-handed threads on this car...". You almost have to put aside your [perceived] knowledge about fastening torque and aluminum heads) Also, I removed the left tire and fender liner to get better access - others have reported not needing to do so. Tools: * floor jack * jack stand * tire iron * T-30 Torx bit * 10 mm socket * 5/8 deep-well sparkplug socket * ratchet (swivel-head preferable) and extension * torque wrench * phillips screwdriver * 17mm wrench (I did NOT use the Hazet wrench others have referred to, just a standard open wrench) * masking tape Steps: -------- 1) jack left front tire up and place jack stand under car (being sure rear wheels are chocked, transmission in park, etc.), and remove left front tire 2) unscrew 6 nuts holding the left fender liner. If you have fender moldings installed, remove the 4 screws holding the molding, and remove the attached clips. Now remove the fender liner - no need to remove the fender molding (if applicable) 3) unscrew 3 10mm nuts holding the heat shield above the manifold in place, and remove the heat shield 4) remove plastic engine cover from top of engine 5) remove engine air filter box by unclipping air intake tube (to manifold), and box cover, then removing air filter, and finally the bottom part of the box. The bottom of the box is NOT held in by screws, so you need to give it a firm tug 6) now pry off the spark plug boots with the 17mm wrench, using the manifolds on the left and right as a fulcrum - others have reported using a piece of wood to get additional leverage. Be careful not to damage the boots, in particular note that the metal part of the boot has a ridge running along it. Note that the 2 wires for each respective cylinder are labelled A and B. Although both the coils and the head have clear labelling, I prefered an additional visual hint and wrapped the bottom of each "A" boot with a piece of masking tape. For the passenger side, I was able pry the boots off from the top, whereas for the driver's side, I accessed the boots from the left wheel well. 7) Unbolt the 6 T-30 Torx screws holding the 6 coil packs (3 left, 3 right) in place and move the coil packs and attached plug wires out of the way - this facilitates access to the plugs 8) Unbolt each spark plug using the deep-well socket and ratchet - NOTE: the factory-installed plugs are AMAZINGLY tight - I'd like to hear from others (DIYs and Pros) whether this is common. I changed the plugs with the engine cold - perhaps that's part of the problem? 9) NOTE: I do not intend to start a flame war - on the installation I do some things that may or may not be commonly accepted. I am always happy to hear differing opinions, but FWIW, this is how I do it. Check plug gap and gap new spark plugs to 1.0mm (if you are using the Bosch plugs sold on FastLane, they come pre-gapped at 1.0 mm) Lube threads of new spark plugs with antiseize compound, and lube ceramic body of new spark plug with dielectric grease Screw each plug in finger-tight, then tighten with torque wrench to 25Nm 10) reattach coil packs, and put a dab of dielectric grease inside each spark plug boot 11) reconnect boot to respective plug (remembering "A" vs. "B"), making sure the boot "snaps" on - don't forget to remove the masking tape from the boots if you used that to keep track of "A" vs. "B" 12) reinstall air filer box and reconnect intake hose 13) reattach heat shield 14) reattach fender liner (and fender molding if applicable) 15) snap plastic engine cover in place 16) reattach left front wheel, being sure to torque lug bolts to proper specs Done. I think it is in keeping with the spirit of this forum, if I add the disclaimer that although the above worked for me, I make no representations whatsoever that this is the complete, correct, factory-approved procedure and will not cause damage to your vehicle and / or bodily injury to yourself. Always take all necessary safetly precautions before performing any work on your car. Hope this helps.
__________________
1997 E420 
|
|
#2
05-15-2004, 10:23 PM
|
|||
|
|||
|
you can also do it from the top...
Great post...
Also consider that you can do it from the top with no need to jack the car up and take the fender liner out. Takes about 1.5 hours with chitchat and drinks. If you have a long and short extensions and a swible attachement you can get it done without the extra work. My 0.02
__________________
'02 C240 '00 LR Discovery '72 280SE '67 280SL ---past--- '79 280E sold (RIP) '86 300E sold '87 300SDL sold '90 Laforza sold '95 320SE sold '98 ML 320 (sold)
|
|
#3
05-17-2004, 02:03 PM
|
||||
|
||||
|
I think between the two....I will use the swivel socket
I bought the bosch platinum plugs, just waiting to hit 100,000 miles.
I own several sized extentions for my 3/8" racket. And a swivel socket.
__________________
Steve Danville what i did myself. CPS rear shocks MAS x 3. SparkPlugs (twice) Fuel pump & Filter Window switch replaced both failed horns with Honda horns. Cleaned ERG Tube Oil changes Oil consumption Fix Brake Pads A/C Recharge Anti-Freeze change X 2. Front Shocks. Monroe. $90 Mercedes Warrenty Work: Harmonic balancer,power steering clamp. Cat converters.Drive Shaft Bearing.s Replaced Outer Lower Tie Rods and front lower ball joints at 156,000 miles
|
|
#4
05-17-2004, 06:51 PM
|
||||
|
||||
|
Quote:
Now I may be mistaken but I don't think the stock plugs are called bosch platinum although they may have a platinum tip. Just make sure they have the same bosch part number as the ones sold by the dealer.
|
|
#5
05-17-2004, 07:28 PM
|
||||
|
||||
|
Overwhelming Information again
I thought I would surf a little about spark plugs. Just like motor oil. I read so much conflicting information..it made my head spin.
Most say platium is a waste of money. Shoot, I sprung for iriduim my last set. Good for 200,000 miles they claimed. Bosch offers 3 that work on their Bosch USA Page. O.E. # F8Dpp332 Platinum2 Part # 4301 Platinum+4 Part #4418 I think I bought the 2's. THAT IS A +4 pictured Below.
__________________
Steve Danville what i did myself. CPS rear shocks MAS x 3. SparkPlugs (twice) Fuel pump & Filter Window switch replaced both failed horns with Honda horns. Cleaned ERG Tube Oil changes Oil consumption Fix Brake Pads A/C Recharge Anti-Freeze change X 2. Front Shocks. Monroe. $90 Mercedes Warrenty Work: Harmonic balancer,power steering clamp. Cat converters.Drive Shaft Bearing.s Replaced Outer Lower Tie Rods and front lower ball joints at 156,000 miles Last edited by sdanville; 05-17-2004 at 07:56 PM.
|
|
#6
05-17-2004, 07:45 PM
|
||||
|
||||
|
Steve,
Do the plugs you got look like the one in the photo below?  If they do all I can say is I put those in my 1987 420 SEL and the car after a short time seemed down on power. I pulled the plugs to check their condition. Well one of the plugs had one of the four electrodes broken or burned off. It was jambed between the insulator and the inside wall of the plulg. Take about luck. If that metal had hit the top of the piston I think that would have the potential for being very bad and very expensive. Moral of the story. I always use the plug with the part number on it that is recommened by the manufacturer.
|
|
#7
09-01-2004, 09:24 AM
|
||||
|
||||
|
bosch spark plugs ML320
yes my Bosch --they look like those.
There are many numbers on plugs. My Manual reads F 8DPP332 Spark Plug searches show #4418 for Platium 4 #4301 for Platium 2 NAPA SHOWS 17 choices of Spark Plugs for the ML320. update- finally installed them. I took my time - it took me 2 hours. I didnt do anything with a floor jack, removing fender liner, heat shield. just took of the air cleaner top and coils to gain prying room. Platinum II's. DEC 7th 2006 Update. with only a few thousand miles on my truck it started missing. Codes said multi missfires. replaces the MAS still ran bad. The Auto zone guy said codes usually mean spark plugs..since it was for diagnostics. ..i put in copper champion. it ran better. idled bad yet. Took to dealer. he said i had a vacuum line problem...rerouted a vacuum line for $80 and cleared the codes. so far so good.
__________________
Steve Danville what i did myself. CPS rear shocks MAS x 3. SparkPlugs (twice) Fuel pump & Filter Window switch replaced both failed horns with Honda horns. Cleaned ERG Tube Oil changes Oil consumption Fix Brake Pads A/C Recharge Anti-Freeze change X 2. Front Shocks. Monroe. $90 Mercedes Warrenty Work: Harmonic balancer,power steering clamp. Cat converters.Drive Shaft Bearing.s Replaced Outer Lower Tie Rods and front lower ball joints at 156,000 miles Last edited by sdanville; 12-08-2006 at 04:39 PM. Reason: more input.
|
|
#8
09-01-2004, 02:34 PM
|
||||
|
||||
|
Steve,
Do try and get some additional input about using those plugs from someone more knowledgeable than me. Like an experience professional mercedes technician. I was told they were not appropriate for my 420 SEL and that they were not of very high quality. I did have the problem I described above and I would not want anyone else to have that problem.
|
|
#9
02-19-2007, 08:33 PM
|
||||
|
||||
|
plugs plugs plugs
Well Ron,,
Tonight I installed the Stock Bosch Plugs. Ive had a rough idle and never felt the best about the Bosch platinum 2's. So I only ran them 5,000 miles. I think my mass air flow problems may have made them foul early. At least they were only $4 per cyl each so I only blew $24 plus tax. 2/21/07 update. New stock $100+ plugs still did not take miss out of idle. 2-1-8 UPDATE : I replaced 3 of the ignition wires where my records show I picked up some misfires based on my code reader. I am down to a rare occational mis fire. I sat in my brother in laws 2007 Suburban and it idled worse than my 1999 with 130,000 miles. I decided my rough idle is so small I can ignore it.
__________________
Steve Danville what i did myself. CPS rear shocks MAS x 3. SparkPlugs (twice) Fuel pump & Filter Window switch replaced both failed horns with Honda horns. Cleaned ERG Tube Oil changes Oil consumption Fix Brake Pads A/C Recharge Anti-Freeze change X 2. Front Shocks. Monroe. $90 Mercedes Warrenty Work: Harmonic balancer,power steering clamp. Cat converters.Drive Shaft Bearing.s Replaced Outer Lower Tie Rods and front lower ball joints at 156,000 miles Last edited by sdanville; 02-01-2008 at 01:45 PM. Reason: adding update
|
|
#10
02-22-2007, 11:04 AM
|
|||
|
|||
|
ML320 plug change./WARNING
I think it is in keeping with the spirit of this forum, if I add the disclaimer that although the above worked for me, I make no representations whatsoever that this is the complete, correct, factory-approved procedure and will not cause damage to your vehicle and / or bodily injury to yourself. Always take all necessary safetly precautions before performing any work on your car.
Hope this helps. Thanks for the great write up. Prying the plug wires off worked well using just a regular 17mm combo wrench, as you describe. My plugs were not that tight. I removed the driver's side coil pack for better freedom to wrench. A WARNING, totally off the wall with regard to changing plugs. The surge line from the radiator to the expansion tank is very vulnerable to anyone climbing up on top of the engine to get a better pull on something. I broke the little nipple off the plastic header on the radiator and didn't even know it. It is unsupported and PLASTIC! luckily, i was able to tap some threads and then seal/support it with some JB Weld Jim in PHoenix
|
|
#11
02-23-2007, 07:41 AM
|
||||
|
||||
|
I have changed the plugs on two 99 ML's in the last year or so; did not remove any parts of the fender, etc etc. I did have to use a pipe for leverage on the ratchet wrench to get several of the plugs out. They were very tight at 60K and 70K miles. I use Plats in all my Mercedes and they work beautifully ..... all of them run like deer!! Ben Carter
__________________
Ben Harrison Carter 1999 Mercedes ML320 87K 1992 Mercedes 300CE 89K 1995 Corvette 29K -- Sold Dec 09 1989 Mercedes 420SEL 99K -- (Sold 4/08) 1968 Mercedes 230S (106K) (Sold 9/06)) 1976 Mercedes 450SEL 130K (Just sold - 06) 1961 Mercedes 220Sb (sold years ago) Last edited by blueeagle289; 02-02-2008 at 08:28 AM. Reason: misspelled word
|
|
#12
02-26-2007, 07:40 PM
|
|||
|
|||
|
dont they take 12 plugs..
Quote:
|
|
#13
02-27-2007, 09:36 AM
|
||||
|
||||
|
There are six coil packs; one for each two plugs -- and there are indeed 12 plugs. It is not really a tough job if done properly, except for some tight plugs in a few cases.
__________________
Ben Harrison Carter 1999 Mercedes ML320 87K 1992 Mercedes 300CE 89K 1995 Corvette 29K -- Sold Dec 09 1989 Mercedes 420SEL 99K -- (Sold 4/08) 1968 Mercedes 230S (106K) (Sold 9/06)) 1976 Mercedes 450SEL 130K (Just sold - 06) 1961 Mercedes 220Sb (sold years ago)
|
|
#14
01-31-2008, 10:43 PM
|
||||
|
||||
|
99 ML 320 wih 207K miles
I changed plugs over the weekend. Took about 30 minutes of prep (check gap, anti-seize threads, dielectric both ends of each plug wire) and about 90 minutes to do the R&R. Thanks for the excellent write ups in this forum. My experience: 1) I was really surprised how deep the plugs fit into the side of the block. It's like a Hemi. I wasn't expecting to be working mostly by feel. But didn't run into any problems. 2) I read in multiple places a 17 mm wrench is used to pop the wires off the plugs. I checked and a 17 mm wrench may have worked but it did not fit around the metal shaft of the wire. I used an 18 mm. It fit perfectly. 3) I did not remove a wheel or inner fender. I did remove all coil packs as I went and removed the air box to do the passenger side. 4) I wasted about 20 minutes chasing a new plug I dropped into the nether regions of the engine compartment. Got smart and stuffed an old bath towel in the gap between the engine and inner fender. The towel trick saved me twice after that. 5) I bought Beru wires (part number ZEF 1442 and 300.891.442 on the box) and I have a concern for the next plug change in 100K miles. Look at the image. The old plug wire is on top. The new Beru is on bottom. The Beru has much less metal and no lip to grab onto. The only thing you see when they're installed is the rubber part of the connector. Not sure how I'll get those baby's off in four years. Hopefully the dielectric will enable me (or future owner) to pop them off by hand. I may proactively pop them off and re-seat them every six months or so (if I can remember to). 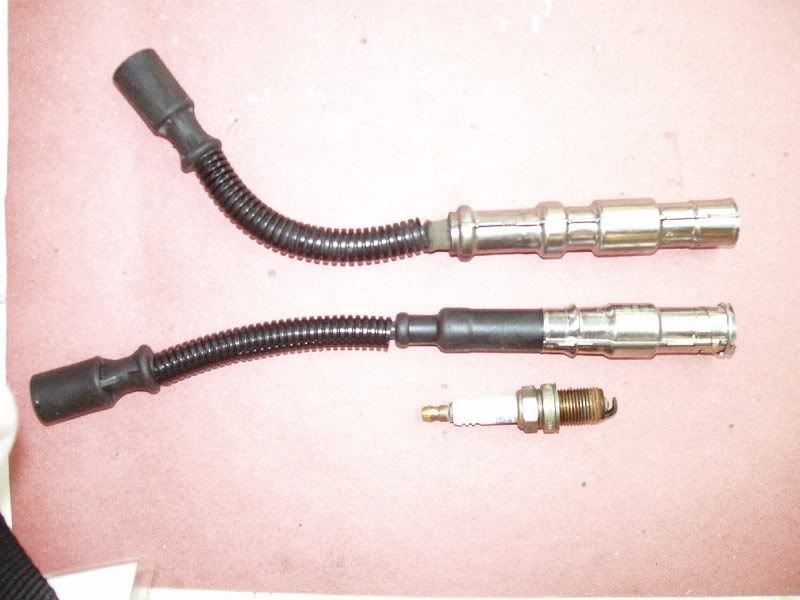 Notice also my old plug with right at 100K miles on it. The center electrode is worn to a nub. The gap probably opened from 1.00 mm to 2.00 mm. Amazingly, the truck ran smoothly with the old plugs. Wife needs to give me some gas numbers from before and after so I can see if it made a difference in mileage. But this is still hard evidence you should change them AT LEAST every 100K miles.
__________________
 Behind every great man is a great woman. Behind every great woman is a great behind. Last edited by sunedog; 02-02-2008 at 05:45 PM.
|
|
#15
02-01-2008, 01:37 PM
|
|||
|
|||
|
Don't bother with torque figure if you use antiseize on threads because it won't be accurate.
__________________
Kent Christensen Albuquerque '07 GL320CDI, '10 CL550. '01 Porsche Boxster Two BMW motorcycles
|
 |
| Bookmarks |
|
|


 Linear Mode


