

|
|
|
|
|
|
#556
 06-23-2014, 12:02 PM
|
||||
|
||||
|
Little bit of work on the intake manifold
These part numbers might not be useful to people but then again you never know. These are for the joint between the lower section the throttle valve body and the upper section of the intake manifold on a M102
1021413880  1021413980  1021413780  As anyone of my age from England will know - all the women say "when my man puts on blue hylomar I don't have to sing the blues"...  I swear this car's going to be dripping with this stuff - I'd better watch out this car is going to be like black rolling fly paper
__________________
1992 W201 190E 1.8 171,000 km - Daily driver 1981 W123 300D ~ 100,000 miles / 160,000 km - project car stripped to the bone 1965 Land Rover Series 2a Station Wagon CIS recovery therapy! 1961 Volvo PV544 Bare metal rat rod-ish thing I'm here to chat about cars and to help others - I'm not here "to always be right" like an internet warrior  Don't leave that there - I'll take it to bits! 
|
|
#557
06-23-2014, 03:48 PM
|
||||
|
||||
|
Stripping out the front end has started!
I've decided to tack some rust spots I've seen.
Headlights have been removed for access   It has taken the best part of a year but I feel that I'm finally getting to grips with ownership of this car.  Now that looks a lot better - doesn't it? 
__________________
1992 W201 190E 1.8 171,000 km - Daily driver 1981 W123 300D ~ 100,000 miles / 160,000 km - project car stripped to the bone 1965 Land Rover Series 2a Station Wagon CIS recovery therapy! 1961 Volvo PV544 Bare metal rat rod-ish thing I'm here to chat about cars and to help others - I'm not here "to always be right" like an internet warrior Don't leave that there - I'll take it to bits!
|
|
#558
06-23-2014, 04:37 PM
|
|||
|
|||
|
Looks great.
Can't wait to see you get this bad boy back on the road.
__________________
Paul S. 2001 E430, Bourdeaux Red, Oyster interior. 79,200 miles. 1973 280SE 4.5, 170,000 miles. 568 Signal Red, Black MB Tex. "The Red Baron".
|
|
#559
06-24-2014, 02:09 PM
|
||||
|
||||
|
Quote:
 I had to remove the head again (I hadn't torqued it down 'cos I thought this might happen) to check the valve springs. I could not find any information via my trusty book worm sources or even via the friendly chief mechanic and his WIS access. The colour code on the springs that came with the Carlsson head are blue red and white.  Eventually I figured out that the ones that came with the Carlsson head are not compatible with hydraulic lifters. So they had to come out. You can just see the difference in the picture if you look closely...
__________________
1992 W201 190E 1.8 171,000 km - Daily driver 1981 W123 300D ~ 100,000 miles / 160,000 km - project car stripped to the bone 1965 Land Rover Series 2a Station Wagon CIS recovery therapy! 1961 Volvo PV544 Bare metal rat rod-ish thing I'm here to chat about cars and to help others - I'm not here "to always be right" like an internet warrior Don't leave that there - I'll take it to bits! Last edited by Stretch; 06-24-2014 at 02:38 PM. Reason: Added a picture for the next post
|
|
#560
06-24-2014, 02:31 PM
|
||||
|
||||
|
After replacing the valve springs...
...and fitting the head and this time torquing the bolts as per FSM...
...I moved on to checking out the camshaft. EDIT => I forgot to say it is worth while fitting the small Allen head screws in position in the head before starting the main bolt torque down. If you were to drop one down the hole at the front you'd probably regret the fitting of the other bolts first 'cos you'd then loose a head gasket if you had to take the head off again. 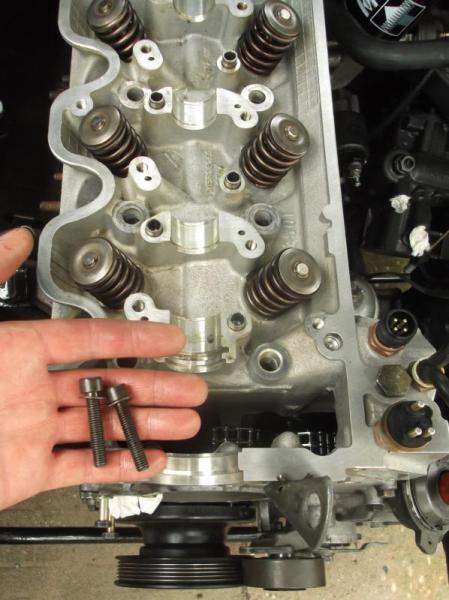 {Oh yeah and there are three of them not just two!} Camshaft binding is a big deal in the FSM. Performing a trial fit with the camshaft previously I managed to find a combination of camshaft / rocker arm saddles that did indeed cause binding. So careful measurement is what I tried with this stuff  It didn't quite work as I had hoped - almost but not quite I'm missing the all important silicone release gunk - so I tried KY jelly (roll eyes) Grease went on the head and the saddles and the KY went onto the camshaft bearing parts. The saddles have a split in the middle part of the their bearing surfaces to allow for lubrication so you can't put plasti-gauge there. You also need to remember not to put the oil holes in the cam on top of the plasti-gauge. Fit the saddles - do not turn the camshaft at all! Torque the saddles to the LOWER value of 15Nm. This information is hidden in the FSM => if the rocker arms are not fitted you can damage the saddles if you tighten to their normal fitting torque. You have been warned. As you can see the plasti-gauge doesn't like KJ jelly - there was just enough of a mark left on each journal to check the clearance. All is OK but towards the tight side of the limit of 0.05mm as I expected. Don't forget with plasti-gauge the bigger the splat the tighter the clearance
__________________
1992 W201 190E 1.8 171,000 km - Daily driver 1981 W123 300D ~ 100,000 miles / 160,000 km - project car stripped to the bone 1965 Land Rover Series 2a Station Wagon CIS recovery therapy! 1961 Volvo PV544 Bare metal rat rod-ish thing I'm here to chat about cars and to help others - I'm not here "to always be right" like an internet warrior Don't leave that there - I'll take it to bits!
|
|
#561
06-24-2014, 02:51 PM
|
||||
|
||||
|
After checking the camshaft clearance
I bolted the camshaft in place to do a final check for binding - I could turn the shaft with my fingers pushing on the lobes with the lower 15Nm torque 'cos the rocker arms aren't fitted yet.
Moved on to fitting the camshaft cog and the chain. I started off fitting the chain guide to the head  This was a mistake - well not a big one but no sooner than I had smeared those bloody pins in copper ease  (OTT copper ease for photographic effect! I wiped most of it off - honest gov') And figured out which way round the guide goes  And got the guide fitted I found I couldn't get the camshaft cog to ping onto the end of the camshaft. So the pins for the guide came out again  The correct order is to leave the guide on the chain almost in the right place but loose - then fit the camshaft cog - then fit the pins for the chain guide.
__________________
1992 W201 190E 1.8 171,000 km - Daily driver 1981 W123 300D ~ 100,000 miles / 160,000 km - project car stripped to the bone 1965 Land Rover Series 2a Station Wagon CIS recovery therapy! 1961 Volvo PV544 Bare metal rat rod-ish thing I'm here to chat about cars and to help others - I'm not here "to always be right" like an internet warrior Don't leave that there - I'll take it to bits!
|
|
#562
06-24-2014, 02:57 PM
|
||||
|
||||
|
Considerring what happened before I'll just do the pictures and no words for this bit
    
__________________
1992 W201 190E 1.8 171,000 km - Daily driver 1981 W123 300D ~ 100,000 miles / 160,000 km - project car stripped to the bone 1965 Land Rover Series 2a Station Wagon CIS recovery therapy! 1961 Volvo PV544 Bare metal rat rod-ish thing I'm here to chat about cars and to help others - I'm not here "to always be right" like an internet warrior Don't leave that there - I'll take it to bits!
|
|
#563
06-24-2014, 03:12 PM
|
||||
|
||||
|
Quickly moving on
I now have a camshaft fitted with a chain and a (cough cough) tensioner but no rocker arms
 Looking through the FSM it gives the impression that the rocker arms can be fitted to a saddle in-situ. This isn't the case. The pins for the rocker arms are too long  To fit the rocker arms I figured I could just do one saddle at a time. All I did of course was to turn the camshaft lobes downwards before fitting the saddles with the rocker arms fitted. I've decided not to fill the hydraulic lifters before fitting so I can check to make sure they all fill properly before I start the engine (I'll crank and crank a bit to check this) When fitting the saddle with the rocker arms make sure you don't drop those little shim things down an oil way! Make sure they stay between the rocker arm ball and the top of the valve stem Torque the saddle in place at the full 20Nm  Not much is it?
__________________
1992 W201 190E 1.8 171,000 km - Daily driver 1981 W123 300D ~ 100,000 miles / 160,000 km - project car stripped to the bone 1965 Land Rover Series 2a Station Wagon CIS recovery therapy! 1961 Volvo PV544 Bare metal rat rod-ish thing I'm here to chat about cars and to help others - I'm not here "to always be right" like an internet warrior Don't leave that there - I'll take it to bits!
|
|
#564
06-24-2014, 09:05 PM
|
||||
|
||||
|
Pretty!
__________________
http://i284.photobucket.com/albums/l...aman/Fleet.jpg Peach Parts W124.128 User Group. 80 280SL 85 300SD 87 300TD 92 300D 2.5 Turbo 92 300TE 4Matic
|
|
#565
06-25-2014, 01:10 PM
|
||||
|
||||
|
Quote:
It was pretty irritating at first today though. I got the new chassis plate for the front anti-roll bar from the dealer...  ...only to find the original is spot welded in place with 8 4mm diameter heavy duty spot welds. So that plate is spot welded to the chassis half and then the chassis rail is spot welded together during manufacture.  Tricky bit to repair - not impossible but beyond my DIY spot welder's capabilities. I don't fancy plug welding something that needs that kind of strength. So I persisted with the tap... ...having the replacement part helped me see that there is a whole long length of threads in this plate. As only the first one and a half turns were nadgered by yours truly I've more than enough safety in the rest of the threaded connection. The front anti-roll bar is fitted. Pretty good eh?
__________________
1992 W201 190E 1.8 171,000 km - Daily driver 1981 W123 300D ~ 100,000 miles / 160,000 km - project car stripped to the bone 1965 Land Rover Series 2a Station Wagon CIS recovery therapy! 1961 Volvo PV544 Bare metal rat rod-ish thing I'm here to chat about cars and to help others - I'm not here "to always be right" like an internet warrior Don't leave that there - I'll take it to bits! Last edited by Stretch; 06-28-2014 at 03:25 PM. Reason: Forgot picture
|
|
#566
06-28-2014, 03:05 PM
|
||||
|
||||
|
Water pump swapping parts
I bought a new water pump - bought a decent brand - but the buggers who sold it to me sent me a sodding Febi pump and refunded the difference. I hate Febi but I haven't got the energy or time to argue with the seller. I'll fit it and see if I can refurbish the old one which has quite a nasty rusty impeller.
 Even with the rusty impeller I seriously considered fitting that old part in preference to this bit of over priced cheap junk - just look at it. Anyway I thought of the sediment of rust in my clean engine and thought I'd better put the Febi crap on... Unbolt the magnetic clutch from the main casing but before you fit it on the new pump transfer the bolts that can not be removed or fitted with out the clutch in place Here's the underside of the magnetic clutch Here's an awkwardly positioned ring spanner on the nuts Fitting the thermostat The Febi part has a large hole in the casting that needed a step down plug (included) for the thermostat. I expect that'll leak...
__________________
1992 W201 190E 1.8 171,000 km - Daily driver 1981 W123 300D ~ 100,000 miles / 160,000 km - project car stripped to the bone 1965 Land Rover Series 2a Station Wagon CIS recovery therapy! 1961 Volvo PV544 Bare metal rat rod-ish thing I'm here to chat about cars and to help others - I'm not here "to always be right" like an internet warrior Don't leave that there - I'll take it to bits!
|
|
#567
06-28-2014, 03:13 PM
|
||||
|
||||
|
Headlights going back on after a bit of wipe
The rain is a coming...
...quick get those lights back in! 303 on the rubber   Clip the white wheel adjusting screw for the indicator into the slot on the headlight casing  Position of the indicator on the body can be adjusted by loosening / tightening the white wheels  Lower fitting for the headlamp  I've fitted the headlamps as best as I can for now...  ...I've got to finish the bumper first.
__________________
1992 W201 190E 1.8 171,000 km - Daily driver 1981 W123 300D ~ 100,000 miles / 160,000 km - project car stripped to the bone 1965 Land Rover Series 2a Station Wagon CIS recovery therapy! 1961 Volvo PV544 Bare metal rat rod-ish thing I'm here to chat about cars and to help others - I'm not here "to always be right" like an internet warrior Don't leave that there - I'll take it to bits! Last edited by Stretch; 06-28-2014 at 03:26 PM. Reason: Added more pictures
|
|
#568
06-28-2014, 03:56 PM
|
||||
|
||||
|
Poshing up the bumper here =>
http://www.peachparts.com/shopforum/body-repair-restoration/356716-paintin-plastic.html Started with this kind of damage  Ended up with a slight colour mismatch but I think it will do for the time being...   ...I need to get this finished!
__________________
1992 W201 190E 1.8 171,000 km - Daily driver 1981 W123 300D ~ 100,000 miles / 160,000 km - project car stripped to the bone 1965 Land Rover Series 2a Station Wagon CIS recovery therapy! 1961 Volvo PV544 Bare metal rat rod-ish thing I'm here to chat about cars and to help others - I'm not here "to always be right" like an internet warrior Don't leave that there - I'll take it to bits!
|
|
#569
07-12-2014, 01:47 PM
|
||||
|
||||
|
Bumper continued
 The four main parts - on the left is a new cover (van Wezel cost about 30 euros delivered) - inside this bit you can just see a big lump of foam - the touched up bumper + air dam bit I've re-painted - the rigid plastic beam (that holds the mounting brackets).  Mounting brackets - use loctite to stop the bolts from coming undone  Note how the two threaded "bolts" on the bracket are closer to the top of the plastic beam - note also you need the holes in the plastic beam to be facing up so you can fit the cladding around the radiator.  Rigid plastic beam being fitted to the main bumper moulding  I used real steel bolts and nuts where previously there had been plastic bayonet fixings. This might not be a clever move - it probably messes with the crash specifications of the bumper => ho hum... ...the heads of the bolts don't dig into the foam buffer part. 
__________________
1992 W201 190E 1.8 171,000 km - Daily driver 1981 W123 300D ~ 100,000 miles / 160,000 km - project car stripped to the bone 1965 Land Rover Series 2a Station Wagon CIS recovery therapy! 1961 Volvo PV544 Bare metal rat rod-ish thing I'm here to chat about cars and to help others - I'm not here "to always be right" like an internet warrior Don't leave that there - I'll take it to bits!
|
|
#570
07-12-2014, 01:53 PM
|
||||
|
||||
|
Mono wiper fun
I killed the original mono wiper - well to be fair the half moon cog was buggered on removal so it could have been dead before I got there...
...even so I needed to get a replacement. This time i got a Bosch one - much better made than the original (I forget the make) I still needed to check the grease. Removed the big nut on the mechanism that runs from the motor  Get a small two legged puller to remove the mechanism from the shaft  Then there's a clip to come off  Tap through 
__________________
1992 W201 190E 1.8 171,000 km - Daily driver 1981 W123 300D ~ 100,000 miles / 160,000 km - project car stripped to the bone 1965 Land Rover Series 2a Station Wagon CIS recovery therapy! 1961 Volvo PV544 Bare metal rat rod-ish thing I'm here to chat about cars and to help others - I'm not here "to always be right" like an internet warrior Don't leave that there - I'll take it to bits!
|
 |
| Bookmarks |
|
|


 Linear Mode


